Drag racing the GMT360 with the LL8

Mooseman

Moderator
Dec 4, 2011
25,331
Ottawa, ON
If there's no cooling system there's no fan clutch. No fan clutch, no 5V reference signal. This could be the source of the 5V reference issue.
Well no. Many times we advise to disconnect the fan clutch to diagnose issues with the throttle system. The problem lies in the fan clutch or the wiring leading to it. A missing fan clutch will not cause this. I have driven lots without an EV clutch, using a thermal instead, and didn't cause any issues (with the relevant fan codes tuned out).
 

rchalmers3

Original poster
Member
Jul 11, 2020
207
Irmo, SC
If there's no cooling system there's no fan clutch. No fan clutch, no 5V reference signal. This could be the source of the 5V reference issue.
Thanks for your interest and suggestion. I tested and confirmed the hi and lo reference signals were present before posting. For some reason I ended up with an APP pedal harness connector that was pinned differently. That's what I get by building a car in the manner of country singer Johnny Cash did back when he worked for Cadillac.

Rick
 

FloMaxSS

Member
May 24, 2021
18
Maryland
Hey Rick, Congrats on getting it moving! The Braille battery relocation looks great.. got to love that short zero-voltage-drop cable run!
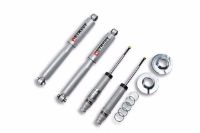
Suspension: I see you already have djm dropped UCA's, check! You'll still need the bell-tech front drop spring mount/shock kit or the kw coilovers. Tie-rod alignment and lower control arm alignment will inevitably be off after lowering. Wait until you finish installing rest of front suspension pieces and no longer need to unbolt front crossmember, then get alignment done at shop that knows how to do lowered alignments.
For the rear, you just need belltech 31.5" springs and their shocks or kw adj shocks. I recommend installing adj. "helper" air bags inside the springs, allowing you to stiffen pass side rear suspension to perfect your launch. You don't need sway bars front or rear for pure drag so you can ditch all that if not already done so.
A more "radical" idea for rear-mount rad would be to remove hatch and mount rad vertically in rear cargo area. With all 4 windows down this would provide decent airflow and allow the most efficient vertical orientation. Are you even keeping 4 operable windows? lol
Also curious to see how you are mounting front bumper cover back on.. a bumper-gap-delete kit solves the top bumper cover mounting, but all the lower mount points stem from having un-shortened front frame rails and having intact steel front bumper.
 
  • Like
Reactions: rchalmers3

rchalmers3

Original poster
Member
Jul 11, 2020
207
Irmo, SC
Suspension: I see you already have djm dropped UCA's, check! You'll still need the bell-tech front drop spring mount/shock kit or the kw coilovers. Tie-rod alignment and lower control arm alignment will inevitably be off after lowering. Wait until you finish installing rest of front suspension pieces and no longer need to unbolt front crossmember, then get alignment done at shop that knows how to do lowered alignments.
For the rear, you just need belltech 31.5" springs and their shocks or kw adj shocks. I recommend installing adj. "helper" air bags inside the springs, allowing you to stiffen pass side rear suspension to perfect your launch. You don't need sway bars front or rear for pure drag so you can ditch all that if not already done so.
A more "radical" idea for rear-mount rad would be to remove hatch and mount rad vertically in rear cargo area. With all 4 windows down this would provide decent airflow and allow the most efficient vertical orientation. Are you even keeping 4 operable windows? lol
Also curious to see how you are mounting front bumper cover back on.. a bumper-gap-delete kit solves the top bumper cover mounting, but all the lower mount points stem from having un-shortened front frame rails and having intact steel front bumper.
Hiya FloMaxSS,
Unfortunately I won't be able to utilize any of the pre-made, kitted suspension components that are offered for the GMT360. I have carved way too much weight out of the car to use an off-the-shelf lowering spring. I spoke with an engineer at Eibach, and he agreed to assist me with spec'ing a set of springs once I get it weighed. If I'm lucky, he may find springs in their catalog that will work, saving me the trouble and cost of ordering a custom set.

I eliminated the front sway bar early on, and retained the rear sway bar, as I have no idea on just how much induced torque roll I'll be encountering, so I'll leave it there until proven otherwise. I'm not sure an air bag is a better option. What are you running?

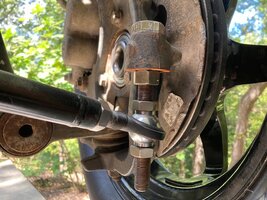
Reducing bump steer effect is proving difficult. I have collected the components for fabricating heim joint tie rods, but I am not able to locate an adapter stud with the correct taper dimensions at the spindle. If you have any recommendations or resources for this detail, please do share!

For this weeks update, I have created a fixture for the fuel tank and routed the power supply for the pump. I need to weld in a bung into the tank for draining, then I can fit the tank, replace the fuel rail and injectors with the two hose model, then build out the hose assemblies.

I am assembling a water to air inter-cooler system that I wish to fit. My intention is to have this system in place and proven before I fit a built motor. At the moment I have the water side (tank, submersible pump and plumbing) all ready. I need to purchase a suitable inter-cooler, mount it and then route the inlet and outlets.

@MRRSM I remember you mentioning the idea of fitting some skinny front wheels. I bought and fitted new front brake rotors, wheel adapters (6x5 to 5x4.75) and a set of 2006 GTO spare wheels. The wheels are spiffy looking, if I do say. I'll use the improvement in looks to spur me onward.

A radiator purchase is on hold while my credit card cools down. However I am able to prepare some of the hose routing details that will allow for the radiator relocation. More on that later.

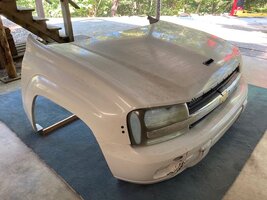
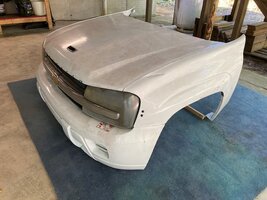
Yeah, the front clip.... I need to look at some tilt front end assemblies to get my head around the tilt action, pieces and fitment. Then I need to devise a frame that holds the grill, backing, lamps, bumper and so on to the fenders and hood. I'm looking forward to having that project be my focus!
 
  • Like
Reactions: mrrsm

FloMaxSS

Member
May 24, 2021
18
Maryland
Hey Rick, Hope you have fared this summer well! Hope Eibach has some de-rated springs that fit! I recommend getting helper bags installed inside the springs... allows you pump up pass side more, allowing better weight transfer and traction off the line. I have had no issues with bump-steer and I'm lighter than almost all the modified v8 TB's out there. I just used upper control arms made for lowering, KW v3 front coilovers and rear shocks, 31.5" lowering springs out back.. Wish I had more to contribute for potential bump-steer causes. How is the project going??
 
  • Like
Reactions: rchalmers3

rchalmers3

Original poster
Member
Jul 11, 2020
207
Irmo, SC
Hey Rick, Hope you have fared this summer well! Hope Eibach has some de-rated springs that fit! I recommend getting helper bags installed inside the springs... allows you pump up pass side more, allowing better weight transfer and traction off the line. I have had no issues with bump-steer and I'm lighter than almost all the modified v8 TB's out there. I just used upper control arms made for lowering, KW v3 front coilovers and rear shocks, 31.5" lowering springs out back.. Wish I had more to contribute for potential bump-steer causes. How is the project going??
Hey! @FloMaxSS Thanks for your continued interest in my project. You were gone awhile!

I spent most the summer working on other people's projects, but I'm getting back to the car.
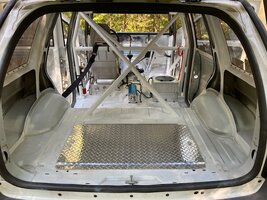
It's a running, driving vehicle. I drove it around the block a few times, enjoying the open exhaust sound. I then gutted the interior for finishing the roll cage. That task is complete, so this weekend I will re-install all the interior pieces and post up some glam shots of the current status. Meanwhile, I have eplies, and a few questions for you:

Re: helper bags.... I thought it would be simpler to build one adjustable sway bar link to use the sway bar to load the passenger side rear corner. Would you agree or dis-agree with this method over a helper air bag?

Re: Bump steer... I had a machinist fashion some 3/4" shouldered bolts to pass through the spindles, and replaced the ball joints with heim joints. The total cost was equivalent to an off-the-shelf kit and while I have not yet had it aligned, I am confident the tie rod angles can now be optimized to the lowered front suspension.

Re: KW coil overs... Wow! Thanks for the opportunity to source adjustable front coil overs! I went to their website, but was unable to locate ANY products for the Trailblazer. If you don't mind, please share here the part numbers or custom build specs on the units you are running. This intel would be greatly appreciated, as I have not been able to uncover any resources on my own.

The current remaining project tasks are to get the car weighed, fit the suspension pieces, have it dyno tuned for E85 and install the front clip. The list is getting shorter, and I feel the goal of taking it to the track is becoming realistic.

Cheers,
Rick
 

rchalmers3

Original poster
Member
Jul 11, 2020
207
Irmo, SC
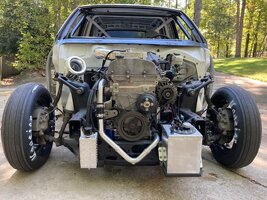
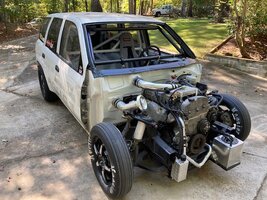
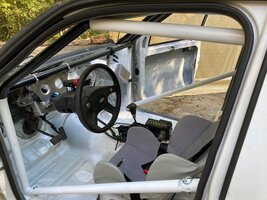
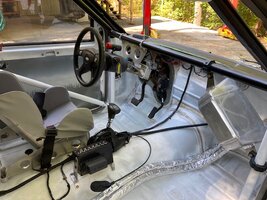
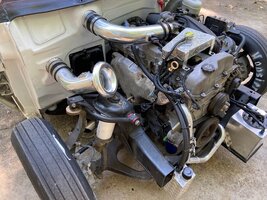
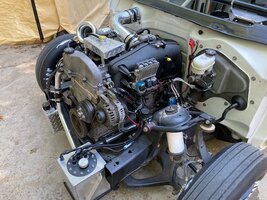
More...IMG_0726.jpgIMG_0725.jpgIMG_0731.jpgIMG_0737.jpgIMG_0730.jpg
Apologies to those of you who know how to build a car properly. I am aware of many details I could do better. I'll listen to your observations and ideas about things I may not know of or may not have considered. This has been an educational and fulfilling project.
The remaining details include fitting the front clip, installing a windshield, fitting customized suspension and final tuning.
 
Last edited:

Mooseman

Moderator
Dec 4, 2011
25,331
Ottawa, ON
What will be interesting is the final weigh-in without all the extras.

You may have already talked about it but what is the purpose of the duct going in and out of the firewall? An intercooler?
 
  • Like
Reactions: rchalmers3

Blckshdw

Moderator
Nov 20, 2011
10,681
Tampa Bay Area, FL
You may have already talked about it but what is the purpose of the duct going in and out of the firewall? An intercooler?
That's what I thought the box and tubing in the passenger seat area was for, an ice box :undecided:

Very cool to see how this is progressing. :yes:
 
  • Like
Reactions: rchalmers3

rchalmers3

Original poster
Member
Jul 11, 2020
207
Irmo, SC
What will be interesting is the final weigh-in without all the extras.
I have no idea of what the thing will end up weighing. I hope to be pleased and surprised, but because these trucks are so heavily constructed, I am attempting to curb my optimism.

Why don't we start a guessing pool? Wikipedia says these trucks have a curb weight of 4400 lbs.

I'll start by guessing I have removed 1000 lbs, so 3400 lbs is my guess. What's your estimate?

Rick
 

rchalmers3

Original poster
Member
Jul 11, 2020
207
Irmo, SC
That's what I thought the box and tubing in the passenger seat area was for, an ice box :undecided:

Very cool to see how this is progressing. :yes:
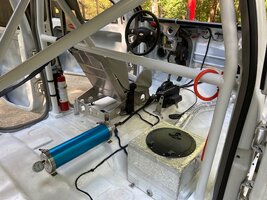
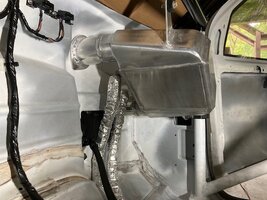
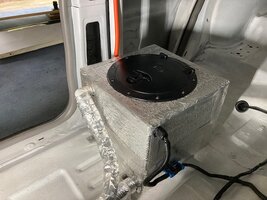
Thanks for the props. Yes to an inter-cooler. Here are a few details: The cooler hangs from the roll bar. I put flanges on the inlet and outlet to seal the pipes against the firewall. An unrelated detail is the dual OBD ports: one for a dash and the other for diagnostics.
IMG_0738.jpg
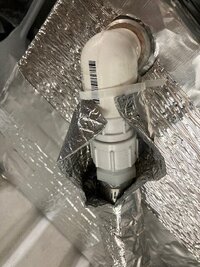
The ice box has an immersion pump inside. The orange hose is a simple vent curled around the roll cage cross bar. The sealed hatch on the ice box may look familiar to those of you who enjoy kayaking. IMG_0739.jpg
I fitted a hose bib connection to the return hose. I'll disconnect the return hose and run the pump to purge the tank.
IMG_0741.jpg
Thanks to all.
Rick
 

FloMaxSS

Member
May 24, 2021
18
Maryland
Hey! @FloMaxSS Thanks for your continued interest in my project. You were gone awhile!

I spent most the summer working on other people's projects, but I'm getting back to the car.
It's a running, driving vehicle. I drove it around the block a few times, enjoying the open exhaust sound. I then gutted the interior for finishing the roll cage. That task is complete, so this weekend I will re-install all the interior pieces and post up some glam shots of the current status. Meanwhile, I have eplies, and a few questions for you:

Re: helper bags.... I thought it would be simpler to build one adjustable sway bar link to use the sway bar to load the passenger side rear corner. Would you agree or dis-agree with this method over a helper air bag?

Re: Bump steer... I had a machinist fashion some 3/4" shouldered bolts to pass through the spindles, and replaced the ball joints with heim joints. The total cost was equivalent to an off-the-shelf kit and while I have not yet had it aligned, I am confident the tie rod angles can now be optimized to the lowered front suspension.

Re: KW coil overs... Wow! Thanks for the opportunity to source adjustable front coil overs! I went to their website, but was unable to locate ANY products for the Trailblazer. If you don't mind, please share here the part numbers or custom build specs on the units you are running. This intel would be greatly appreciated, as I have not been able to uncover any resources on my own.

The current remaining project tasks are to get the car weighed, fit the suspension pieces, have it dyno tuned for E85 and install the front clip. The list is getting shorter, and I feel the goal of taking it to the track is becoming realistic.

Cheers,
Rick
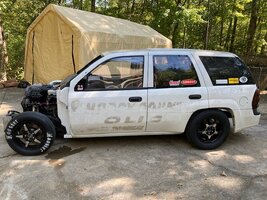
Glad to see all the progress and that you're seeing this through!
The Viking coilovers are phenomenal or so I've heard.
Can't wait to hear how your bump-steer soulution works out.
It's been awhile since I've heard of using adj swaybar tierods to preload. I think most just rely on rear adj shocks, I went a step farther with the bags. I'm not sure why more people haven't experimented with adj tie rods though..
You still had something left in the interior to gut?
 
Last edited:

rchalmers3

Original poster
Member
Jul 11, 2020
207
Irmo, SC
Fellas,
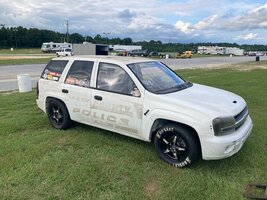
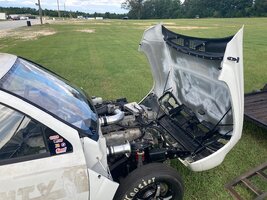
It's been three years in the making. This spring and summer I completed the car, then had it aligned and tuned. Last night I took it to the local 1/8th mile track. I will make this the final chapter of this thread and share with you the results of this project. Here are images of the car at the track yesterday evening. It was over 90 degrees and humid as heck.
IMG_1048.jpg

The completed car weighs 3088lb, W/O driver weight. The weight bias front to rear is 55.5% to 44.5%. The stock, normally aspirated 2006 engine running on E85 race gas produces 262 horsepower at the wheels.
IMG_1049.jpg
The completed tilt front clip is made of 90% factory pieces cut up, stitched together and hinges on a removable hinge/brace.
IMG_1052.jpg
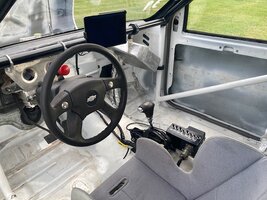
I'm using an Autometer gauge product that uses a Bluetooth connection. It is a dongle that plugs into the ALDL, and sends a signal to the cheap tablet mounted on the roll bar cross brace. Honestly, having gauges is kinda useless. That big red light will inform me if the oil pressure drops below 20PSI. That's all that really matters, isn't it?
IMG_1054.jpg
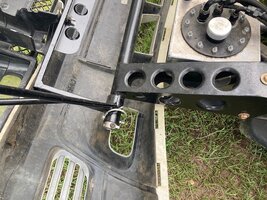
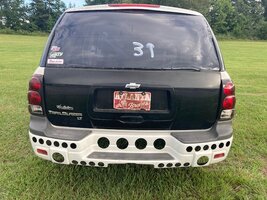
I decorated the car by covering it with stickers and by drilling holes in the rear bumper cover. My excuse for doing this was to prevent the bumper cover from blowing off at mach speeds....IMG_1057.jpg
The performance results were a disappointment. According to one of the online calculators, I should have a sub 14 second car, given the car weight and power produced. The calculator also indicates a 60' time of 2 seconds. The best I could do was 2.3 seconds. The stock street tires and open differential would not allow me to mash the throttle. It would spin up the rear tires anytime I floored it within the first 200 feet. On a prepped track!

Despite the lackluster results, I am pleased. To have finally driven this creation at a track is a personal victory in itself. Of course, I will look for a way to lock the differential and purchase a set of drag radial tires. I remind myself that this was the plan: sort out the car and make it ready for adding power through forced induction.

I recognized at the beginning this forum serves TB owners who want to keep their trucks on the road, while here I am taking this one off the road and onto the track. I acknowledge the divergent purpose my project is to the forum, and I am grateful to all of you who have contributed an interest and/or commentary. This thread has been a welcome form of expression, and I hope I have lent value to others. Thank you.
Rick

@FloMaxSS @limequat @Mooseman @mrrsm @Tankcruiser @azswiss @TJBaker57 @Reprise
@efi-diy
 

Blckshdw

Moderator
Nov 20, 2011
10,681
Tampa Bay Area, FL
That's awesome, glad you were able to get it done, and test it out. Had to be an amazing feeling to get to take it down the track after putting in so much time and effort.
 

Mooseman

Moderator
Dec 4, 2011
25,331
Ottawa, ON
We've had a few over the years that modded them for racing so it's not entirely foreign to us here. That front clip is awesome!

I'm kinda surprised at the HP numbers you got as this engine in stock form produced north of 290 HP. Just needs some more tweaking. The weight savings were amazing going down from the stock 5500 lbs.
 

mrrsm

Lifetime VIP Donor
Supporting Donor
Member
Oct 22, 2015
7,714
Tampa Bay Area
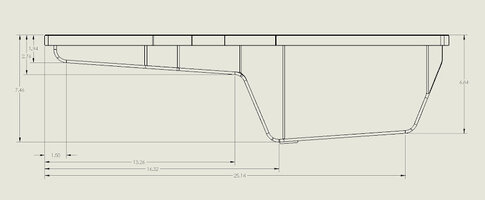
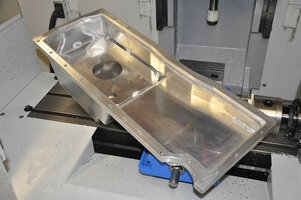
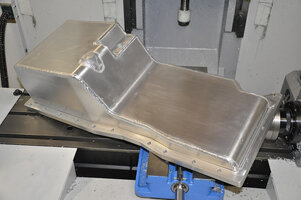
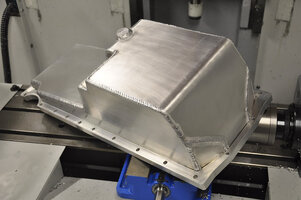
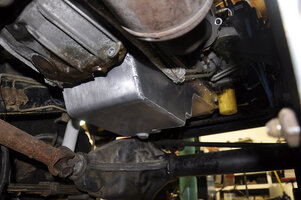
I know that Rick ( @rchalmers3) has pretty much completed this Novel GMT360 Drag Racing Machine... but I would be remiss for not mentioning a decade old Thread from another site that featured a Q&A about GM Atlas Vortec 4200 Engine Swaps into certain Vehicles. By the second page in that Thread... One particular Member there cranked out THESE Very Cool images (AND HIS UNIQUE SPECS) of his Custom Welded Aluminum Crank-Case Oil-Pan for his JEEP that is well worth dropping into THIS Thread ...for the sake of Drag Racing Posterity:


Oil%20Pan%20Dimensions.jpg_DSC6857.JPG

_DSC6858.JPG
_DSC6859.JPG

_DSC6849.JPG
 
Last edited:
  • Like
Reactions: rchalmers3

rchalmers3

Original poster
Member
Jul 11, 2020
207
Irmo, SC
I know that Rick ( @rchalmers3) has pretty much completed this Novel GMT360 Drag Racing Machine... but I would be remiss for not mentioning a decade old Thread from another site that featured a Q&A about GM Atlas Vortec 4200 Engine Swaps into certain Vehicles. By the second page in that Thread... One particular Member there cranked out THESE Very Cool images (AND HIS UNIQUE SPECS) of his Custom Welded Aluminum Crank-Case Oil-Pan for his JEEP that is well worth dropping into THIS Thread ...for the sake of Drag Racing Posterity:
Thanks for the bump.
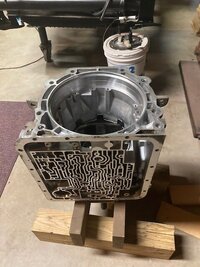
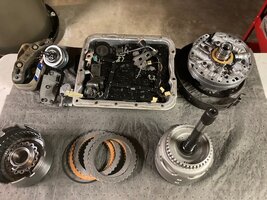
I wish I could agree with you that I have nearly completed this project. It appears to be the opposite: After fitting drag slicks and welding the differential, I tested the car and found the transmission has weak holding power in second gear. I am in the process of building a 2008 year model 4L60E transmission using extensive Sonnax performance parts and a Rossler trans brake. Here is the assembled back half:
IMG_1127.jpg
The front half is waiting for delivery of a heavier spring compressor, as my Chinese spring compressor cannot compress the Rossler springs and billet cap for the reverse piston (seen on bottom left).
IMG_1128.jpg
Eventually I'll get the vehicle sorted and get to building a few engines for receiving forced induction.

Regarding engine modifications and performance, I located a Facebook group focused on the 4200.
As you find everywhere in life, there are a handful of experienced and helpful contributors, .... and a bunch of other people. This resource is the place to visit for anything that is LL8 performance related, which is not all that much, really. But yeah, custom oil pans and intake manifolds are common within the group, and there is now a production cast turbo manifold being offered. If anybody is seeking performance related ideas and parts, this is the current source. I'll just add here that I'm not a fan of social media. A fellas gotta go where the stuff is.

Thanks to all,
Rick
 
Last edited:
  • Like
Reactions: mrrsm and Mooseman

mrrsm

Lifetime VIP Donor
Supporting Donor
Member
Oct 22, 2015
7,714
Tampa Bay Area
Ouch... But... Your work is that One Shining Project of its Kind anywhere in North America that is very likely to "Break New Ground" along the lines of "Breakage". It these Links will help... Drop by and Download these for your Project Library Research:


Last edited:
  • Like
Reactions: rchalmers3

mrrsm

Lifetime VIP Donor
Supporting Donor
Member
Oct 22, 2015
7,714
Tampa Bay Area
Just touching Base again, Rick...

Calvin (NIVLAC57) produced THIS Video on the implications of Dry vs. Wet Oil Pans and Dry Sump Racing Applications...the primary one right in reach of Calvin...might also interest you:


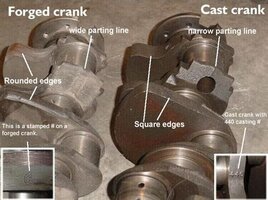
Best way to compare the differences between a Cast Crank (THIN Casting Parting Line from the Sand Mold) and Forged Crank (WIDE Drop Forging Impact Space along the Center Line) and the differences in the SOUNDS when struck with a Brass Hammer... Cast = A Dull THUD vs. Forged = It WILL Ring Like a BELL:


So WTF am I mentioning THIS information for?

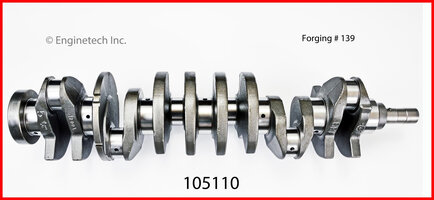
Well... HERE is an Interesting Development... Am I CRAZY...or is THIS a Genuine Forged Crankshaft for the GM Atlas LL8 4.2L (Early Model 7 Notched) Motors. I'm very suspicious because they use the word "Forging" in this Advert Image....but it displays a THIN Sand Casting Mold Line...so WTF?


th-3485352956.jpeg

105110_1__09905.jpg

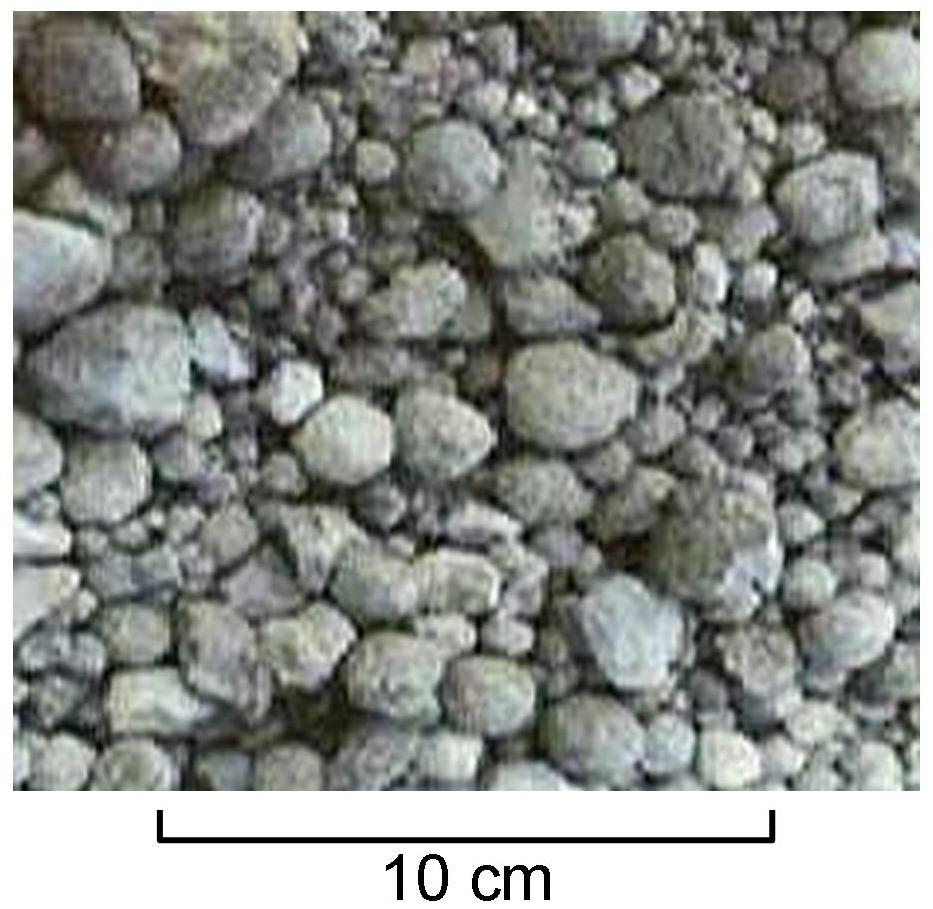
Is this REAL... Or REALLY JUST A "SINTERED POWDERED IRON" HEAD FAKE?


Last edited:

Forum Statistics

Threads
23,319
Posts
637,893
Members
18,519
Latest member
chirobo1

Members Online