NEED HELP Double Din Stereo Install

RTTBLT1

Original poster
Member
Jan 25, 2016
512
Louisburg, KS
Hello, everyone

So I figured while the PCM is in North Carolina and the Battery is disconnected, this would be a good time to install the Pioneer Stereo.

Everything i purchased was based off of Clucthfield website and according to their website everything I purchased will fit/work. Here is what I have for the Install:
Pioneer AVH-X4800BS (Stereo)
Axxess LC-GMRC-01 (Wiring Harness)
Metra 40-GM10 (Antenna Adaptor
Metra 95-2001 (Dash Kit)

Ok so I ran into a issue during install. There are two (2) Wiring Harness that connected to the factory Stereo but the LC-GMRC-01 (Wiring Harness) only accepts/takes one of the two Harness which is the bigger of the two...
1473459476265.jpg
1473459476395.jpg

Is the other Harness for Chimes and RAP?...and is all that built-in to the LC-GMRC-01 Aftermarket Wiring Harness?...or I'm missing something else for install?

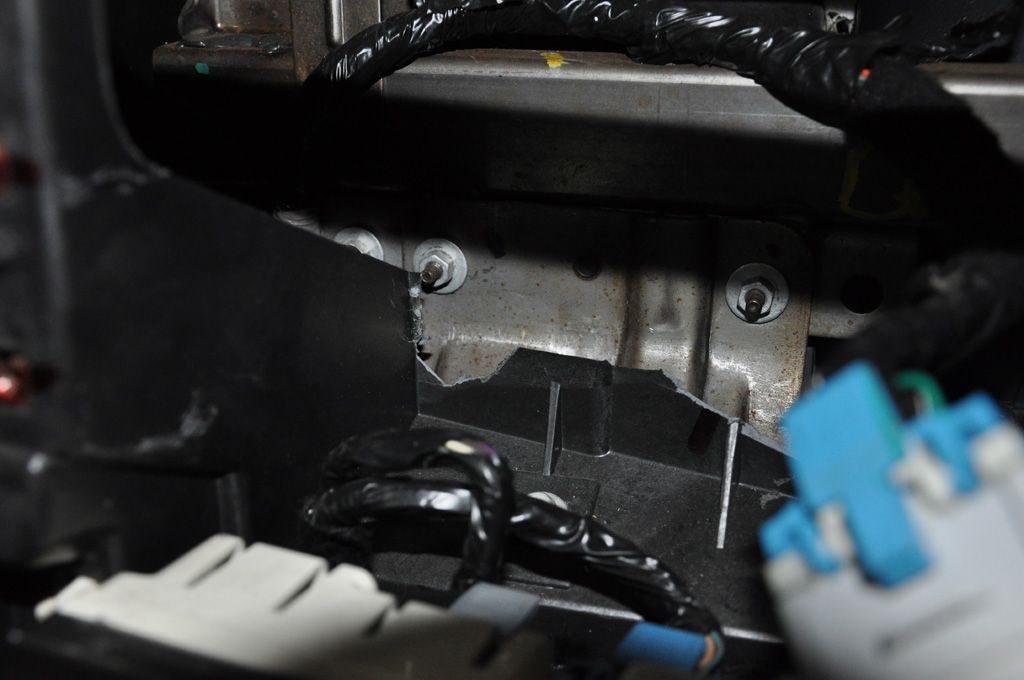
Also, I noticed the new Double Din will not sit flush with the mounting area on the Dash. It seems as if the Stereo is hitting a panel just behind the Stereo...here is a picture of the Panel I believe it is hitting/touching...
1473459476890.jpg
As you can see the Panel has a guide hole (factory) in it for the factory Stereo which I think is interfering with the Install.

Is it common when installing a Double Din Stereo in this model for the need to trim to fit?...(Crutchfield mentioned nothing of the sort but...)

*additional info*
2004 TB
No Onstar, Bose or Steering Wheel Controls

Any input would be greatly appreciated!
Thanks in advance!
 

Sparky

Member
Dec 4, 2011
12,927
I really don't remember what that plug is for. The Metra unit handles RAP stuff and I only had the one plug hooked up. I don't recall if there was another plug in my dash or not. Try it and find out!

Yes, sometimes trimming the plastics behind there is needed. I had a single DIN so I didn't need to, but on my Silverado I had to trim back there when I put my new radio in it.
 
  • Like
Reactions: RTTBLT1

DAlastDON

Member
Apr 6, 2014
5,550
Kentucky
I used a different module and had two big harness plugs if i recall correctly. But my envoy has everything but a sunroof and a V8.

I had to trim alot of plastic and practice good wire management to get my double din to fit.

DSC_0378resized_zpsbd658330.jpg
 
  • Like
Reactions: MAY03LT and RTTBLT1

Reprise

Lifetime VIP Donor
Supporting Donor
Member
Jul 22, 2015
2,724
My harness had provision for both plugs - but I had Bose, SWC, Onstar, and I wanted to retain the chimes, so I got a harness that would retain that for me. Bonus was that I didn't have to cut one wire on the stock harnesses.


On the plastic panel in the back - get a small saw, or a Dremel. Trim the vertical panel out where it joins to the other two ends (about 1" on the left, and 6" or so across the bottom). That will allow the radio to fit. The plastic isn't really hard / dense, so with a sharp enough edge, it'll take 5-10min to take out (the biggest problem is the limited reach inside, using the tool of choice). Quicker if you can get a Dremel in there with a cutting wheel. I had to use a small hand saw, but it cut through easily.

I have the AVH-X3600BHS in the Voy (one step or so below yours; same form factor). Once you get the radio in, the harness wiring takes up a bunch of room, and you have to get a bit creative. But it'll fit. :wooot:

Not sure how the HVAC head fits in the TB, but in the Voy, it's right beneath - and taking it out gives you a lot more room to work.
 
  • Like
Reactions: RTTBLT1

Sparky

Member
Dec 4, 2011
12,927
I'll admit, I reached in with a pair of channel locks on mine and just busted the plastic off :satan:
 

Reprise

Lifetime VIP Donor
Supporting Donor
Member
Jul 22, 2015
2,724
I think I left the bottom plastic 'as-is', because the bottom of the radio rested on it nicely. I don't recall that I even had to attach a backstrap to it.

With just the vertical piece removed, the head unit mounted really nicely with the trim kit, in the stock mounting holes in front. I had to use a Scosche, and the Metra kit that Crutchfield gives out is a little nicer than the Scosche, IMO.

(I was even able to kind of get it to fit without removing the plastic, but it did look a little ghetto...it sits at a slightly upward angle and you can see an ugly gap, especially on the bottom edge)
 

RTTBLT1

Original poster
Member
Jan 25, 2016
512
Louisburg, KS
The Harness I purchased says it retains RAP, Chimes and Balance & Fade...
1473465316492.jpg
I just didnt know if the other Wiring Harness/Plug should be left unplugged and to be sure i had the right Harness before starting to make my connections.

Here is the Harness Crutchfield recommended...
1473465316595.jpg
It has a second Harness/Plug with 4 Wires that Plugs into a mini speaker. The 4 Wires are also Wire back into the main Aftermarket Harness except for the Red Wire which connects as pictured above...
1473465316689.jpg
So that's what I'm working with.

I would like to test it without the other Harness/Plug connected but I don't have the PCM as of now.
 

DAlastDON

Member
Apr 6, 2014
5,550
Kentucky
Im thinking it should still power up the radio and other accessory's. They are controlled by the BCM under the rear seat.

Did the factory radio have the satellite radio option?
 

Sparky

Member
Dec 4, 2011
12,927
Yeah can still turn the key to accessory to give it a test.
 
  • Like
Reactions: RTTBLT1

RTTBLT1

Original poster
Member
Jan 25, 2016
512
Louisburg, KS
Thanks to everyone for the info.

Now that I know the Stereo is wired to the BCM, i will be giving the Stereo a test run. Just wasn't sure if I could do that with no PCM installed.
 

Mooseman

Moderator
Dec 4, 2011
25,319
Ottawa, ON
That other harness is for OnStar so just leave it unplugged and you're good to go.

Btw, you can reconnect the battery without the PCM to try out the radio.
 
  • Like
Reactions: RTTBLT1

RTTBLT1

Original poster
Member
Jan 25, 2016
512
Louisburg, KS
Im thinking it should still power up the radio and other accessory's. They are controlled by the BCM under the rear seat.

Did the factory radio have the satellite radio option?

I apologize, I totally overlooked this. It does not have the factory Satellite Radio option.

That other harness is for OnStar so just leave it unplugged and you're good to go.

Btw, you can reconnect the battery without the PCM to try out the radio.

Ok, great. I was thinking it would be ok to test without the PCM but didn't know for sure.

I would like to thank everyone who has replied/helped.

I was able to get a little more done on the Stereo yesterday, had to do a little cutting like others have mentioned...
1473689888127.jpg
All I have is a little Wiring work to tie up, then I can give the Stereo a test run...
1473634136952.jpg

I have another question...

I was reading the Owners Manual to the Pioneer Stereo and it says "Use speakers over 50 W (maximum input power) and between 4 ohm to 8 ohm (impedance value)"....

Now I'm pretty sure the factory Speakers would not be recommended for this Aftermarket Pioneer Stereo...so im thinking about upgrading/updating the Speakers as well.

I know I will need these items/components...
Screenshot_20160911-232122.png
Screenshot_20160911-232445.png

But don't know what Speakers to look for to pair with the new DD.

So my question is: Should I be looking to to purchase 2-way, 3-way or component Speakers for each door?...or would I want 2-way or 3-way in front and component in rears?

Any suggestions would be greatly appreciated!
 

DAlastDON

Member
Apr 6, 2014
5,550
Kentucky
The non bose speakers do not have the funky impedeance's that the bose do. They should be 4ohm. They will play and handle what the reciever can throw at them as long as they are not distorting.
 
  • Like
Reactions: RTTBLT1

RTTBLT1

Original poster
Member
Jan 25, 2016
512
Louisburg, KS
The non bose speakers do not have the funky impedeance's that the bose do. They should be 4ohm. They will play and handle what the reciever can throw at them as long as they are not distorting.

Oh ok, wasn't sure of the ohm or watts of the factory Speakers, thanks....so I shouldn't have to worry about overpowering the Speakers and blowing them?
 

Sparky

Member
Dec 4, 2011
12,927
I ran my factory front door speakers for almost 6 years behind my Pioneer. They were fine.

My rear driver's door speaker was bad when I bought the truck so I just put some Kickers I had from my old car in there.

Look at it this way - if you do end up blowing them somehow, then upgrade!
 
  • Like
Reactions: RTTBLT1

RTTBLT1

Original poster
Member
Jan 25, 2016
512
Louisburg, KS
Ok, so I got the Stereo mounted and the Wiring all complete. Had to connect the Backup Camera, 3.5mm Jack, USB, Video Out RCA and the Bluetooth Microphone Cables on top of the rest of Wires/Cables during install but everything went together great.

Also decided to route the Bluetooth Microphone Cord/Cable from the Stereo along the bottom of the Instrument Panel under the Windshield Pillar Trim then under front lip of Headliner then over to the Ceiling mounted Console and mounted the Microphone between the six Voice Recorder and Garage Door Opener Buttons. I didn't like the idea of mounting the Microphone on top of the Steering Column like Pioneer recommends. I figured the Microphone would pick up more up high and in the middle of the Vehicle...but we will see.

I tested it and everything is working as expected so far. Sounds and looks great! I'm a happy camper! :yes:

I will post pics soon.

Thank you again to everyone that replied! Have a great day!
 
  • Like
Reactions: Blckshdw and Matt

Blckshdw

Moderator
Nov 20, 2011
10,680
Tampa Bay Area, FL
Also decided to route the Bluetooth Microphone Cord/Cable from the Stereo along the bottom of the Instrument Panel under the Windshield Pillar Trim then under front lip of Headliner then over to the Ceiling mounted Console and mounted the Microphone between the six Voice Recorder and Garage Door Opener Buttons.

This is also where I mounted mine, everyone I've spoken to can hear me loud and clear at normal conversation level speaking, unless I've got the windows down at speed. :thumbsup:
 
  • Like
Reactions: RTTBLT1

RTTBLT1

Original poster
Member
Jan 25, 2016
512
Louisburg, KS
Back with pictures as promised...
1473985548740.jpg
1473985423554.jpg
The DVD picture/video quality is good for a car Stereo...
1473985380041.jpg
Below is pictures of the Tilt Screen option...
1473985343359.jpg
On-screen Tilt Icons grey out after reaching its limits...
1473985343282.jpg
Next three (3) pictures are where I mounted the Bluetooth Microphone, 3.5mm Jack Port and the USB Port...
1473985343195.jpg
1473985423518.jpg
1473985423481.jpg

I also have the Backup Camera connected to the Stereo as well as Video Out & In Inputs from DVD Monitors in the 2nd and 3rd rows.


I'm loving the Stereo so far, it sounds and looks so much better than stock/factory.

Thank you to everyone for the help!
 

Blckshdw

Moderator
Nov 20, 2011
10,680
Tampa Bay Area, FL
Next three (3) pictures are where I mounted the Bluetooth Microphone, 3.5mm Jack Port and the USB Port...
1473985343195-jpg.78440

:duh: Whoops, I thought you put your microphone INSIDE the overhead console. lol That's where I put mine, there's a small opening in the slotted section in the center :cool:

I was actually gonna put mine there too, but I was out of double sided mounting tape and was too lazy to go out and buy some. :bonk:
 
  • Like
Reactions: RTTBLT1

RTTBLT1

Original poster
Member
Jan 25, 2016
512
Louisburg, KS
:duh: Whoops, I thought you put your microphone INSIDE the overhead console. lol That's where I put mine, there's a small opening in the slotted section in the center :cool:

I was actually gonna put mine there too, but I was out of double sided mounting tape and was too lazy to go out and buy some. :bonk:

Lol, I was also thinking about mounting it where you ultimately did but wasn't quite sure what I would run into inside the Ceiling Console and figured what the heck it would have to be better than the Steering Column option.
 

Forum Statistics

Threads
23,313
Posts
637,830
Members
18,518
Latest member
bobby2175

Members Online