A/C Clutch Kit from AliExpress

Mooseman

Original poster
Moderator
Dec 4, 2011
25,344
Ottawa, ON
Continuing from this post, starting this thread to document and review this clutch kit:


So the initial cost came to about $105CAD and then I also had to pay another $25CAD in taxes and (the fee portion was like $18). Took less than 2 weeks to get here surprisingly. Ordered on Jul. 28 and arrived Aug. 9. Arrived in the usual yellow taped box.
PXL_20220810_134759005_resized2399856210616067942.jpg

Even came with the shim.

As soon as I have a chance to, I'll install and report how it goes.
 

Chickenhawk

Member
Dec 6, 2011
782
That's pretty stiff shipping, to Canada but if it saves money by not cracking the a/c system, it would be easily worth it. Please keep us updated! There are lots of us who have removed the shim to restore functionality, but that is just temporary.

I am most interested in knowing if it can be installed without removing the compressor.

Thanks for your research!
 

Mooseman

Original poster
Moderator
Dec 4, 2011
25,344
Ottawa, ON
That's the plan anyway.
 

Mike534x

Member
Apr 9, 2012
934
Oh I'm definitely watching this! With how many of these trucks that were produced, its mindboggling this is one of the few parts you can't even get a replacement for until now.
 

c good

Member
Dec 8, 2011
533
This would have saved me a huge headache a few years ago. Thanks for posting this up Mooseman. Please let us know how it works out.
 

corky

Member
Jan 23, 2012
77
Portland OR
Hey Mooseman Never saw an update on this, so how did it go, were you able to do it without pulling the compressor, I've already removed the shim and don't really want to replace the whole pump if this is easier
 

Mooseman

Original poster
Moderator
Dec 4, 2011
25,344
Ottawa, ON
Haven't done it yet. Hoping I can do it this week.

Stay tuned.
 
  • Like
Reactions: Joe_67

Mooseman

Original poster
Moderator
Dec 4, 2011
25,344
Ottawa, ON
And the moment you've all been waiting for. Short answer, it works as it should.

Now for a more detailed look.

I took the fan shroud and fan out. Don't bitch about how difficult it is to remove. Just do it. Need the space to work. Can't really get to it from the bottom neither.

PXL_20220815_160101893_resized1740089849606834791.jpg

Removed the belt. The tensioner felt difficult to move and the bearing is noisy. Have to run to get another one later. And the idler pulley bearing is just too loose so might as well change that out too.

Put a piece of cardboard against the radiator to prevent damaging it.

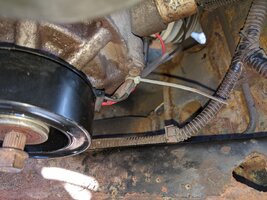
Remove the nut and remove the outer clutch plate. It was pretty nasty. Just surprised at how much rust formed on it.

PXL_20220815_160142679_resized2945756083437232729.jpg

Inside there is the first circlip. Kinda can see it in the pic. Because I can't stick my head down there, I basically had to feel with the snap ring pliers to get them in the holes and open up the clip. After that, get the puller on it and pull it off. Recommend putting the nut back on to prevent damaging the threads. It resisted a little coming off but not too bad.

PXL_20220815_160628254_resized4097404140771010405.jpgPXL_20220815_162827979_resized3851851317861280667.jpg

This is the inner clutch and bearing. The bearing was also pretty rough so it was just a matter of time before it also failed.

PXL_20220815_163105447_resized3303520297674597493.jpg

Removed the second circlip retaining the magnet. Again, had to feel my way with the pliers to get it off. Taking a picture first helps knowing the orientation.

PXL_20220815_163129377_resized5962815070041952930.jpg

The wires are retained by a clip held in place by a Philips screw which is almost impossible to get at on the side of the compressor. Even tried with a bit and 1/4" wrench but I couldn't get it off. I just cut the wires at the magnet. I used the puller again however it wasn't really necessary. Could have just pried it off after removing the clip.

PXL_20220815_170423433_resized6107127587985874536.jpg

Using some Scotchbright and small wire brush, cleaned up the compressor's shaft to make installation of the new clutch easier.

PXL_20220815_170430522_resized6511022937054985950.jpg
Noticed a difference with the wiring. The ground wire on the new magnet had an eyelet instead of the bullet connector on the original. I cut off the bullet connector from the original magnet and splice it onto the new one.

PXL_20220815_171448571_resized9043084703794910224.jpg
Install the new magnet. It's exactly like the old one so it slips on easily. There is a notch on it that corresponds to a hole in the compressor to ensure it's oriented properly and doesn't rotate. Getting the clip back on was challenging. Once I got it on the shaft but not quite in the slot to hold the magnet, I used a short screwdriver and hammer to push the clip into the slot. Go all around the clip to ensure it's completely seated. Then give the magnet a good tug to make sure it doesn't move.

PXL_20220815_173254948_resized3200602079141142129.jpg

For the wires, used the stumps of the old wiring on the clip to zip-tie them out of the way after connecting them.

PXL_20220815_174313734_resized8642880492805078570.jpg

Next, put on the new inner clutch after putting a light coat of grease on the shaft to help it slide on. Tapped it lightly until it was seated. Again it was the same deal with the circlip. until it was seated. Make sure the circlip is actually seated in its slot on the shaft. Cleaned the clutch face with some brake cleaner on a rag. DO NOT SPRAY BRAKE CLEANER ON THE CLUTCH DIRECTLY. It will destroy the bearing seals.

PXL_20220815_175516611_resized854108350938567871.jpg

For the outer clutch, there are two shims included with the kit. One thinner than the other. They fit pretty tight on the shaft so I filed them using a round file. The thin one was too thin as the clutch rubbed. The thicker one gave me a perfect .024" gap. (Sorry, forgot to get a pic of it finished). Again cleaned the clutch face with brake cleaner on a rag.

So that's it for the A/C clutch install. For the rest of the story, read on.

Then ran to get a new belt tensioner and idler pulley from the local parts house. I was floored with the price ($72). The idler pulley was a ludicrous $52, so I passed on that. The idler I just popped the seals, cleaned out what little grease was left and filled it with Lucas Red and Tacky red synth grease. If it goes later, I'll replace just the bearing.

Start the engine and it's shaking worse than a California earthquake. A/C works great but it's like it has a really bad misfire. Grab the Tech 2 and, no misfires and no codes. Huh? Rev the engine a bit and I hear a bang and it smooths out. Later find my feeler gauges that were spit out under the truck. My guess is that they got jammed between the fan and shroud and sent vibes through the engine. Some of the feelers got bent.

While I had the Tech 2 hooked up, I tested the EV fan clutch and... it's dead. It's doesn't change speed despite being commanded to 100%. Now that the engine is hot, no way I was going to open the cooling system to take out the fan clutch. Remembered someone here mentioning that they got it out by unbolting the fan from the clutch first and then unscrewing it from the water pump and sliding it out. That worked not as easy as it sounds but it worked. Pulled the old clutch between the fan and the shroud.

Since the thermal clutch was smaller, I figured I would install it first on the fan and slip the whole thing in. The extended top part of the shroud prevented that so I cut it off. It then went in but still tight as the lip inside the shroud would jam the fan. With a little prying, it eventually went in. So this is another method if you really balk at disconnecting the upper radiator hose.

PXL_20220815_211826795_resized2821135196413711162.jpg

Final note, the A/C is performing very well. Idling, it outputs at 48f and if I hold the RPM to 1000, it drops to 40f. Nice.
 

Attachments

  • PXL_20220815_174313734_resized434908669344679139.jpg
    PXL_20220815_174313734_resized434908669344679139.jpg
    438.5 KB · Views: 32

Joe_67

Member
Aug 9, 2022
56
Central Virginia
This post should be stickied and a big thanks to mooseman - from many of us, I'm sure.

For all of those trials and tribulations that were reported, the biggest thing that gives me the heebie-jeebies isn't pulling the fan/shroud which is obviously necessary, even though a bit of a pain. But it's just the "little" things - like those snap rings. They're annoying when you can seen them, let alone when you have to fly blind. And they're so simple...yet can be so difficult.

Perseverance is always the key I guess. Great write-up. Thanks much.
 

Mooseman

Original poster
Moderator
Dec 4, 2011
25,344
Ottawa, ON
I didn't sticky it however have added it to the Technical FAQ in the HVAC section.
 

aaserv

Member
Dec 1, 2019
408
N of Baton Rouge, La.
About to change mine on the Chev. Van, 4.8L. Just wondering? Is it really necessary to change the magnet? Seems like they would last forever but what do i know ive never taken 1 off before. Just looking to cut any corner I can. I went with the ACD from Rock Auto so Im thinking I can save some time and just reuse the old magnet???
 

Blckshdw

Moderator
Nov 20, 2011
10,685
Tampa Bay Area, FL
Ballpark, about how long did it take for just the clutch swap?
 

Mooseman

Original poster
Moderator
Dec 4, 2011
25,344
Ottawa, ON
About to change mine on the Chev. Van, 4.8L. Just wondering? Is it really necessary to change the magnet? Seems like they would last forever but what do i know ive never taken 1 off before. Just looking to cut any corner I can. I went with the ACD from Rock Auto so Im thinking I can save some time and just reuse the old magnet???
You're already halfway there. Is it worth saving a few bucks and having to do it over again because the magnet failed? Do it once, do it right.

Ballpark, about how long did it take for just the clutch swap?
About 2 hours taking my time. Another ~2.5 hours running to get the tensioner and the rest.
 

Joe_67

Member
Aug 9, 2022
56
Central Virginia
About to change mine on the Chev. Van, 4.8L. Just wondering? Is it really necessary to change the magnet? Seems like they would last forever but what do i know ive never taken 1 off before. Just looking to cut any corner I can. I went with the ACD from Rock Auto so Im thinking I can save some time and just reuse the old magnet???

First off, like Mooseman said, you're already halfway there. So why not?

But second, ... well it most likely IS the magnet if you're having a clutch problem. They're not just typical "permanent" magnets like you'd hang on your fridge. They're electromagnets - meaning that they only become magnetic when electricity is passed through their coils. The typical failure mode is that the coils break down with time, use, heat and whatnot. The electrical coils can break entirely, not pass any current at all and then you get no magnet at all. Or they can be breaking down, get hot, resistance increases, and then can't pass enough current to make a strong enough magnetic field.

So yes. My call is that it's necessary to change the electro-magnet.
 
  • Like
Reactions: Mooseman

Mektek

Member
May 2, 2017
656
FL
From what I've seen, when the clutch friction material wears out there is slippage which generates heat. Over time the high temperatures overheat the coil and damage it.
The other possibility is that the coil starts to fail which allows the clutch to slip and wear out the friction material.

The price on Aliexpress is astonishingly high considering that you can get a similar unit for a Honda on fleabay for $35.
 

Mooseman

Original poster
Moderator
Dec 4, 2011
25,344
Ottawa, ON
There is no friction material. It's steel on steel machined surfaces. I figure mine failed because it rusted over the winter and would slip when engaged. Because the TB is used infrequently, it probably added to the rusting issue.

I agree that the price, and especially shipping, are high but that's today's reality. Still a cheaper and easier option to replacing the entire compressor.
 

aaserv

Member
Dec 1, 2019
408
N of Baton Rouge, La.
What an adventure this turned out to be. I should have gotten pics or video but a huge case of the red azz developed shortly after I started on the project which would have deemed video unsuitable for production.
The compressor could not be removed without taking loose front end parts which would have required an alignment so i managed to turn the the comp face down and get the clutch off like that .
Shortly after flipping it part of a plastic pulley fell down and it didnt dawn on me at the moment what that was. Shortly after that while laying under the truck i noticed something dripping on my shirt, then a drop went in my mouth....THEN i noticed it was orange and THEN i noticed my water pump was leaking... THEN i go up top to look at the pump and THEN i see where that plastic pulley came from....The idler pulley for the drive belt!!!!! THEN i blew a brain gasket.......Im changing a clutch that isnt the problem, its the idler pulley that bad!
So Ive got an upside down compressor, a leaking water pump and a totally destroyed idler pulley... Yea I was a little perturbed to put it mildly. The compressor was actually no problem. No pullers needed for the clutch. outer 1 just pried off with a screwdriver and the inner almost fell of once the snap ring was removed. Bolted it all back in and then spent a a couple of hours trying to put the new 'stretch ' belt on.. That was a no go. Im bringing it to the shop anyway and let them do the water pump so Ill let them fight that stupid belt. Replacing the pulley and belt turned into a disaster that I dont have the bandwidth to get into but I will point out that an AZ Duralast idler pulley that says it will fit a 2010 Chevy Van w 4.8L doesnt fit.... A Gates from Oreilly did fit thankfully.

1 other thing that really chapped my already heavily chapped azzzzzzz...........The water pump from either store started at around $250 and went up from there.... The EXACT same pumps down to the model number from Rock Auto were $120-$160 cheaper!!!! I dont know how they do it but I can order from Rock on a friday and get it on tuesday mornings most times so needless to say the pump is on the way from Rock Auto...

Oh and I rolled over on the creeper to grab a wrench and bruised a rib or 3......needless to say there were a few cross words tossed around my driveway this weekend :Banghead::Banghead::Banghead::Banghead::Banghead::duh::duh::duh::duh:
 

Forum Statistics

Threads
23,330
Posts
637,992
Members
18,534
Latest member
06_4.2_4x4_ls

Members Online