Skip having to take the Valve Cover Off just yet... Just keep pouring the Diesel Fuel or Solvent of Choice down through the Oil Filler Neck again and again until those Channels clear out quite a bit. I would not even put the Drain Plug(s) back in for the moment. Just pour the stuff on through fast enough to spread the liquid out across the Upper Engine Head and wait for each batch to drain down into the Catch Pan and drag out that Old Black Mung with it. Then after straining out the Big Chunks... Repeat that process until you begin to see less and less of the Carbon Chunks coming loose.
You are using an out of date browser. It may not display this or other websites correctly.
You should upgrade or use an alternative browser.
You should upgrade or use an alternative browser.
4.2 keeps losing oil pressure
- Thread starter chuey_316
- Start date

you don't use the compressed air sprayer "directly". You need to take the tip off... they are a threaded fitting. You then get a compressed tube fitting for a small tube... 1/8... 3/16 or so then you couple that tube to the body of the compress air sprayer where the tip was.... ie. the thread will be that of the sprayer body / shaft and the compressed end will be that of your tube. You now have a tube that is small enough to poke inside oil drain hole or your new hole (which ever is bigger). IF you choose your tubing well, you will be able to bend it a bit to form angle to spray in a direction that is useful.... I think.Thanks I'll look into it. Just got home with a new gauge, and had a look at the pickup screen, and it was about 50-60% plugged again. I started straining the new oil I drained before leaving, and there was enough crud that the oil had a hard time flowing through my makeshift filter.
I also bought a pump sprayer and attempted to spray everything down with the chem dip, but didn't have any real success. I looked at pneumatic sprayers while I was at Harbor Freight as well, but the tips are too large to fit through the drain plug opening.
I don't see any options other than multiple engine flushes at this point.
Most of the chucks didn't want to come off the strainer to get a good napkin shot but here's a few pics


Here's the best shot. You can see all the gunk that's still in the container that didn't make it to the funnel while straining the oil.

Here's the best shot. You can see all the gunk that's still in the container that didn't make it to the funnel while straining the oil.
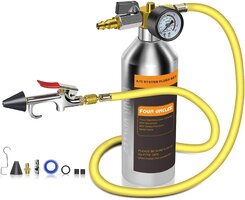
I've had luck with using HVAC Flush Cylinders, too. You can fill it up with a Quart of Solvent or Diesel Fuel at a Time... Pump It Up to a Safe Level with Compressed AIr ...Close off the Fill Ball Cock Valve... Point the Rubber Nozzle into the New Drain Port... and Squeeze The Trigger. Then Drain the Pan...Strain the Contents and Re-Fill the Flush Tank with the Solvent as often as needed until that stuff stops showing up in the Pan:
THIS One looks Promising:
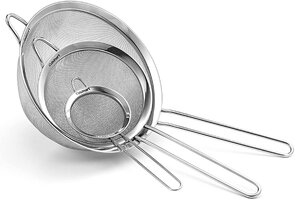
Having a Fine Mesh Stainless Steel Strainer Set like THIS one would save an awful lot of time when Filtering & Recycling the Used Solvent:
THIS One looks Promising:
Amazon.com: FOUR UNCLES IRONCUBE AC Flush Kit,A/C Air Conditioner System Flush Canister Kit Clean Tool Set R134a R12 R22 R410a R404a for Auto Car with 3.5 ft Hose American Interface : Automotive
Buy FOUR UNCLES IRONCUBE AC Flush Kit,A/C Air Conditioner System Flush Canister Kit Clean Tool Set R134a R12 R22 R410a R404a for Auto Car with 3.5 ft Hose American Interface: Air Conditioning Line Repair Tools - Amazon.com ✓ FREE DELIVERY possible on eligible purchases
www.amazon.com
Having a Fine Mesh Stainless Steel Strainer Set like THIS one would save an awful lot of time when Filtering & Recycling the Used Solvent:
Attachments
Last edited:
That flush tank looks like a plan. If I don't have the parts I need to build a pneumatic washer I'll probably end up ordering one.
I dumped around 5gal of diesel through the fill hole, and drained it into another container under the truck, but didn't really see anything come out. I ended up doing another flush with 6qt of oil and 1qt of diesel, and got some more chunks out. Still allot to go though.
I tried to get a look at those plugged up drain down passages mentioned above, but had a hard time maneuvering the camera in there. I was going to try to push the camera right up through them in the hopes of opening them up a bit so the diesel could do a better job at cleaning them out. Once the mosquitoes came out, I went in though.
My glimmer of hope has dwindled to a flicker. I put on a fresh filter, and refilled with 6qts of 10w30 full synthetic, and 1qt of MMO. Figured I'd drive it a little each day after work, and let the detergents do their thing for a couple hundred miles, or until the pressure no longer rose to an decent level at start up, whichever came 1st, then clean the screen again.
Went for a 5 mile drive between 25-45mph, and all was well until the last 1/4 mile or so when I got into it just a little, and brought the rpm's up to about 5k while accelerating. The pressure almost immediately dropped to 0psi. I put it in neutral while coasting, killed the engine, and restarted, and the pressure came back at 20psi. A few more blocks, right as I was turning into my drive, the pressure dropped again. Another shutdown/restart, and the pressure was back up again.
Does this sound like a definite pickup seal or relief valve, or is there a possibility that the sudden surge in rpms caused the pickup to suck up enough of the readily available gunk to re-clog the screen, and shutting it down for a second and restarting caused it to dislodge, and flow oil again?
I'll continue to drive it very close to home each day, making sure to allow it to get to operating temp since it needs cleaning out no matter what, but I'm assuming a tear down is imminent, based on the above condition. At least that's what I've read as far as the pressure drop, and sudden return with a quick shutdown/restart.
Last edited:
Unless the issue with the Oil Pick Up Screen getting covered over and over with "New Mung" can be isolated from the other possible issue of a compromised "O" Ring, its a Crap Shoot as to whether all of the additional effort will be necessary. Right now, it almost looks more worthwhile by pulling the Oil Pan and Front Cover and Killing 4 Birds at the Same Time on this High Mileage Motor:
(1) Replace the Gerotor Oil Pump "O" Ring
(2) Thoroughly Flush and Spray Out the Bottom End.
(3) Deep Soak the Oil Pick Up Tube and Screen again.
(4) Consider replacing the Timing Chain Set, Guides and Tensioner.
I'm back in my own camp again on using MORE Berryman's after seeing the Night to Day differences between every area below the "Berryman's Line" in the Oil Pan and the Ugly, Crusted Nether-Regions just above that position. Good Science always suggests, "Only Work On One Variable at Time..." Right now...THAT issue is the Immediate Re-Clogging of the Oil Pick Up Tube.
If you can just get enough of the Berryman's Chem-Dip up in there to reach the entire Cradle and bathe it for another Good, Long Soak... it just might get rid of the Lion's Share of what is left clogged up and collected down in there to cause more 'Carbon Coffee Grounds' Mischief.
Then, after using the Pressurized Flushing Cylinder filled with Solvent in the recommended ways to dislodge and flush out whatever is left down in there, that would allow you the chance to decide then if it was finally the time to "Crack the Case" with more Wrench Turning. It gets a bit more expensive after that happens for the Gasket Sets, Special Silicone Sealant, Part Kits, Special Tools and the Right Tactics & Know-How necessary to do this follow-on work.
Last edited:
Mooseman
Moderator
At this point, I'd be pulling the pan. I would also go ahead and replace the oil pump and bypass valve. Given the amount of junk in the motor, we have to assume it was poorly maintained and that the pump and valve may be in need of replacement. It could just very well be just the o-ring however, since you have an oiling issue and that taking the pan out is a bitch of a job, might as well just in case.
I've done it. It's not a job, it's a project, so be prepared for it.
 gmtnation.com
I've done it. It's not a job, it's a project, so be prepared for it.
How to remove I6 oil pan in vehicle
This is the second of several articles during my work to replace the timing chain and tensioner. I thought it better to separate into articles for those that are looking for specific instructions. How to remove the I6 oil pan in vehicle Difficulty (out of 5): 5 Tools required: Assortment of...
In the Link below, I have posted ALL of the relevant images, component autopsy and layouts and Assembly Instructions that describe the following Different Components of the GM Atlas LL8 4.2L Engine Oiling Gerotor Pumps:
(1) The New, Updated GM Part# 1262856 OEM Timing Cover AND Oil Pump as a Single Purchase Item.
(2) The New, Updated Sealed Power Part # 224-53582 Gerotor Oil Pump Kit
(3) The New, Updated Melling Part# 358S Oil Pump Pick Up Tube
(4) The Old GM Part# 12557752 Blue Viton "O" Ring ONLY.
NOTE: Check for the Gerotor Pump Autopsy Data in the GMT Nation FAQ & Articles
The Old and New Components AND their Seals...are Mutually EXCLUSIVE and cannot be Mixed and Matched in between the two different Gerotor Oil Pumps.

 www.flickr.com
(1) The New, Updated GM Part# 1262856 OEM Timing Cover AND Oil Pump as a Single Purchase Item.
(2) The New, Updated Sealed Power Part # 224-53582 Gerotor Oil Pump Kit
(3) The New, Updated Melling Part# 358S Oil Pump Pick Up Tube
(4) The Old GM Part# 12557752 Blue Viton "O" Ring ONLY.
NOTE: Check for the Gerotor Pump Autopsy Data in the GMT Nation FAQ & Articles
The Old and New Components AND their Seals...are Mutually EXCLUSIVE and cannot be Mixed and Matched in between the two different Gerotor Oil Pumps.
GM Atlas 4.2L LL8 Engine Gerotor Oil Pump
This Album shows Images of the Autopsy of a Late Model GM 4.2L LL8 Gerotor Oil Pump.
www.flickr.com
Last edited:
Thanks MRRSM. I'll pricing everything, and look through the album you posted as well. I'm hoping the garage opens up soon, so I can pull it in. If it takes too much longer, I may have to accept the possibility of selling it as a parts or fix deal, and buy another one. I'd love to just buy a 2wd, but living in Michigan, I want her to be driving a 4wd in the winter.
Tankcruiser
Member
Tankcruiser
Member
how to do private message? just saw ur profile
ext LT 03 looks like lake michigan snow effect area thats why you need 4wd
ext LT 03 looks like lake michigan snow effect area thats why you need 4wd
Mooseman
Moderator
how to do private message?
If you hover over or click on the member's avatar or name, option comes up to start a conversation. Or click on the envelope on the top right of the screen and click on start new conversation. Start typing the member's name and it should come up.
I'm in southern Michigan, not far from the Indiana border.where in mich are you located?
if ur close by could help out with repairs?