SOLVED! 4.2 cam phaser 03 Tb Ext LT

mattpaul89

Original poster
Member
Jan 13, 2023
12
MI
So I'm in the middle of a replacing my cam phaser, oil pump, and harmonic balancer pulley and I'm not sure what cam phaser to get the 1 on my 03 EXT LT is the one with the solid crank attached to the phaser. The only one I can find is the one with the holes in the crank so I was wondering if they are there different or are they compatible??? And is there anything else I should or need to replace while I'm in there I'm no mechanic I'm just a DIY guy that's handy with a wrench and trying to save some money I've got everything apart just need some advice on how to get everything back together properly I would really hate have to redo this fun project lol thanks for any advice that can be shared 👍🏻 pic of my cam phaser below
 

Attachments

  • IMG_20230106_021942.jpg
    IMG_20230106_021942.jpg
    356.4 KB · Views: 4
Last edited:

Mooseman

Moderator
Dec 4, 2011
25,344
Ottawa, ON
Holes or no holes doesn't make any difference. It's the internals that changed, IIRC, in 2005. I've tried the Delphi rebuilt and it failed. The Dorman, #917255 (with holes), worked fine until the truck went to its grave.


You should also replace the CPAS since everything else will be new. Just clean off the cam sensor.

If you want to read up, I have this thread I did a few years ago:
 

TJBaker57

Member
Aug 16, 2015
2,900
Colorado
If I remember correctly there were 4 different variations over the years and they are not interchangeable.

I am fairly certain there were differing reluctor notching in addition to internal changes.

I have this info but definitely do your research and get the right one...


Screenshot_20230113-212502.png
 

Mooseman

Moderator
Dec 4, 2011
25,344
Ottawa, ON
And it looks like the ACDelco/Delphi unit is discontinued, at least for 2002-2004 (19179010 ). Not surprising given it's been almost 20 years.
 

mattpaul89

Original poster
Member
Jan 13, 2023
12
MI
Yeah I seen GM discontinued it. And I can't find the originally one anywhere with part number 25178506 or 19179010 I've been looking at the doorman cam phaser but from the pictures it looks different from mine so I been a little skeptical about trying it. Has anybody used the doorman or similar aftermarket cam phaser that has an 02 - 04 Trailblazer if so can you please elaborate a little bit on how everything turned out. Moose man so I see everything worked out with the '05 Trailblazer? And I actually just replaced the cpas like 6 months ago hoping that would solve my problems and then I started it one day not long after and thats when I started hearing a rattling noise coming from the top of the engine and when I took off the oil cap I could see the cam phaser wobbling around has anyone had that issue. I know it's really common on the Ford F-150 with the 5.4
 
Last edited:

Mooseman

Moderator
Dec 4, 2011
25,344
Ottawa, ON
Yep, I did. Worked fine.


Mooseman

Moderator
Dec 4, 2011
25,344
Ottawa, ON
I started hearing a rattling noise coming from the top of the engine and when I took off the oil cap I could see the cam phaser wobbling around has anyone had that issue.
You mean the phaser gear itself was wobbling around? Never heard of that one before. If that's the case, either it wasn't tightened properly or a new bolt wasn't used. It's a TTY bolt and is supposed to be replaced. Needs a lot of torque too.
 

mattpaul89

Original poster
Member
Jan 13, 2023
12
MI
You know what that might be a strong possibly. When I loosen that bolt it didn't giving me any trouble at all it actually came loose with very little effort. It wasn't finger loose but it wasn't like really tight either really got me thinking now because looking down at it from the top of the oil fill I could clearly see it had a bit of a wobble and I was thinking maybe it was fully advanced and that front plate was extended if it does extend I don't know how it really works to be honest but maybe the internal mechanism was busted and that's what caused it to wobble like I said I'm not sure exactly what caused it to do that I've been trying to figure it out myself but that was what came to mind. And I seen your Old Post with the side by side pictures of the cam phaser and that pretty much took care of my worries whether or not the different style cam phaser would work or not thanks a lot that really took off a lot of stress now I can get on with the repair LOL
 
Last edited:
  • Like
Reactions: K4uwc

mattpaul89

Original poster
Member
Jan 13, 2023
12
MI
What about the rattling sound I was hearing is that normal for the cam phaser when they fail?
 

Mooseman

Moderator
Dec 4, 2011
25,344
Ottawa, ON
The rattling sound while idling on mine was a failed chain tensioner. The ratcheting mechanism failed internally but at higher than idle, the oil pressure part of it would take up the slack. The noise was very irregular.

Another possibility on your wobble is the mechanism has failed and separating. I would not run it at all until it's fixed because if it completely fails or separates from the cam, there would be MAJOR destruction.
 

mattpaul89

Original poster
Member
Jan 13, 2023
12
MI
I have what I hope is the last issue I'm at the point of putting on the exhaust cam phaser and I'm just not quite sure what it is I have to do I I seen a couple posts where they said it has to be in the advanced position with the flats facing up which the flights are already facing up but I'm not sure what this phaser being different from the original idk how to tell whether advanced position is on the new phaser does anybody have a video link or a detailed instruction manual LOL this is something I don't want to mess up so any knowledge you guys can provide I would really appreciate it thanks again fellas
 

mrrsm

Lifetime VIP Donor
Supporting Donor
Member
Oct 22, 2015
7,730
Tampa Bay Area
Don't Do ANYTHING to it... It should have come from the Factory pre-loaded correctly within the possible range of 0-25 Degrees ...AND... The Metal Restraint Tab inside of it can be very easily Broken Off by Accidental Excess Manipulation. The action of the PCM via the VVT CPAS (Solenoid) and varied Oil Pressure that changes dynamically from the Gerotor Oil Pump moving oil in subtle pressure variations depending upon Engine RPM does all the work after that. Most of the Cam Phaser's "EGR"- like behavior that the LL8 Engine exhibits occurs at lower and idle RPM. But the Cam Phaser's actions have a dramatic effect upon the Engine Power Band through a fairly wide range of Engine RPM and Torque conditions.

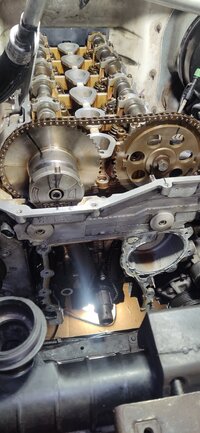
As far as confirming your correct installation, you should know that if you have conformed with the Alignment Pattern shown in the image attached below, after following the positions of having the Black Links situated at every Seventh Link fitted on top of the Designation Marks on the Cam Phaser and the Intake Camshaft Sprocket as well the one that should be found at 5 O'clock Position "DOT" on the Outer Crankshaft Gear Cog indicating the #1 Cylinder is at TDC... then all will be well.

Once these references have all been confirmed... it is very important to remember to "Pull The Grenade Pin" on the Retention Pin holding the Timing Chain Tensioner in Spring Compression to release the Contact Push Pad against the Passenger Side Timing Chain Guide. After these actions are done and you have REMOVED THE SPECIAL CAMSHAFT ALIGNMENT TOOL from the back of the Two Camshafts, the next and last method for confirmation is to Rotate the Engine Clockwise at the Crankshaft Bolt (14) Fourteen Times in a Row in order for this Installation Geometry to arrive back at this Imaged Correct Alignment Starting Point. If this occurs and you feel No Inordinate Mechanical Resistance to these actions, then you will be done.

It only remains to use either the Approved GM OEM Factory ACDelco Engine Gray Sealant, or the correct flavor of the Permatex Brand High-Temp Gray Silicone Sealant upon the inner flange surfaces of the Timing Cover. After cleaning the Timing Cover Flange and the Mating Front Engine Block Surfaces with Acetone or Lacquer Thinner as a de-greasing method, squeeze out a 3mm Wide Bead of Sealant into the appropriate Grooves and around the Fastener Buss Points. Next, install the Timing Cover uniformly, without allowing it to 'Slip-N-Slide' onto the Engine Block, being mindful of the proper placement by length and the correct positioning of all the Fasteners. Do NOT Freelance with screwing in those Fasteners Too Tight.

Tighten them down in the Proper Pattern using three passes leading to the final, mild GM Factory Torque necessary for a Good, Oil and Water Tight Seal. It is important not to skimp on the correct installation procedures here, since the Timing Cover - Gerotor Oil Pump also serves as a Supporting Structural Member to the GM 4.2L Atlas LL8 Engine making it Rigid and Strong. Remember that the effective "Work Time" of the ACDelco Sealant is Only Ten Minutes, so do NOT begin these procedures before you have everything necessary on hand before you start doing this job.

Take Note of these Torque Sequence Limits as "Do NOT Exceed These Limits " Warnings as shown on THIS Diagram:

GM42LTIMINGCHAIN.jpg
 
Last edited:

mrrsm

Lifetime VIP Donor
Supporting Donor
Member
Oct 22, 2015
7,730
Tampa Bay Area
If You follow @Mooseman 's Epic "How To" Thread for the Cam Phaser Installation to a "T"... You won't have any problems. If you have NOT been able to locate the Camshaft Holding Tool... Amazon is selling the OEM Version at 29% OFF the original asking price ...so you can pick one up HERE for around $20.00:


The Critical "Ear Marks" necessary to get this done right are as follows and were illustrated in the previous posted image:

(1) The #1 Cylinder must be at Top Dead Center.

(2) The Word "DELPHI" on the Cam Phaser should be Horizontal with the edge of the Upper Block.

(3) The Intake, Exhaust Camshafts and the Crankshaft Cogs should have Black Links over them all.

(4) The Flats cast into the Rear of the Camshafts should be Upright, Horizontal and EVEN using the Special Alignment Tool fitted over them both.

(5) Do NOT use THIS Tool as the means to Restrain the Crankshaft when removing or installing the Harmonic Balancer! You must pass a 15mm Deep Socket on a Breaker Bar THROUGH the Back Flange of the Rear Crank-Case-Oil-Pan and then fitted over one of the three 15mm Torque Converter Bolts to HOLD THE CRANKSHAFT STILL.. WITHOUT FAIL.

THIS
is the Camshaft Holding Tool That You Want:

71Zs9BxMgZL._AC_SL1500_.jpg61LzQeDMGmL._AC_SL1500_.jpg61EL89SEsnL._AC_SL1500_.jpg617LJaZuOPL._AC_SL1500_.jpg
 
Last edited:
  • Like
Reactions: K4uwc

Forum Statistics

Threads
23,330
Posts
637,974
Members
18,530
Latest member
jvest

Members Online

No members online now.