- Jan 3, 2015
- 75
I had some struggles with removing the upstream O2 sensor even after reading how others on this forum had successes and failures, so I wanted to share my experience.
2008 Trailblazer, 92,000 miles all in Maine and Michigan. Original sensor.
The sensors was operating good but I thought with the age and miles, it would be good to replace it now before it went bad and perhaps became more seized than it was probably already.
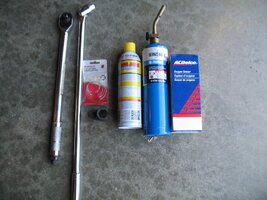
One week ago, I sprayed some PB Blaster on it. Yesterday, I removed the wheel for better access and left the O2 electrical connector in place in case I could not remove it and needed more time to come up with a better plan. I sprayed some PB blaster on it. I heated the car up for 10 minutes and used a temp gun to check the temp around the sensor (400 degrees). I used a moderate amount of force using a breaker bar and the O2 socket and it would not budge. I did not want to put a ton of force on it and perhaps bugger the threads. I then used propane to heat the area up to about 650 degrees, still no go. I sprayed some PB blaster on it again and two more times including before I went to bed.
The following morning, more PB Blaster an hour before. Warmed the car for 2 minutes bringing the temp around the sensor up to 300 degrees. Still would not budge. I then heated the area with the propane torch for probably 5 minutes. Moderate amount of force and it popped loose. Had I not had success, my plan was to order a bottle of Mouse Milk off of Amazon and try that as a penetrating oil. I also considering melting candle wax as well as an option if need be.
The Oxygen sensor socket I used was a 7/8” ½” drive, Autocraft AC830 with a 24” breaker bar.
I got the AC Delco Sensor (12592591) on a wholesaler sale on Rockauto for $26.79.
2008 Trailblazer, 92,000 miles all in Maine and Michigan. Original sensor.
The sensors was operating good but I thought with the age and miles, it would be good to replace it now before it went bad and perhaps became more seized than it was probably already.
One week ago, I sprayed some PB Blaster on it. Yesterday, I removed the wheel for better access and left the O2 electrical connector in place in case I could not remove it and needed more time to come up with a better plan. I sprayed some PB blaster on it. I heated the car up for 10 minutes and used a temp gun to check the temp around the sensor (400 degrees). I used a moderate amount of force using a breaker bar and the O2 socket and it would not budge. I did not want to put a ton of force on it and perhaps bugger the threads. I then used propane to heat the area up to about 650 degrees, still no go. I sprayed some PB blaster on it again and two more times including before I went to bed.
The following morning, more PB Blaster an hour before. Warmed the car for 2 minutes bringing the temp around the sensor up to 300 degrees. Still would not budge. I then heated the area with the propane torch for probably 5 minutes. Moderate amount of force and it popped loose. Had I not had success, my plan was to order a bottle of Mouse Milk off of Amazon and try that as a penetrating oil. I also considering melting candle wax as well as an option if need be.
The Oxygen sensor socket I used was a 7/8” ½” drive, Autocraft AC830 with a 24” breaker bar.
I got the AC Delco Sensor (12592591) on a wholesaler sale on Rockauto for $26.79.