2005+ e-fan swap on a 2002 GMT800: the right tune?

SpitShine_PL

Original poster
Member
May 26, 2023
34
Poznan, Poland
I hope this is the right forum section (as it concerns both electrical wiring and PCM tuning), so here it goes.

I am acquiring parts for the electrical fan swap/mod on my '02 Suburban. This is a stock 5.3 K1500 with the 'large' engine radiator (34" inches wide, AFAIR) and mechanical, shaft-mounted visco clutch fan.
I will be using a Nelson harness and 2005+ GMT800 dual fans. I'm not shy of the mechanical or electrical work on this mod (hell, I usually do a ton of modding/servicing on my own); I got two questions, tho.

(1) The 2002 version is different in most of the writepus on this topic in that the e-fan relay & wiring harness requires a control input from what is cryptically referred to as the "A/C clutch trigger wire". I need clarification: does it mean the trigger wire for the A/C _clutch power relay_ or the A/C clutch _12V power wire_ going to the A/C clutch itself? I know GM can be pretty stupid about wiring color coding consistency, so I believe -- assuming it's the 12V power wire for the A/C clutch -- this is the dark green wire from the A/C clutch relay to the A/C clutch, like in the diagram below, not the dark green/white wire which triggers the relay - correct?

Clipboard01_1.jpg

I know the DK/GN wire from the A/C clutch relay probably lives in the stock harness that goes by the red positive battery pole box to the left of the engine block. Is this correct? I also read there are several likewise-colored wires in the same harness, so I'd need to test for full 12V with the A/C clutch commanded to engage. (Or perhaps I should access the underhood relay center and tap directly below the respective relay's base?)

(2) I know I need to tune the PCM to enable and set the function of pin #42. I will be using HP Tuners.
I just need to know and verify which settings are correct:

First and foremost: I need to enable the PCM pin #42 to control the fans.
I think it's called 'Recirculation Output' and needs to be set to 'Fan 2' - I am not sure about it, tho.
EDIT: I was wrong, Recirculation Output is assigned to pin #33 on C2 of the PCM and should not be modified (it forces recirculation of air vs. A/C pressure buildup).

System > Fans tab: Fan 1 and Fan 2 set to ON
System > Fans tab, under 'Hardware':
Fan type: 2 fans
Under 'Fan 1 (first stage)':
On ECT: 185F
Off ECT: 178F
Under 'Fan 2 (second stage)':
On ECT: 205F
Off ECT: 185F
System > A/C tab:
I believe I need a setting option which is called "Analog" instead of "Analog, Cycling" under 'A/C System Type'.

For other settings that can be required - I am not certain and I'd appreciate any help. I do not know the compressor on/off pressures, on/off speeds, minimum run times, etc. for fan stages 1 & 2. There's a suggestion I found it's best to copy as much of the settings (the non-conflicting ones) from a 2005+ PCM file.
 
Last edited:

Mooseman

Moderator
Dec 4, 2011
25,323
Ottawa, ON
I know @Reprise did this swap. He should be able to help.
 

SpitShine_PL

Original poster
Member
May 26, 2023
34
Poznan, Poland
Oh, nice.
Also, about the potential application with A/C pressure control: that doesn't work on the 99-02 trucks; they don't have A/C pressure sensors with the manual A/C controls, there's only an A/C pressure switch which tells PCM how to control the A/C compressor, so... My bad here. 😅
 

Mooseman

Moderator
Dec 4, 2011
25,323
Ottawa, ON
I think he's busy travelling with his RV this weekend but I did find his thread about his conversion.


mrrsm

Lifetime VIP Donor
Supporting Donor
Member
Oct 22, 2015
7,697
Tampa Bay Area
Even BETTER!


SpitShine_PL

Original poster
Member
May 26, 2023
34
Poznan, Poland
@mrrsm A nice mod there, tho I will go with stock 2005+ e-fans and a Nelson relay harness :wink:
@Reprise seems to be busy with RV adventures, so I'll wait some more for his input in this thread:
 

Reprise

Lifetime VIP Donor
Supporting Donor
Member
Jul 22, 2015
2,724
@SpitShine_PL -- I answered in more detail in the linked thread above, since you also posted there, and I better understood what you were asking, there. But the short of it is, you're on the right track.

From what I can tell, the various temp settings can remain the same between the earlier / later models; it's only the '02-down that require the 'analog' cycling (and the different wiring connections).

If you need more info on the wiring, send reply (here). I'm not expert with wiring (especially w/ differences in earlier model years), but there are various YT vids and such on doing this with the older trucks. Post back if you can't find them. In the meantime, I'll look at the schematic you posted above.

(on edit): Take a look at THIS page (although I have a feeling you may have seen it already). There's a pic a little more than halfway down that shows the wire they tapped from the harness by the red 'battery' box by the alternator. I'm pasting here for reference:
lighter


The issue I have is with the color description (schematic vs. their writeup) -- GM's 'dark green' is more like 'forest green', IMO. I also don't see any white stripe on this wire, but that doesn't necessarily mean it doesn't have one.

Thankfully, they describe the differences between the correct / incorrect wire, with +12v applied. Take a look and see if that doesn't get you closer to the solution.

(2nd edit): If you purchased the Nelson harness (and selected the 99-02 option), they may be able to help. Their installation instructions online (that I have a copy of) are specifically for the '03-up, but I'll guess that if they're selling different harnesses at the MY break, they'll know the best way to hook up the older one. Note that the guy there can be a bit mercurial, so if you reach out, it's better if you're an 'existing' customer, vs. a 'potential' one (just my observation, not from personal experience). If you've already ordered, and are pending shipment, they may (?) include instructions in the package. I can't remember whether my harness came with printed instructions, TBH.
 
Last edited:

SpitShine_PL

Original poster
Member
May 26, 2023
34
Poznan, Poland
Thank you!
Yes, I read the page you linked - it was actually one of the first I studied when I began researching this mod.
It's kinda iffing me out they didn't pinpoint which wire specifically provides the A/C clutch power from the power relay that lives the UEC, but I believe there's a workaround. (Tho the idea of pinpointing with a multimeter is pretty neat).
Instead of going for the harness next to the red battery positive terminal box, someone simply opened the UEC cover and accessed the relay/fuse base panel underside. By locating the A/C compressor clutch relay in the UEC, you just flip the relay/fuse base panel over and look at the wiring coming out from the sector occupied by the relay, referring to the relay pinout. The power wire for the A/C clutch that comes out from the relay base there is dark green (or forest green, if you like), and carries the 'heavy amps' to engage the clutch.
I've seen some other writeups and as far as the year 2002 units are concerned, the dark green/white stripe wire is the trigger voltage input for the A/C clutch relay; I don't think it makes sense using that, as the amps might be too low to drive the e-fan harness relays.
Tapping into the wire right in the UEC also seems to be more neat and safer, at least for me. I hate wire taps, they cause problems over the years, even if confined to the cabin (it doesn't protect from issues like humidity from wet carpet, some rain getting in through an open door/window, or snow brought in on the shoes). I don't know if the wire tap provided with the Nelson harness is weather-sealed, my guess it's not. Anything that goes extra in terms of wiring or splices under my hood deserves a marine heat shrink sleeve, period! :wink:

One more thing... My Burb has a stock 130 amp alternator. Some say it will be enough, others say nah. Switching it out for a 145 amp unit is not a big deal, but I wonder if the alternator wiring should be replaced along with it in favor of a thicker gauge?
 

Reprise

Lifetime VIP Donor
Supporting Donor
Member
Jul 22, 2015
2,724
One more thing... My Burb has a stock 130 amp alternator. Some say it will be enough, others say nah. Switching it out for a 145 amp unit is not a big deal, but I wonder if the alternator wiring should be replaced along with it in favor of a thicker gauge?
Well, you could always do (part of) a 'big 3' upgrade, like the bassheads do here in N. America. Less resistance never hurts, I suppose. But I'd leave it, at least to start.

My truck spec'd a 145A, and when I had the Chinese harness in, it *sucked* down the juice... you could actually see the dash gauge move appreciably when both fans ran on 'high' (which was a lot more of the time than they were supposed to). With the Nelson harness, it's more of a rare event that they both run 'high'. Above 45 mph (60-ish KPH ?), they shouldn't need to run at all under most conditions.

Because I expect to put more load on the alternator down the line (winch, 2nd battery), I upgraded my alternator to a 220A (the existing was a reman that someone else had in there when I got the truck). But unless you're planning on bigger electrical load, 145A should be fine, I would think. Run the 130A for now, and like you said... it's child's play to swap it out on the V8-equipped 800s.
 

SpitShine_PL

Original poster
Member
May 26, 2023
34
Poznan, Poland
Indeed, tho I think it was kinda easier on my Grandma Keith, the access to the alternator on the Modular does not require removing the resonator/intake tube, but that's only a minor inconvenience.
I love how the accessories are laid out on most American V8s!
 

SpitShine_PL

Original poster
Member
May 26, 2023
34
Poznan, Poland
PS. The Nelson harness was delivered today. Yes, it comes with printed instructions on a piece of A4 paper. They even specify the temp settings, both for stock and 180 F t-stats, which is nice.
 

SpitShine_PL

Original poster
Member
May 26, 2023
34
Poznan, Poland
After a long hiatus, I'm back on track with the e-fan mod.
The Nelson harness and 2007 fans have been acquired.
The PCM is readable wih HP Tuners and accepts the new settings file. Before I commit the 'first-final' settings... Well, yeah, I'm not sure about what is correct for some of the Fan tab parameters in HPT.

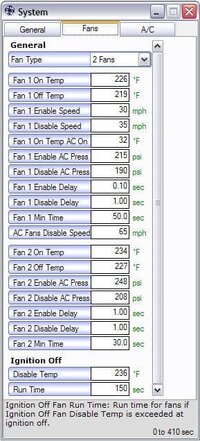
@Reprise posted his conservative settings in his e-fan thread, which look like this:
(Yes, I'm aware the settings are different from a '02 PCM, cuz his is a 2003+.)
_1630986467017.png

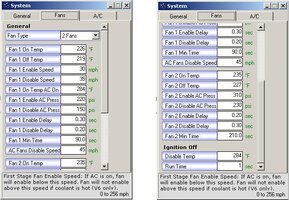
What follows is the HPT settings of the PCM specific to a 2006 GMT with a non-Flexfuel 5.3 V8:
(The display in HPT here is different, as it was read by an older version of the software, but the parameters are here, despite a different layout.)

_2005 fansettings.jpg

While desk-researching the parameters and differences between the manufacture years, I stumbled upon the settings for an almost the same PCM as mine (2002), but they are specific to a '02 Camaro:

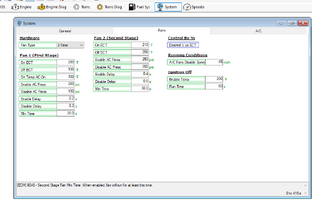
_2002 camaro fansettings_ac4ac010ffae7449d5fd2ca278d7fb1f59f4ba54.jpg

All in all, most settings are very similar; the 2002 Camaro and 2006 GMT settings are bumped up a bit from what @Reprise used in his first tune for the mod.
Temperatures are a non-issue, but I know it's kind of better to go for values that are a tad higher; engines do not like running colder than they should, due to worse mileage and increased wear.

What bothers me - and here's where we're getting to what I need to now - is the differences between the Fan# Enable and Disable Pressure values across these three sets of PCM fan settings. The 2002 Camaro tune was said to work fine on the owner's truck (a 2002 GMT). The 2006 settings I posted here are stock for 2006 5.3 trucks and SUVs.

I just don't know which Enable and Disable AC Pressure values should be applied to my 2002 with dual A/C. Note that the 2002 doesn't use the 3-wire A/C pressure sensor that came with 2003+ models.
It's my understanding that without such a pressure sensor, the enable/disable pressure settings have no effect on e-fan operation.
One more thing... The PCM pin #33 is for the recirculation door. It turns out that this pin is empty on some 2002 PCMs, but not all of them, and I will know if it's there on my truck once I pull the connector apart. Now, some people claim that Fan #2 should not be controlled by tapping into the A/C compressor clutch +12V line, as the fan would come on and off with the A/C compressor. This is supposedly 'bad' to the electrical system of the car.
Supposing that pin #33 is present on mine, should I try and use it to control Fan #2? I am aware the PCM outputs are 'sinks' (when an output is made, it provides ground to its output signal), this would mean I'd have to connect the Fan #2 relay trigger wire via a separate relay, correct?

[EDIT]:
Found this in the 2002 service manual:
"
The PCM will engage the A/C clutch any time the engine speed is below 5000 RPM and the A/C is requested unless any of the following conditions exist:
Throttle angle is at 100 percent.
The A/C low pressure switch is less than 18 psi (124 kPa) or more than 49 psi (338 kPa).
The A/C high pressure switch pressure is more than 420 psi (2896 kPa).
Engine speed is more than 5500 RPM.
Engine Coolant Temperature (ECT) is more than 250°F (121°C).
The A/C system is protected by 2 pressure switches. The A/C high pressure switch interrupts the A/C request signal when the A/C line pressure exceeds 420 psi (2896 kPa). The A/C low pressure switch interrupts the A/C low pressure switch signal when the A/C line pressure falls below 21-25 psi (145-172 kPa). When the PCM sees an open in either signal, the A/C clutch relay control circuit is no longer grounded, thus shutting off the compressor. The low pressure switch will close when pressure reaches 38-42 psi (262-290 kPa)."

It would seem that the PCM only sees if a pressure sensor passes a signal or breaks it, and responds to a break by breaking the ground to the A/C compressor clutch relay to stop the compressor.
 
Last edited:

Forum Statistics

Threads
23,313
Posts
637,838
Members
18,518
Latest member
bobby2175

Members Online