2004 Trailblazer EXT Road to Recovery

Dieseldog

Original poster
Member
Jul 22, 2020
25
New Mexico
I got my Trailblazer from my girlfriend's dad for free. It was sitting in his backyard with 4 years of dust on it. I asked him what was wrong with it and he said it just lost power one day and it has been sitting there ever since. He said that I could have it he just wanted it out of his yard. I figured I scored big!
Well I'm still trying to get it fixed. After installing the fuel pump I was getting a P0300 a really bad misfire and this is what I've done so far.
Installed a new battery
New fuel pump and filter
New ignition switch
The fuel tank had the broken filler neck so I plastic welded it
6 new coils
New spark plugs
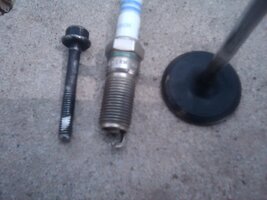
After this I was still having the same misfire. I did a compression test and the #5 cylinder had zero compression. So I went ahead and pulled the valve cover and found what appeared to be a bent intake valve. The rocker had been pushed out and was sitting in the head and the valve was stuck open. So I removed the cylinder head and to my surprise there was a bolt stuck in the valve!!!! 😫🤢🤮
I found out later it was from the throttle body!!
This is where I want to hear what you think about what I have done so far from here.
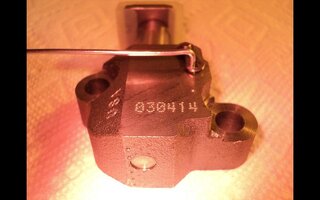
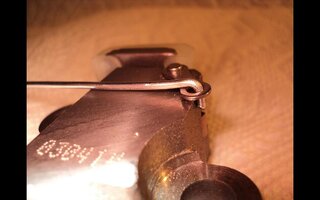
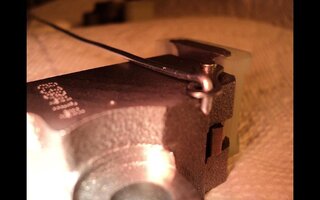
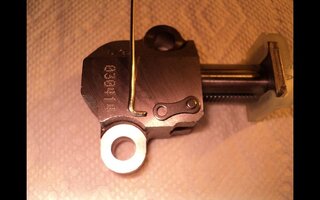
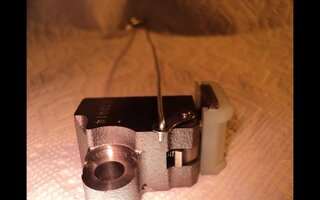
I got a used head from the scrapyard and the cheapest head gasket set with bolts that I could find online. I completely disassembled the head and replaced the valve seals and hand lapped the valves. I didn't use any special tools to hold the timing tensioner I just held the chain tight against the crank so it wouldn't skip a tooth on the bottom and let the tensioner extend out. I don't see any reason to waste time playing with garbage expensive tools that don't even work very well. My tensioner tool is a wire hanger cut in two long pieces I bend a hook on one to grab the plunger and pull it in and I bend a tiny bit of the end of the other to grab the tensioner retract arm I used a little flashlight to see into the front cover took a total of 4 minutes to retract the plunger then my girl held the plunger with the wire while I put the chain guide and the sprockets on. After getting the chain right I just gave the wire a little yank and it came out and the tensioner extended. I did push it out a little to make sure it was tight against the chain. I got everything reinstalled and started it and she RUNS!!! No more misfire lol
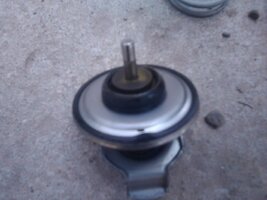
So now I was getting a cam correlation code. I had already replaced the actuator and sensor but the code staying coming back. I was already going to buy a new cam phaser when I figured I would just check the actuator one more time and guess what?? Plugged screens!! I think it was the Seafoam treatment. The bottom end of the engine is very sludged up from using conventional oil so I Seafoamed the crankcase before I changed the oil. I think it loosened up a whole lot of crap and it found its way to the actuator. Well I no longer have the pending cam code but I still have the stored cam code but I think it will go away after the cold start tomorrow we will see. My current issue is 9 MPG!!
My fuel trims are really high especially LTFT. It will get around 21% at cruising
1800 rpm. I'm leaning towards thermostat but the temp gauge reads fine needle straight up after warm-up but I'm thinking the sensor is probably bad too. Am I going in the right direction here or is there something else I should be checking as well? I believe the VVT is functioning properly now because there is a huge difference in bottom end power and when I floor it it doesn't make the weird roaring/bogging sounds like before. Also the pending code is gone and has been for 2 cold starts.
I have pics and I'll post them in a few.
 
  • Like
Reactions: Mektek

Reprise

Lifetime VIP Donor
Supporting Donor
Member
Jul 22, 2015
2,724
Welcome! Took you a little while for you to make your first post! :biggrin:

I'm going to only make a couple of quick comments here, because I have the V8, not the I6. And I think you've done pretty well, up to this point, btw.

Anyway... you probably are aware of this, since you're talking LTFT, but... make sure you eliminate the possibility of a vacuum leak (perhaps from a worn intake gasket, etc.)

Re: 9mpg... I think most of the I6 guys see about 15-17 or so, in mixed driving. The I6 isn't a fuel economy champ (neither is the V8, but that's kind of expected). So... there's some mpg to gain, but don't expect to break out of the teens, unless you're on a long highway trip, etc.

I'll stop here, and let some of the members who are more expert with the I6 take a stab at your issues / questions. And if they contradict anything I've said above... better to listen to them :bonk:
 

Chemman

Member
Jul 13, 2013
35
Maryland
I don't remember if we ever discussed lazy oxygen sensors over on the other board. Since the TrailBlazer sat for so long, it might be worth it to replace both oxygen sensors with a couple of Denso or ACDelco sensors. They are quite reasonably priced on rockauto.com.

And while you are waiting for the oxygen sensors to arrive, you can use a can of spray carb cleaner to look for vacuum leaks as Reprise suggested. I would also inspect the air inlet tubing to make sure it's not cracked or hasn't been used as a teething toy for those pesky mice. Also, be sure and check the vacuum hose that goes to the power brake booster to make sure it hasn't cracked.

Good luck!
 
  • Like
Reactions: Mooseman

Dieseldog

Original poster
Member
Jul 22, 2020
25
New Mexico
I can see why you would be leaning towards the O2 sensors but on the live data stream the upstream sensor seems to oscillate properly but with 208k I'm sure it is a good idea to replace them. Same thing kinda happened with the CPAS. It was new and I didn't think it could have been the issue but the screens were already clogged!! I wouldn't have checked it again if TJBaker didn't mention something about it. So I will take your advice and get the O2 sensors. I didn't realize that my scanner reads the coolant temperature in the live data stream so I will be checking that tomorrow.
 

Mooseman

Moderator
Dec 4, 2011
25,344
Ottawa, ON
Good work on this basket case. It's certainly on its way to being rehabilitated and back on the road.

A couple more things to check. Do an exhaust backpressure check. Since it operated with a misfire, there is no way of knowing how long it was driven like this and may have clogged the cat.

The SAIS valve may be leaking air into the exhaust, making the O2 sensor think it's running lean. Make or grab a block off plate for it and remove the valve. You'll get codes for it but you know what it's for. Check your trims. Either way, it's recommend to delete this system as it will eventually fail and become a costly repair.
Removing Secondary Air Injection System
SAIS gasket (Reasons to delete SAIS and tune)
Air Check Valve delete parts: GM 2574378 & GM 24577193 ...

Oh, BTW, replace only the upstream O2 sensor. The rear one is only to tell the PCM that the cat is working properly or not and does nothing for engine operation.
 

budwich

Member
Jun 16, 2013
2,048
kanata
I can see why you would be leaning towards the O2 sensors but on the live data stream the upstream sensor seems to oscillate properly but with 208k I'm sure it is a good idea to replace them. Same thing kinda happened with the CPAS. It was new and I didn't think it could have been the issue but the screens were already clogged!! I wouldn't have checked it again if TJBaker didn't mention something about it. So I will take your advice and get the O2 sensors. I didn't realize that my scanner reads the coolant temperature in the live data stream so I will be checking that tomorrow.
you got a data reader... so look at what your vacuum reading is saying at idle and at "constant medium rpm". Go from those results. Check a few other datas also, incoming air temp. Since I don't think a 2004 has a MAF, "most" of the "run calc" is done based on MAP and o2 sensors. My guess would be that the MAP sensor is "frozen" by lack of use. Again, the vacuum data will likely tell you that and more.
 
  • Like
Reactions: Mooseman

Dieseldog

Original poster
Member
Jul 22, 2020
25
New Mexico
The engine had been replaced before I got it and it doesn't have the SAIS so one less thing to worry about. I am installing a new thermostat today in hopes of getting my fuel trims down.
I had the AC vacuumed and leak tested but when I charged the system it would only take 24 ounces of refrigerant and it has the rear AC. It's cold but I can't figure out why it didn't take the whole amount required.
 

Mooseman

Moderator
Dec 4, 2011
25,344
Ottawa, ON
I had the AC vacuumed and leak tested but when I charged the system it would only take 24 ounces of refrigerant and it has the rear AC. It's cold but I can't figure out why it didn't take the whole amount required.

Is it possible that the rear lines were blocked off? Are the rear lines cold?

If you're not getting any codes for the missing SAIS, it has likely been tuned.
 

Mektek

Member
May 2, 2017
656
FL
Congratulations on replacing the head - that is an epic job on the I6 that few would undertake. And a helpful girlfriend - that's like finding a unicorn:Lager Louts:
And it runs - awesome!!!

I would second checking the exhaust backpressure. Often people keep using a badly running vehicle as long as it still moves and in your case dumping the raw fuel from the dead cylinder will cause catalytic converter damage after extended running.
 

Dieseldog

Original poster
Member
Jul 22, 2020
25
New Mexico
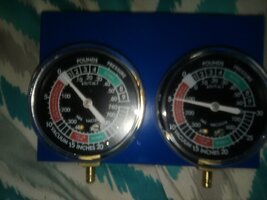
The cat is my next task. I'm planning on using a vacuum gauge that is used for syncing motorcycle carburetors it can read positive pressure as well up to 9 psi do you think this is sufficient? The thermostat was an issue and the temp sensor has to be bad too cause it was showing the temperature as correct so I ran out and got a new one. The thermostat had a bad seal. The AC is a mystery 😱 the rear AC works fine as well the only thing I found on the rear AC is if you want the air to come from the overhead vents you have to set the fan to #1 and wait until the air starts blowing from the vents then you can turn it up. I think its a weak actuator.
The really strange thing is the high and low pressures are good. 47 psi low 276 psi high 88° was the ambient temperature. With the rear AC is there a specific way to charge the system? Can refrigerant get stuck somehow in the rear system? I ran the vacuum for about 2 hours and let it sit for another hour and the vacuum held at 26 inches of me15998493166515810241851697529774.jpg15998493687697361078866288683849.jpg159984945475216475388855145144.jpgrcury.
 

Mooseman

Moderator
Dec 4, 2011
25,344
Ottawa, ON
Filling the A/C is the same for both. If filling with the can upright, it can take quite a while for it to get into the system, especially if the can becomes cold and may seem like it's not getting in. If you are certain about the amount that you put in there, you can speed it up a bit by tipping the can upside down to get the liquid gas in. I usually tip it for a second or two and then return it upright while the pressures re-stabilize and repeat until the desired weight of refrigerant is in. I do this to prevent liquid refrigerant from entering the compressor, called slugging.
 

Dieseldog

Original poster
Member
Jul 22, 2020
25
New Mexico
I didn't tip the can cause I was worried about liquid refrigerant grenading the compressor lol 😬
It took about 15 minutes to get 20 ounces in then I added a can of PAG that had 4 ounces of refrigerant in it as well. I didn't add any more cause of my pressure readings but now that I'm thinking about it this system is big and it probably takes a few ounces to raise the psi just one point right?? I probably won't have a chance really put it to the test until next summer 😣
Do you think my vacuum gauge idea will work to check my exhaust back-pressure? It does measure positive pressure up to 9 psi?
What is the procedure for shifting into 4lo? I know I must be doing something wrong cause it won't go into 4lo and I don't have any 4x4 codes
 

mrrsm

Lifetime VIP Donor
Supporting Donor
Member
Oct 22, 2015
7,731
Tampa Bay Area
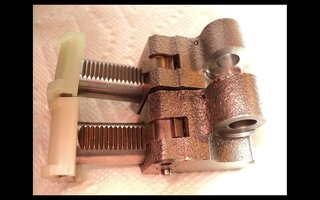
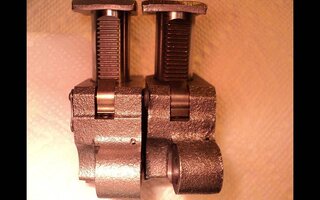
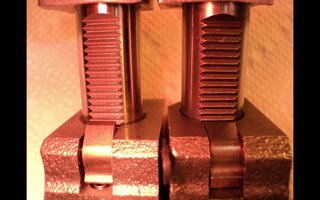
Regarding your extraordinary success with re-compressing the Timing Chain Tensioner... It would be very helpful for us all to know precisely how you managed to do that within that very narrow work space at the front upper area of the GM 4.2L Engine. Having attempted this myself, I never imagined using Two Wire Tools to get the job done... and definitely not under four minutes.

To help you better illustrate what went on uniquely with your repair... I've attached enough images of a Brand New Timing Chain Tensioner for you to choose from to "doctor up" graphically and hopefully, post back here in your Thread to show us your remarkable tool use in this case. Especially the part about how you managed to use a Second Tool when working to free up the Locking Pawl on the Ratchet area on the bottom of the Tensioner Plunger as well as the Latch on the side of the unit . TIA.

43101813594_799267002d_c.jpg43101814144_bba518525b_c.jpg43101814254_6ab4f4b127_c.jpg43101814564_bc70684ab6_c.jpg43101814654_480ef8468f_c.jpg43101814724_4f88ffeff3_c.jpg43101814894_774b0894b2_c.jpg43101814834_4706bd85ac_c.jpg
 

Dieseldog

Original poster
Member
Jul 22, 2020
25
New Mexico
MRRSM Ok I'll come clean on the tensioner 😳 I watched quite a few videos on replacing the head before I even attempted to remove it. I did have everything else disassembled up to the valve cover. In the oldest video I watched the guy used all the GM recommended tools but still ended up with the tensioner extending. He kinda did the same thing. He used a wire hanger to hook the plunger release and pushed it back in with a long screwdriver. He didn't show any of it and that's basically what he said he did. I did the same thing except I made another wire that hooks around the plunger and holds it in place after I pushed it back in with a long screwdriver. I'll do a step by step.

1. Set the engine to #1 TDC on the compression stroke.
2. Mark the spots on the sprockets and the same spots on the chain with a paint marker. Or just turn the engine until the dark chain links match up with the sprocket spots. I also marked the crankshaft position on the front cover.
3. I used some mechanics wire and a turnbuckle to tie the chain to the hood.
4. I got a ratchet strap to raise the head enough for me to reach under and tie the chain to the sides of the engine compartment. After this I just tied the chain to the AC line making sure it couldn't go slack.
Reassembly
1. Get a wire hanger and make two long pieces. One with a little hook for the plunger release and one with a larger hook for the plunger.
2. Get a helper and the wire tools also get a long screwdriver I used a tire iron cause I don't have a long enough screwdriver.
3. Before installing the head I got the little hook and a flashlight and hooked the tensioner release. I think luck was on my side here cause it stayed there and didn't fall off while I installed the head.
4. After the head has been torqued I got the other wire and my girlfriend and I hooked the plunger and had her hold the wire. Then I got the tire iron and stuck it down to the plunger pulled up on the release and pushed the plunger in with the iron. My helper then held the plunger in with the wire tool.
5. I got the chain tensioner guide and slid it down to its position and bolted it in.
6. While my helper continued to hold the plunger in I installed the timing sprockets.
7. After matching up the marks on the sprockets and chain and making sure TDC was still being held I gave the wire tool a little yank and the plunger extended tightening up the chain slack. I did give it a little push to make sure it was tight.
8. I turned the engine 6 times so 3 full cycles to make sure the timing was correct.

4 minutes is just the time I took to reset the plunger. I guess I exaggerated lol
 
Last edited:
  • Like
Reactions: Mooseman and mrrsm

TJBaker57

Member
Aug 16, 2015
2,900
Colorado
  • Like
Reactions: mrrsm

Dieseldog

Original poster
Member
Jul 22, 2020
25
New Mexico
TJBaker57 I finally found where the cool kids hang lol 😁 Does that scanner have the ability to manipulate components? I paid like 80 bucks for mine and I really wish I had spent a little more and got a better one. Mine can probably do more than I know but I haven't downloaded the app so it will connect to my phone. Thank you all for helping me with my dumb questions and the issues with my Trailblazer!!!
 

Dieseldog

Original poster
Member
Jul 22, 2020
25
New Mexico
I'm trying to figure out how I can make a bung to connect my gauge to the O2 sensor port. The gauge has a 1/4" fitting. If I had a wine cork I would be golden!! Any suggestions??
 

Dieseldog

Original poster
Member
Jul 22, 2020
25
New Mexico
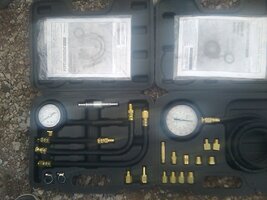
I completely forgot that I had these test tools!! I was searching around for something I could use when I found these-15998655211971628645952956467133.jpg


None of the fittings are big enough but the actual gauge is probably better than my syncing gauges
 

Mooseman

Moderator
Dec 4, 2011
25,344
Ottawa, ON
It's basically the same thread as a spark plug so if you have a compression tester that has detachable fittings, that would work.

Edit: Posted at the same time. Looks like you're good to go.
 

Dieseldog

Original poster
Member
Jul 22, 2020
25
New Mexico
I wish one was a compression tester 😁
One is a oil pressure tester and the other is a fuel pressure tester. The largest fitting is a little too small but just so I can get some sort of idea on the health of my Cat I'm going to wrap the largest fitting in some tape and see if I can get a seal. I'll spray a little soapy water to see if it is sealed
 

Dieseldog

Original poster
Member
Jul 22, 2020
25
New Mexico
I got the fitting to seal and when I started the vehicle I watched the gauge needle barely come off the stop. So there is some back pressure but I don't think it's enough to condemn the cat just yet. I'm still going to take it to the exhaust shop for a real test. So now I'm going cruising!!! Hopefully my fuel trims will even out now that the thermostat is able to fully seal and get the engine up to temp.
 

mrrsm

Lifetime VIP Donor
Supporting Donor
Member
Oct 22, 2015
7,731
Tampa Bay Area
Have you got one of THESE Wireless Smart Phone Camera Probes to carefully poke down through the Exhaust Manifold Upstream O2 Sensor Port when the Engine Block is Ice Cold?

Then you could approach the CAT Ceramic Honeycomb Blocks and see what things look like (Fractured and Obstructive to the Flow of the Exhaust Gas Stream?) ...Up Close...and Personal...and in MANY other areas you have yet to work on that it could also prove Helpful.

With this thing being capable of using a Magnetic Attachment... It certainly would have come in Handy for the 'Drowsy Bloke' who dropped that Throttle Body Bolt right down through the Intake Manifold & do So Much Mischief inside the Engine Head.


DEPSTECHCELLPHONECAMERA.jpg


Last edited:

Dieseldog

Original poster
Member
Jul 22, 2020
25
New Mexico
Yes I actually do have one but my girlfriend dropped my phone in a river and I haven't got another one that has the OTG that the borescope needs.
 

Dieseldog

Original poster
Member
Jul 22, 2020
25
New Mexico
So I think putting Seafoam in the crankcase was a bad idea. I've had to pull the cam actuator three times. Once to replace it and two more times to clean the sludge out of it. I've changed the oil again and cleaned the actuator again. We will see if the sludge continues to clog it up. I also had the left front wheel hub start grinding so I replaced both hubs yesterday. I was prepared for a hard job but to my surprise it was pretty easy. Took about an hour to finish. Another thing I need to check is my plastic welded fuel neck. I got a CEL code for a large evap leak and the only thing I think it could be is the neck. But I hope not. I'm hoping it's a loose line or something. Other than that my MPG is great now and it has a smooth quiet ride now.
 

Forum Statistics

Threads
23,330
Posts
637,976
Members
18,531
Latest member
MEHMET ONUR

Members Online