2004 Rainier Broken Disconnect Housing

bootlegend

Original poster
Member
Oct 20, 2014
14
My wife complained of a whining noise while driving. I drove the car in circles and the noise increased when turning left and disappeared when turning right. Sounded like a wheel bearing but there was no play whatsoever in the wheel. After doing some reading on the other forum (by the way, I'm really glad The-Roadie posted the link to this new forum in that Pittman arm puller photo that I stumbled across), I suspected the axle disconnect on the passenger side. I was able to get the half axle out pretty easily (the inboard end did look "burned" and worn. The disconnect appeared to be coming out without much trouble. I was using a small chisel and wedging it between the disconnect housing and the oil pan housing and tapping it with a hammer. Long story short, the housing broke and left the "neck" portion stuck in the opening.

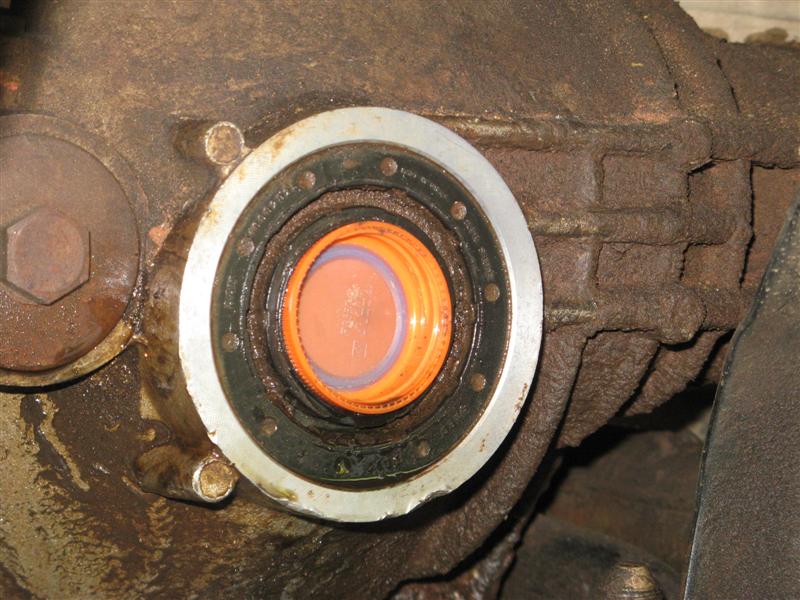
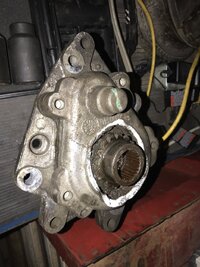
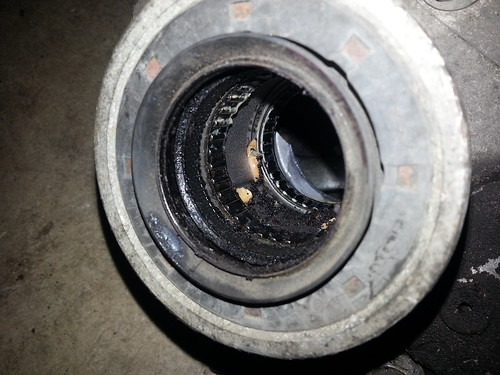
Axle pulled, and I can see some worn bits or dried up grease already.
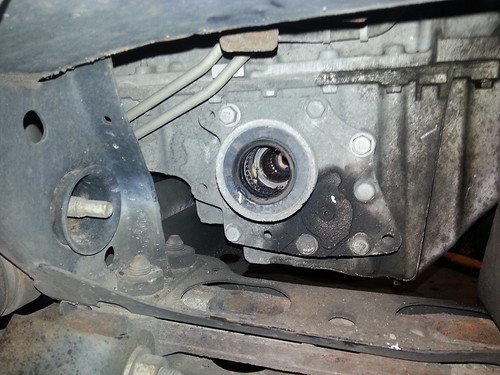
Before


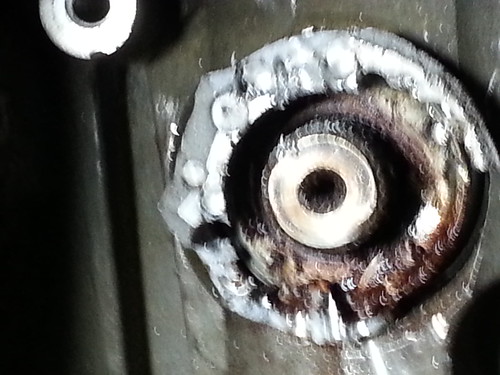
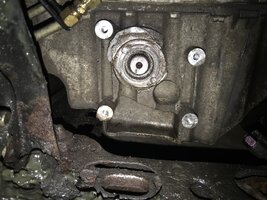
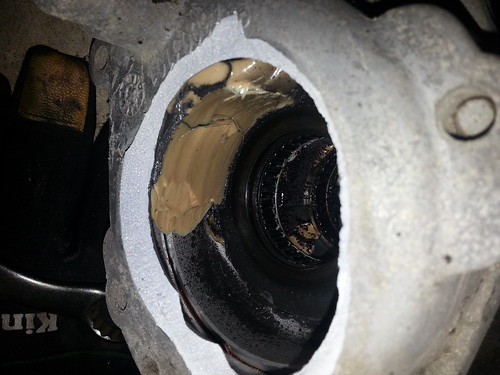
After the disconnect is off. Looks even worse.
20141011_193731


20141011_193749

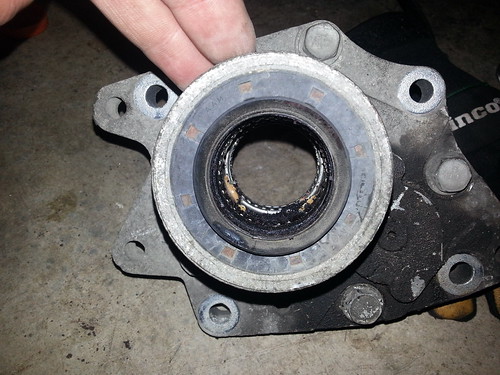
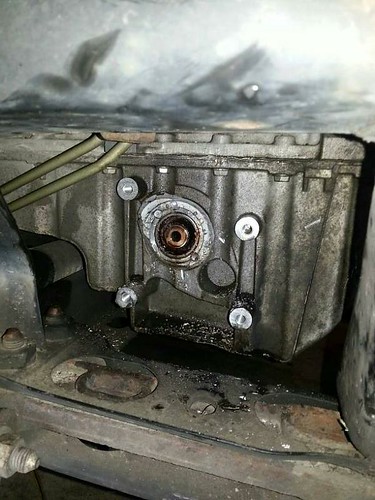
Broken housing backside. I wouldn't expect the grease to be collected in one spot. Any opinions on that?

20141011_193710


20141011_193811


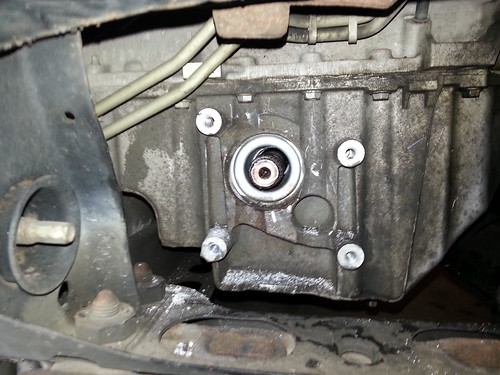
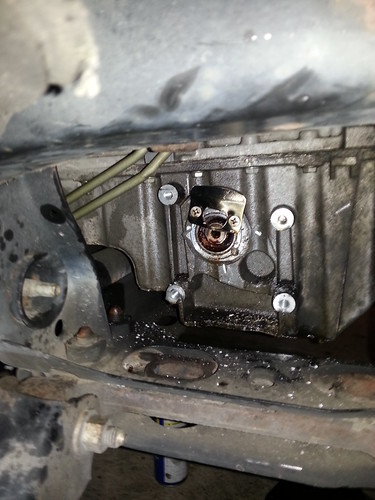
I tried to tap some holes and put some bolts in to get a little something to pull on. There is basically no lip of the flange left to pull on. I tried two different pullers that I rented from Advance. No luck. Obviosly I tried using a screwdriver, crow bar, steel punch, etc. and hammering it away from the oil pan from below, but there's nothing to get a "bite" on.
1413126011284 333

Thought for sure I had it when I tapped two bolt holes and spanned it with some scrap parts. I then rented a slide hammer from advance and was able to get a lot of power in the slide, but this thing didn't budge. I've been using PB Blaster too all along.
20141012_130206


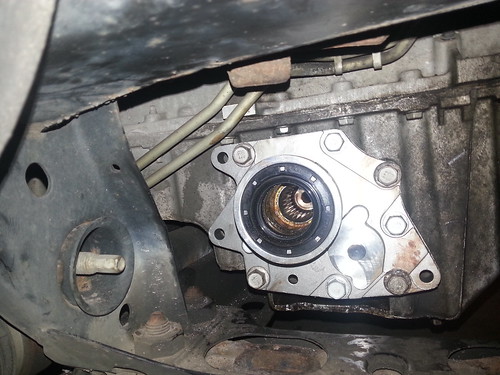
So that is where I am with it. I had drive the vehicle in the meantime until I figure out a way to get this out. I pulled the front driveshaft and the passenger side axle is out (I need to replace that when I get the disconnect fixed). Am I correct in thinking that the center piece of the axle wont be spinning? If front wheels aren't engaged, shouldn't it be disconnected at the differential? I admit I may be in over my head here.
 

Sparky

Member
Dec 4, 2011
12,927
Best way to get that out is to drill a bunch of holes in the broken housing to break it up. Just don't drill too deep as you don't want to drill into the oil pan itself. But drilling the broken housing weakens it and after a few holes it will be able to be broken apart.

What you did was a good idea for 4WD models, not sure how the transfer case on the AWD handles no front driveshaft.
 
  • Like
Reactions: bootlegend

bootlegend

Original poster
Member
Oct 20, 2014
14
Thanks for the reply, Sparky. I'm probably going to give that a try next. But like you warned, I was afraid of drilling to deep.

I have driven the vehicle a few miles and it seems fine, but I did have a vibration at about 65 mph that disappeared below or above that speed. I know the struts are shot and I'm inclined to blame the vibration on that.

I hope to get all this fixed correctly. I don't know how to check the differential internally, but I drained the fluid and it looked fine with no dirt or metal in it. Also, the workings that I could observe inside it looked fine while i turned the wheel.
 

SirRobin53

Member
Apr 27, 2014
118
Great idea. Can you load the puller and lightly tap instead of using hard slams? I used a ratchet strap to load mine then a light tap and it fell off. Because the striker plate is off center, I think a good load on the puller would help to keep the forces in a straighter line and not cock it sideways binding it up. Look at a new one and note how the end snaps in the oil pan housing. It may be hard to break up without damage to the pan.
If The Roadie sneaks by and would post his breakdown of the housing, perhaps an inside puller would work unless the axle shaft is in the way.
I keep going back looking at where the holes are tapped and wonder if there is enough metal to tap without going into the boss in the pan... I'll go pull my old housing and have a look.
 

bootlegend

Original poster
Member
Oct 20, 2014
14
SirRobin53 said:
Great idea. Can you load the puller and lightly tap instead of using hard slams? I used a ratchet strap to load mine then a light tap and it fell off. Because the striker plate is off center, I think a good load on the puller would help to keep the forces in a straighter line and not cock it sideways binding it up.
I started out with smaller taps and progressed to pretty heavy blows. The only piece of scrap that I could find was the door strike plate and the hole spacing didn't allow me to get it centered on the shaft. I may give it another shot, but just drilling it out is sounding just as easy at this point.

The old fluid was dark brown. I guess at one point it could have been either blue or red, but I wasn't really paying attention to that. Just expected to see metal shavings or grit and it had none of that. I replaced it with whatever Advance carried. I think it was clear rather than red or blue.
 

Sparky

Member
Dec 4, 2011
12,927
I chickened out on mine when it broke off and took it to a shop, but all they did was drill several holes near each other (and not all the way through because they didn't want to drill the pan) and it broke free pretty quickly. The idea is you weaken one spot so it can collapse a bit on itself there, which then makes the whole thing pop out.

Once I saw how easy it was for them I wish I had just done it myself and saved the extra time and money.
 

bootlegend

Original poster
Member
Oct 20, 2014
14
Anyone have a picture of the backside of the unit? I'm wondering how far back the "neck" sticks into the oilpan. I suppose I can drill bits at a time and keep it cleaned out with the shopvac.
 

The_Roadie

Lifetime VIP Donor
Member
Nov 19, 2011
9,957
Portland, OR
Welcome! Been busy....

The definitive article is on our sister site (I'm a founder) offroadtb.com

http://www.offroadtb.com/articles/tech-docs/front-axle-4wd-disconnect/

Not certain it has the pictures you want, but drilling and fragmenting it is the traditional way to deal with a broken collar.

1) The grease was put in there to serve as a "lifetime" lubrication. The designer was an idiot, or under orders to use cheap grease. We all use Mobil1 synthetic, and rebuild them every 50-75K if we depend on the things for offroad performance.

2) A little analysis shows the intermediate shaft (the one through the oil pan) will always spin backwards under your conditions. The driveshaft isn't spinning the differential pinion gear, but the driver's side CV shaft is always connected to the end gear inside the diff. Since the gear carrier is not turning because the ring gear is not turned by the pinion, that means the end gear's rotation is transferred to the spider gears, which end up turning the passenger side end gear BACKWARDS and the intermediate shaft is connected to that end gear. You really shouldn't drive much, and when you take the broken disconnect inner bearing off and the intermediate shaft is loose, you can't drive at all. You also can't remove the intermediate shaft using the threaded hole in its end because then the differential oil will start drooling out the passenger side of the tube cast into the oil pan.

3) Diff oil is reletively clear, but turns an awful dark color soon after changing, and then it acquires a god-awful musty smell that is characteristic of ALL differentials, no matter how well vented, it seems. You never forget the smell of used diff oil.
 
  • Like
Reactions: BHAMER

bootlegend

Original poster
Member
Oct 20, 2014
14
Thanks Roadie. I was afraid of that. Sounds like I need to get the new disconnect in hand and a new passenger side axle before I finish drilling out the old one so that I can replace it immediately.

Is there a cheaper option than this one from Amazon? Although if it isn't a lot of difference I'd rather use Amazon for the two day shipping.
http://www.amazon.com/automotive-111002-Front-Axle-Disconnect/dp/B004QBY4I8/ref=sr_1_1?s=automotive&ie=UTF8&qid=1413909190&sr=1-1&keywords=15200680#productDetails
 

bootlegend

Original poster
Member
Oct 20, 2014
14
Sparky said:
Thanks Sparky. I have it on order. I'll keep you posted.

Also, I'm looking on Rock auto at the half axle assemblies. Searched PN 26079789. They show Cardone prices of $40 to $55. That seems too cheap. Am I missing something or are the axle assemblies really that affordable.
http://www.cardone.com/Products/Product-Detail?productId=601345&p=rock
 

HARDTRAILZ

Moderator
Nov 18, 2011
49,665
They are cheap. I had bad luck with Cardone boots in my use, but Detroit Axle on Ebay or Amazon makes some solid re manufactured ones.
 

Sparky

Member
Dec 4, 2011
12,927
I have those $50 Cardone axle shafts on both sides and no issues with either one. I've not done any major offroading so there really hasn't been anything to tear the boots.
 

bootlegend

Original poster
Member
Oct 20, 2014
14
HARDTRAILZ said:
They are cheap. I had bad luck with Cardone boots in my use, but Detroit Axle on Ebay or Amazon makes some solid re manufactured ones.
Anyone familiar with this brand? I can get these quicker:
http://www.amazon.com/GSP-NCV10248-Constant-Velocity-Assembly/dp/B003CEQGQS/ref=sr_1_4?ie=UTF8&qid=1413912112&sr=8-4&keywords=2004+Buick+Rainier++cv+half+axle

Thanks for the photos SirRobin. Looks like there is a good bit still stuck back in the opening. I like the grease fitting idea too.
 

HARDTRAILZ

Moderator
Nov 18, 2011
49,665
No experience with them. Detroits get to me in 2 days.
 

carshinebob

Member
Jun 13, 2014
153
I would be careful about driving much with one axle removed. I removed both front axles and driveshaft for about 3k miles on my AWD with no problems. Since winter's comming I just recieved my Detroit axles two weeks ago and they shipped very fast. I ordered mine on a Saturday and they arrived next bussiness day, Monday morning. Of course I'm a little closer to Detroit.
It's been a while since I've had as much fun as you're having right now, however keep after it. You'll get it. ~BOB
 

bootlegend

Original poster
Member
Oct 20, 2014
14
Just to be sure, I won't need to grease the new disconnect will I? It will be ready to install out of the box I'm thinking.
 

SirRobin53

Member
Apr 27, 2014
118
When I got mine the unit had grease but I wanted Mobil 1 in it. I removed what I could and refreshed with Mobil 1. This is the recommended lubricant here.....I LIKE Mobil 1
 

bootlegend

Original poster
Member
Oct 20, 2014
14
I'm not going to say it was easy, but I was able to drill the remaining housing out. I used a bit that was just big enough for a metal punch I have and then inserted the punch in the hole and pried/busted little pieces off.

Sorry about the quality of this one. Here's where it finally started breaking up.


Here's one of after removing remaining fragments. I used a shopvac to clean all the drilling shavings up and then cleaned off the end of the intermediate shaft the best I could.


New unit installed. Finally.


So now I need to install the passenger side axle. I was able get the old one out pretty easily and didn't remove the strut assembly. I tried last night to get the new one the same way the old one came out but I don't think it can be done. The Haynes manual says ( I believe) to remove the strut assembly. Is that necessary? What about just lifting the control arm with a floor jack and compressing the spring? Anyone had luck doing it that way?
 
  • Like
Reactions: SirRobin53

HARDTRAILZ

Moderator
Nov 18, 2011
49,665
Try unhooking upper ball joint and moving assembly out of the way a bit
 

Sparky

Member
Dec 4, 2011
12,927
Yeah you don't need to pull the shock assembly out. That's the "official" way but like Kyle said swinging the arm over is enough to squeeze it in there.
 

bootlegend

Original poster
Member
Oct 20, 2014
14
HARDTRAILZ said:
Try unhooking upper ball joint and moving assembly out of the way a bit
That's what I did to get the old one out and that's what I tried. The problem now is there isn't room to push the axle into the disconnect straight on. Looks like I'll need to remove strut assembly or compress the spring in order to get a straight shot to install the axle. It was late last night so I didn't fight with it much. I wanted to save some fun for this evening.
 

bootlegend

Original poster
Member
Oct 20, 2014
14
Sparky said:
Yeah you don't need to pull the shock assembly out. That's the "official" way but like Kyle said swinging the arm over is enough to squeeze it in there.
Well, I couldn't get the axle seated in the disconnect with it kinked. Is it safe to tap on the back of the tripot to drive it in? I was afraid the inner boot would get damaged doing it that way. If I get the inner axle seated then I probably would have enough room.

Thanks for all the quick replies, by the way.
 

SirRobin53

Member
Apr 27, 2014
118
Great job Boot. You accomplished what looks like a #9 on a scale of 10 for difficulty in removing stubborn components. Seems like the axle would be a walk in the park after that.... :smile:
Mine slipped in with just the top link removed.......
 

bootlegend

Original poster
Member
Oct 20, 2014
14
The_Roadie said:
Some CV shafts don't compress at the inner joint enough to sneak it in, but some go in if the steering knuckle is turned all the way.
Dang, Roadie! Now that you mention it I think I did have the wheel turned all the way to the right. when I removed the axle. I know for sure it was straight ahead last night. That might be the ticket.

Thanks!
 
  • Like
Reactions: HARDTRAILZ

bootlegend

Original poster
Member
Oct 20, 2014
14
Thanks for all the help guys. I got the axle in earlier today. Going to be out of town for a long weekend and I'm glad I don't have to come home and work on a vehicle Sunday evening. I did end up having to take the wheel hub off to get the axle in, FWIW.
 
  • Like
Reactions: Mounce

Mooseman

Moderator
Dec 4, 2011
25,323
Ottawa, ON
Maybe a different construction of the aftermarket joints that prevent them from bending as much as the OEM. As long as you got it done, it`s all good :thumbsup:
 

Sparky

Member
Dec 4, 2011
12,927
I was able to get mine positioned to be able to drive it straight in with the knuckle still all there. Still was a pain to get it seated. I had far less trouble popping the old one out than seating the new one.
 

bootlegend

Original poster
Member
Oct 20, 2014
14
Mooseman said:
Maybe a different construction of the aftermarket joints that prevent them from bending as much as the OEM. As long as you got it done, it`s all good :thumbsup:
Might have something to do with that. I honestly didn't fight it very long though before I decided to pull the hub.

Thanks again for all the help.
 

Aec678

Member
Nov 7, 2019
23
Pennsylvania
I'm not going to say it was easy, but I was able to drill the remaining housing out. I used a bit that was just big enough for a metal punch I have and then inserted the punch in the hole and pried/busted little pieces off.

Sorry about the quality of this one. Here's where it finally started breaking up.


Here's one of after removing remaining fragments. I used a shopvac to clean all the drilling shavings up and then cleaned off the end of the intermediate shaft the best I could.


New unit installed. Finally.


So now I need to install the passenger side axle. I was able get the old one out pretty easily and didn't remove the strut assembly. I tried last night to get the new one the same way the old one came out but I don't think it can be done. The Haynes manual says ( I believe) to remove the strut assembly. Is that necessary? What about just lifting the control arm with a floor jack and compressing the spring? Anyone had luck doing it that way?
Having the same problem with my 2004 trailblazer, where did you drill into to get it to break out and how deep? Thanks in advance for any help!
 

Attachments

  • B194DBE0-4C9D-4772-9568-4F4287DFF105.jpeg
    B194DBE0-4C9D-4772-9568-4F4287DFF105.jpeg
    491.8 KB · Views: 11
  • 5ECE7C0C-A241-4984-87F3-F1A30A182815.jpeg
    5ECE7C0C-A241-4984-87F3-F1A30A182815.jpeg
    590 KB · Views: 11

Forum Statistics

Threads
23,314
Posts
637,843
Members
18,519
Latest member
Bigboylove