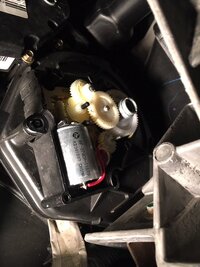
Hello all - I'm attempting to replace the mode actuator in my 2002 Envoy. I've removed the bolt and screws, and at this point the actuator should slide off of the stud that's attached to the mode door, but it will not come off. I can tell the actuator is loose all the way around it, so I know I didn't miss removing a screw. I should be able to lift it straight out, but it is not budging. Does anyone have any tips on how to get it off? I've wiggled it, and I sprayed some lubricant in the hole hoping it would seep down along the sides of the stud, but it still won't budge. I've attached a picture of the actuator with the cover off. Any tips would be appreciated. Thanks.
You are using an out of date browser. It may not display this or other websites correctly.
You should upgrade or use an alternative browser.
You should upgrade or use an alternative browser.
2002 Envoy - Can't remove mode actuator
- Thread starter stoman23
- Start date
I resorted to constructing a puller that pushed/pulled the thing off on my 02.


Thanks for the reply TJBaker57. Your puller/pusher is very clever. I'm not sure I'll be able to make one though, but I think I'll give it a try. I'm really surprised that the stud on the door is stuck in the actuator this much. I replaced the blend door actuator before I attempted to replace the mode actuator, and it slipped right off of the stud. I will proceed with caution because I really don't want to break the stud off of the door.
They can get metal bonded together. It's kinda odd to have it happen inside the dash, but it does happen.
Thanks TollKeeper - I think I'll try to gently wiggle it some more, and keep doing that to see if it breaks loose.
TJBaker57, if I can't get it loose would you be willing to lend me your puller/pusher? I can pay for shipping both ways, and give you something extra for your kindness (and ability to actually make a cool tool like that).
TJBaker57, if I can't get it loose would you be willing to lend me your puller/pusher? I can pay for shipping both ways, and give you something extra for your kindness (and ability to actually make a cool tool like that).
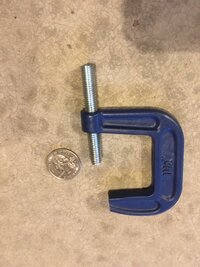
Well, I've tried to make my own tool, and also tried to use a couple of different beam clamps. My own tool was a failure, and the beam clamps were close, but I'm not able to get the clamp in far enough to line up with the hole on the top of the actuator that the bolt would screw into.
TJBaker57, would you be willing to rent me your cool tool? I'll pay for shipping both ways.
TJBaker57, would you be willing to rent me your cool tool? I'll pay for shipping both ways.
Where you at? I can send you either the first one I made or maybe even an improved one! This first one is a little deeper than it needed to be. In my youth I rode a British motorcycle (Norton Commando) across the country a few times. You learn to be resourceful doing that! Send me your address by Direct Message.Well, I've tried to make my own tool, and also tried to use a couple of different beam clamps. My own tool was a failure, and the beam clamps were close, but I'm not able to get the clamp in far enough to line up with the hole on the top of the actuator that the bolt would screw into.
TJBaker57, would you be willing to rent me your cool tool? I'll pay for shipping both ways.
Ditto for the puller being needed. If you have an 02 and the actuator has never been removed, it is likely solidly stuck to the door shaft. Don't try to just pull harder, you risk breaking off the shaft.
When you reinstall it use some silicon lube on the shaft to keep it from sticking again.
When you reinstall it use some silicon lube on the shaft to keep it from sticking again.
linneje
Member
- Apr 26, 2012
- 404
Good advice here. Had the same thing happen to me. Tried many different ways to loosen it, but wiggled with too much force and broke the shaft off. Fortunately, there was just enough of a stub at the bottom to engage the new actuator. But you do not want to break that shaft.
I just made another puller, same concept as before but a little better fit than the previous one. It snowed this morning and I had nothing else going on and I like making stuff 😉. Took a little over an hour, I have a little metalworking experience. @stoman23 , seriously, if you need it, send me a message.


TJBaker57, sorry for the late reply. Had other things come up, and before I saw your reply, I attempted to make one more attempt at it. I found a small C-clamp in my toolbox, took a best guess at where I should cut the end off of it, took a hack saw to it and made the cut. It felt like it fit when I slipped it over the actuator, but the screw was too long. Hacked some of it off, and low and behold, it worked. I had to screw it down very hard, but it eventually popped off. So thank you for your offer. I would have definitely taken you up on it if my last ditch attempt failed.
I now have another issue though, but I think I'll start another thread if I can't figure it out myself. I still don't have heat on my feat, even with the new actuator. I removed the actuator (it was much easier to remove this time since I had just put it on), and moved the door manually, but the heat never blows down low. I'm thinking maybe something is blocking it, but I'm not sure. I'm going to take a closer look at it this weekend.
Thanks again.
Attachments
While the actuator is out, plug it in, and turn on the key. It should move as it determines where it is in space.
Mooseman
Moderator
While the actuator is out, plug it in, and turn on the key. It should move as it determines where it is in space.
It's advisable to NOT do this as it would make it move to it's extreme ends of travel and possibly destroy it. It has to recalibrate while it's installed.
No risk of damage to the actuator by operating it outside. There are mechanical stops that prevent it from rotating it beyond the maximum operating positions.
But any new actuator has to go through the recalibration procedure after install so it operates at the mechanical stops of the mode door, which are different from the stops on the actuator.
The risk is that the remaining old actuators could fail when being recalibrated due to brittle plastic gears
But any new actuator has to go through the recalibration procedure after install so it operates at the mechanical stops of the mode door, which are different from the stops on the actuator.
The risk is that the remaining old actuators could fail when being recalibrated due to brittle plastic gears
There are mechanical stops that prevent it from rotating it beyond the maximum operating positions.
Here's a look at those stops...

And here is an example of old plastic gearing beginning to fail...

Yep, I did the calibration twice, and that had no effect. The second time I did it, I got on the floor and was able to see the actuator rotate, so I'm confident that the actuator is working. That's when I got the idea of removing the actuator and manually move the door to difference spots to see if one of those spots would cause the air to blow down low.
I didn't consider that if the defrost actuator isn't working correctly, the air that's suppose to go to the floor could go up high. It looks like the defrost actuator and the temp actuator are the same parts. I have an extra temp actuator (long story), so I just may try to replace the defrost actuator and see what happens.
That's for the tip on the silicon lube, I'm going to do that once I install the mode actuator permanently.
I'm going to work on this this afternoon. I'll let you guys know how it goes.
This Video from ACDelco demonstrates another EZ way to Bench Test and Re-Calibrate ANY Model of the ACDelco OEM HVAC Actuators. Any manual efforts to move or re-adjust the Internal Plastic Gears are likely to Damage or Break them:
Last edited:
Maverick6587
Member
@TJBaker57 Would you be able to trace that puller with a pencil on a lined piece of paper and post that here?
I would love to have a crack at making one of those. Also, what is the bolt size that you used and thickness of that sheet of metal?
I would love to have a crack at making one of those. Also, what is the bolt size that you used and thickness of that sheet of metal?
@TJBaker57 Would you be able to trace that puller with a pencil on a lined piece of paper and post that here?
I would love to have a crack at making one of those. Also, what is the bolt size that you used and thickness of that sheet of metal?
As with many of my endeavors I take a bunch of pictures detailing the steps involved. I'll see about putting together something. I'll need to take some measurements as I built this last one to fit an actuator, not from any measurements.
Sorry for the very late reply guys. I tried to manually adjust the actuator before I saw the post by MRRSM, and broke it. I moved onto other things, and went through the Minnesota winter without heat on my feet. There were a couple of days where I wish I would have stuck with it and replaced it, but overall it wasn't that bad.
I'm actually going to retire the rig shortly. It's got 365,000 on it, and it's starting to have other problems. The front end is getting 'loose', and the 4 wheel drive is out. Also needs a new upstream O2 sensor, but I can't remove the old one easily. Had my mechanic look at it, and he thinks it's likely he'll strip the threads. It's the original O2 sensor, so it's been in there for 18 years.
It's been a great rig. I'm not sure what I'll replace it with yet. Thanks for your help, this is a great forum.