“Taking Advantage” Of A Vintage Snap-On Vantage Diagnostic Tool

mrrsm

Original poster
Lifetime VIP Donor
Supporting Donor
Member
Oct 22, 2015
7,714
Tampa Bay Area
Taking Advantage” Of A Vintage Snap-On Vantage Diagnostic Tool:

The Snap-on Diagnostics Vantage v5.0 Power Graphing Meter MT2400 w/ KV Module


In many of Paul “Scanner” Danner along with his Brother James and Paul's Son Caleb appearing on YouTube Repair Videos, I’ve noticed that they use their Snap-On Vantage Model# MT2400 Graphing Multi-Meter (it has a Two Channel Oscilloscope Feature, too) for any number of Sophisticated Diagnostic and Component Checks and I thought,

Hmmmmm… I wonder if there are any of THESE available over on eBay?’

So I bounced over there and sure enough, there WERE… However… some of them were either INOP or sported Incomplete or Damaged Components and most were asking WAY TOO MUCH in their price ranges.

But I kept at it ...and found ONE COMPLETE KIT that not only had the OEM Unit… it also would come with the working KV Clamped Add-On Section attached that is so necessary for doing Coil On Plug High Voltage Diagnostics. It ALSO would come with the Modular RAM-ROM Card as Version 5 out of the 8 Updated Software Versions Snap-On had created before finally discontinuing this Device.

I noted that the Version Issuance Date was the Year 2002. This was an important consideration, since I own a 2000 Chevrolet Silverado 1500 and a 2002 Chevrolet Trailblazer AND since these Meters were very much in vogue (and VERY Expensive) as far back as the early 1990s, I did NOT want to Tear a Thousand Dollar Bill in Half and wind up getting a Snap-On Vantage Kit that would NOT have ALL of the features it touted and actually loaded into-onto the RAM Chips of that Damned ROM Card. Well.. So Far So Good!

NEXT UP … I bounced over to make a quick check on YouTube and re-visit most of the “Scanner Danner” Videos where he and his Brother James had also used this Vantage Graphing Multi-Meter… and What Do You Know! ... There was THIS Cool Video from “Crazy Ivan” … The Man From PHAD (Pine Hollow Auto Diagnostics) performing an In-Depth Look at an INOP Snap-On Vantage Model# MT2400 Graphing Meter and THAT is what finally SOLD me that this eBay Offer would be One Great Buy:

From “Crazy Ivan” a Hands-On Bench Top Review:

Diagnosing COP Ignition:

Repairing the Vantage Meter with a Power Off Issue:

Repairing the Vantage Meter with a NO Turn On Issue:

Troubleshooting a No Start Issue with the Vantage Meter:

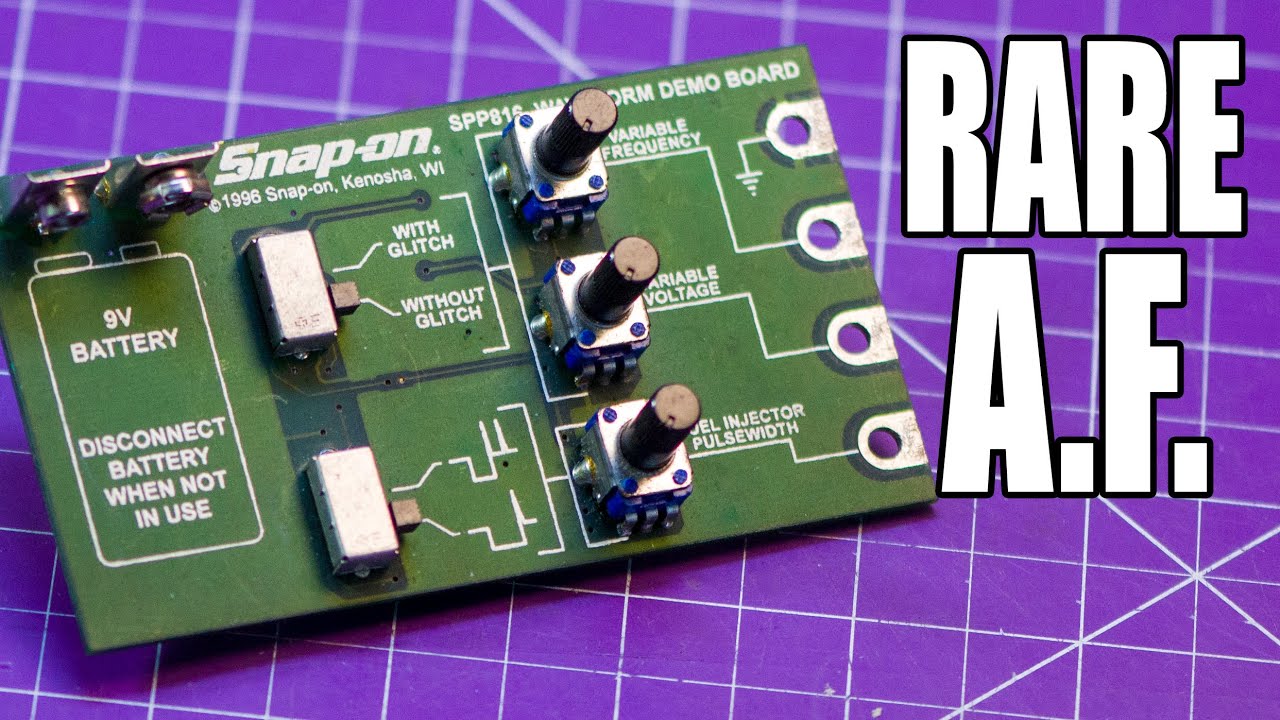
Here are some Images of the Kit that I finally 'Pulled The Pin' on and Got:

SANPONVANTAGE1.jpgSANPONVANTAGE01.jpgs-l1600.jpgs-l1600B.jpgs-l1600C.jpgs-l1600D.jpgs-l1600E.jpgs-l1600F.jpgs-l1600G.jpgs-l1600H.jpgs-l1600I.jpgs-l1600J.jpgs-l1600K.jpgs-l1600N.jpgs-l1600O.jpgs-l1600P.jpgs-l1600Q.jpg

***It would be very nice if there was a separate category or sub-listing for Diagnostics Tools that like these do, would focus on threads covering Oscilloscopes, their Accessory Attachments and Use other High End Diagnostic Meters in Kits like THIS one.***
 

Attachments

  • eetm300c.pdf
    34.5 KB · Views: 4
Last edited:

mrrsm

Original poster
Lifetime VIP Donor
Supporting Donor
Member
Oct 22, 2015
7,714
Tampa Bay Area
Other than the Snap-On Full Color Probe Cable Set coming from Overseas... eBay Shipped just me this Kit in Record Time and this Gear was very thoughtfully packed, too.

By the way... THIS Graphing Meter-Device Runs Very Sweet (It Functions PERFECTLY, actually) on a Pair of Standard "D" Cell Batteries... :>)

Here are the "Un-Boxing" Images:

SNAPONVANTAG1.jpegSNAPONVANTAG2.jpegSNAPONVANTAG3.jpegSNAPONVANTAG5.jpegSNAPONVANTAG6.jpegSNAPONVANTAG7.jpegSNAPONVANTAGE8.jpegSNAPONVANTAGE11.jpegSNAPONVANTAGE12.jpegSNAPONVANTAGE13.jpegSNAPONVANTAGE14.jpegSNAPONVANTAGE15.jpegSNAPONVANTAGE16.jpegSNAPONVANTAGE17.jpegSNAPONVANTAGE18.jpegSNAPONVANTAGE19.jpegSNAPONVANTAGE20.jpeg

EVERYTHING Necessary (including Extra High End Accessories NOT with the Basic Graphing Meter) is all present and accounted for in this Kit... and it ALL Works!


"Whoever has The Best Automotive Diagnostics Tools and Gear... Before He DIES... WINS!" -=The Automotive Master... Sun Tzu =-
 

mrrsm

Original poster
Lifetime VIP Donor
Supporting Donor
Member
Oct 22, 2015
7,714
Tampa Bay Area
After discovering that the Two, Aging in-dwelling Dura-Cell "D" Size Batteries were of the "Old" Design (Smooth Copper Upper Jacket... Lines Free) I decided to order a New Pack of Batteries (With a 10 Year Shelf Life) and Replace them.

DURACEDLL10YRDCELLS.jpg

THIS is how the job gets done in just a few minutes:

SNAPONVANTAGEDCELL1.jpgSNAPONVANTAGEDCELL2.jpgSNAPONVANTAGEDCELL3.jpgSNAPONVANTAGEDCELL4.jpg

And If you are just now getting a "Good Bargain" on your own purchase of Used Snap-On MT2400 Graphing Multi-Meter Kit and have NOT checked into this issue yet, be advised that in cases where some of these Snap-On Units may have been left sitting on a shelf somewhere for too long with the Old Chemical Batteries inside... then the Coil Spring Ground Connection inside of the Meter may have simply Dissolved and Rusted Away.

But Not to Worry though, for just as Paul "Scanner" Danner managed to easily Re-Solder in the Metal Positive (+) Flat Plate at the opposite end inside of the Battery Section after his came loose from the Logic Board, THIS Dude shows how to dis-assemble this Snap-On MT2400 Meter and then perform the repair on the Lost Negative Coil of Wire:


And (Finally...*Whew*) ...

If you wind up getting this Amazing Meter and the LCD Screen FAILS to Work or is Cracked, Damaged or Inoperative… Don’t Despair… IT is STILL available on eBay for Under $200.00 as follows in the Listings that include the Seiko Industries White Paper, a Product Video with a ‘catchy tune’ and other imagery, proving that this indispensable component can ALSO get replaced if needs be:

https://www.ebay.com/itm/2544043850...=0&customid=link&campid=&toolid=20001&mkevt=1

https://www.elecok.com/data_sheet/422480/SII_G121C_LCD_G121C(EN).pdf

https://www.elecok.com/sii-g121c-lcd-g121c.html


Attachments

  • SII_G121C_LCD_G121C(EN).pdf
    376.2 KB · Views: 4
Last edited:

mrrsm

Original poster
Lifetime VIP Donor
Supporting Donor
Member
Oct 22, 2015
7,714
Tampa Bay Area
I try to avoid making recommendations for others to purchase things that are part & parcel of getting Used Equipment or Diagnostic Tools without having bought these items and either installed or used them myself; hopefully with having a satisfying outcome.

The object of attention here is getting that 'Replacement LCD Screen' I mentioned at the end of Post #3 for anyone who Lucks Out in the fervent hope that anyone interested can also get their hands on one of these Amazing Vantage Model# MT2400 Graphing Meters.

However, if that comes to pass and the New Owners are dismayed
to find any problems of not being able to read the screen on a Device that was originally Designed and Sold as Brand New from Snap-On Dealerships way back in 1995.... and then Used Nearly To Death ever since... THIS is a Way Out of THAT Purgatory.

With this philosophy in mind, I ordered this Rare, Brand New LCD Screen and with S&H, it came to just over $200.00 with a pretty surprising FAST arrival time to my front door. In the 'in-between-time' prior to its arrival, I disassembled the Vantage MT2400 Meter for a Second Go:

VANTAGELCDSCREEN1.jpgVANTAGELCDSCREEN4.jpgVANTAGELCDSCREEN5.jpg

But THIS time, I removed the Four Small Screws and separated the 4" Square LCD Screen from the Red Plastic Encasement Halves to get a better view of the 22 Female Header Pins meant to plug into the underlying Logic Board.

VANTAGELCDSCREEN6.jpg
VANTAGELCDSCREEN7.jpg

What has consequence for anyone else following suit with doing this same task is knowing that after I temporarily re-assembled everything... I discovered that the formerly Quite Dim Internal Light... was actually Glowing Nominally Well afterwards; ostensibly the result of me 'jostling' all of those 22 Pin Header Insert contact points onto and inside of the LOBO LCD Screen Socket:

The Moral of The Story should be to 'TRY Going The 'Dis-Assembly--Re-Assembly' Route FIRST' , unless you are like me ....and Unwilling to Do ANYTHING 'By Halves' and so you decide to 'Just Buy the Damned Replacement LCD Screen'... Outright.

One other item of necessity is that the New LCD Screen comes WITHOUT (sans) having those OEM 22 Count X 2.54 X 2.50 X 6-8mm Long Gold-Plated LOBO PIns installed and properly Soldered In Place. So it will be necessary to spend another "Ten Bob" or so for a 10 Pack of these:

GOLDPLATEDPINSET1.jpg

Then carefully Solder them into their respective LCD Board Holes after "snapping" off just 22 from any of the 40 Count Strips available on these "Peanut Brittle" - Like Pin Headers and slip the line of them with the Black Plastic Insulators positioned on the Underside of the LCD Board so the Pins Only appear Straight Up & Down on the LOBO Contact Side.

It follows that I also explored another point of concern I had with my Snap-On Vantage Graphing Meter in that the condition of the Plastic Screen Cover - LCD Protector was in need of some TLC... or if possible ...Replacement.

VANTAGELCDSCREEN8.jpgVANTAGELCDSCREEN9.jpg

This was evident by the presence of some In-Shop Mal-Treatment with some Slight Dents and Cuts versus what should have been a "Clean Screen". But I knew that finding an OEM Plastic Replacement would be well nigh impossible.

The other issue was that the Screen Cover also bore a slight 'Yellow Cast"; much the same as experienced with ALL Poly-Acrylics Head Lamp Covers when exposed to a steady diet of Ultra-Violet Sun Light ...or even from the UV Light coming out of Shop Fluorescent Lamps.

So I scoured eBay and Amazon for some Plexi-Glas or Clear Lexan Sheets of Optical Quality and found a few thicknesses of around 12" X 12" X 0.030mm to experiment with. I probably could have Doubled the Thickness with NO Trouble installing inside of the Red Plastic Casement.

CLEARPLEXIGLAS1.jpgCLEARPLEXIGLAS2.jpg

I got a kick out of one 'Amazon Buyer Dude' who complained that his Sheets arrived as "Bright Green" in color without realizing that they come with layers of Thin Protective Film on BOTH sides to assure they are not damaged in transit. :>)


These images Illustrate how I simply used the 'Sketchy' Original Plastic Cover as a 'Sketch' Template to make a Brand New One via Sharp Scissors and using some Black Gorilla Tape to simulate the Anti-Magnetic Strip decorating the edges of the OEM LCD Cover. It certainly DOES make a real difference once that Screen is finally "Crystal Clear" again:

VANTAGELCDSCREEN10.jpgVANTAGELCDSCREEN11.jpgVANTAGELCDSCREEN12.jpg
VANTAGELCDSCREEN14.jpgVANTAGELCDSCREEN19.jpg

Besides obtaining some alternative Gold-Plated 22 Pin Segments in a correct Length... I'm also waiting on the arrival of some 4" X 4" Firm Foam sections (with Single Sided "Stickum") to measure out and cut out a New Insulation Shock Absorbing Square Gasket.

That Item was meant to fill the space in between the outer edges of the LCD Screen Steel Frame and the Inside Space of the Red Plastic Case Fascia. The OEM version that was once tucked up inside of that space has long since crumbled and now it Turns To Powder at the Slightest Touch, leaving the New LCD Screen with no such protection...Yet... :>)
 
Last edited:

mrrsm

Original poster
Lifetime VIP Donor
Supporting Donor
Member
Oct 22, 2015
7,714
Tampa Bay Area
So... I've been lurking over on eBay for quite a while ...Hoping to find THIS Snap-On Model # EETA308A OEM Low Amp Current Clamp that is the COMPANION to THIS Graphing Multi-Meter after spying Eric "O" from South Main Auto using this device to very great effect while chasing down a Parasitic Drain on a Trailblazer from a good many years back.

This item is BRAND, SPANKING NEW and so it was NOT CHEAP... but nonetheless it is "The Pick Of The Litter" from among the very few candidates available for them over on eBay. This one was around $50.00 LESS EXPENSIVE vs. all the others that looked to be Very Well Used and "Shop Worn" . So... Wow! What an Absolute Compliment to this Snap-On Model # MT400 Graphing Meter Kit ...

SNAPONLOWAMPCLAMP1.jpgSNAPONLOWAMPCLAMP2.jpgSNAPONLOWAMPCLAMP3.jpgSNAPONLOWAMPCLAMP5.jpgSNAPONLOWAMPCLAMP6.jpgSNAPONLOWAMPCLAMP7.jpgSNAPONLOWAMPCLAMP9.jpgSNAPONLOWAMPCLAMP10.jpgSNAPONLOWAMPCLAMP11.jpgSNAPONLOWAMPCLAMP12.jpg

Here ...See it 'In Action' for Yourselves:


...and another Parasitic Draw Case using the Snap-On Vantage Graphing Multi-Meter:

 
Last edited:
  • Like
Reactions: christo829

mrrsm

Original poster
Lifetime VIP Donor
Supporting Donor
Member
Oct 22, 2015
7,714
Tampa Bay Area
Here is Mike, “The Disgruntled Mechanic”...

He's using a fairly pricey Snap-On Wave Form Simulator to “Bench Test Demonstrate” in conjunction with using a Professional Grade Automotive Scan-Tool with the Built-In Lab Scope Features on his Snap-On Modis Scan Tool.

What he is doing is Practicing Diagnosing Simulated Automotive Component *Glitches & Failures*. He does this without having to “Get Dirty Under The Hood”. THIS is an interesting way to PRACTICE and LEARN how to use all kinds of Shop Style Scan Tools and Oscilloscopes. Knowing what a “KNOWN GOOD” vs. a “KNOWN BAD” Wave Form looks like is what THIS is all about:

https://www.ebay.com/itm/3641254995...=0&customid=link&campid=&toolid=20001&mkevt=1

Snap-On Wave Form Simulation Tool:


And here is another Wave Form Simulator Demo Board in action On The Bench:


So… Based upon what these Folks were doing ...I poked around over on eBay and “Haunted THIS Ghost” into being. Then... I “Pulled The Pin” on it because at MY age, I would prefer doing as much of my Practice and Testing with all my “O” Scope and other Scan Tool Gear ON THE BENCH as much as possible so that whenever I’m out in the Real World... Diagnosing Real Problems… I’ll have these kinds of practice experiences to fall back on:


I bought one after this. There is ONLY ONE MORE LEFT of these right now on eBay:

https://www.ebay.com/itm/1344120104...=0&customid=link&campid=&toolid=20001&mkevt=1

EBAYGRABOFSNAPONSIMBOARD.jpg

SNAPONWAVEFORMSIM1.jpgSNAPONWAVEFORMSIM2.jpgSNAPONWAVEFORMSIM3.jpgSNAPONWAVEFORMSIM4.jpgSNAPONWAVEFORMSIM5.jpg


Now… From these “Bench Practice” settings ...We head out onto the Shop Floor to observe Duane from “RealFixesRealFast” YT Channel as he demonstrates “How to Use a Lab Scope to Diagnose a Camshaft Sensor Wave Form”. He takes logical testing steps and procedures using his Bi-Directional Scan Tool; amplified by having access to ALL-DATA for his information references while “Scoping” out the problem:


And let’s finish this foray with a visit to “Schrodinger’s Box “ and observe how badly and expensive a “Simple Misfire” can become without knowing Basic Diagnostic Procedures...and the satisfaction that comes when Knowledge, Specialty Diagnostic Tools and REAL Practiced Skill determine what is REALLY Wrong and FIX The Problem:


Practice ...Makes Perfect…”

PS…

In this Video… The VOP Diagnoses a 4L65E Transmission using his Snap-On Vantage Model # MT2400 Graphing Multi-Meter and his Autel MaxiDas DS708 in order to Diagnose a Failure to Shift into 3-4 Gear on a recently overhauled Transmission.

He diagnoses that the problem was NOT withing the 4L65E...but rather due to a Failed ACC Pedal Module that was misinterpreting the ACC Foot Pedal Positioning as being at WOT and therefore, preventing the normal chance for any 3-4 Shifts.

The fact that the Autel Scanner has Graphing capability of the Two Differential Pedal Inputs for Low Voltage variance and compared those readings on screen with what the Vantage MT2400 was detecting during a Back Probe of the Throttle Body TPS cleared up what the mystery was.

The Throttle Position Sensor (NOT the APP Pedal Module) was eventually replaced and during the Test Drive with teh Autel MaxiDas Hooked Up... the Tech was able to observe Transmission Shifted Normally and Confirm his Repair. This Case was Closed due to the Tech having the RIGHT Understanding of these Systems, Knowing HOW they Interact with each other ...and What Can Go Wrong when they DON’T solve this problem and Avoid an Expensive and Unnecessary R&R of the previously Correctly Overhauled 4L65E Transmission.


Oh… and after I found out there was THIS VERY RARE 5th Edition (May of 2002) of the Snap-On Vantage Model# MT2400 Graphing Multi-MeterMemory Insert Features Card over on eBay… I snagged it on the SPOT:


SNAPONVANTAGEMEMBOARD.jpg


s-l1600.jpgs-l1600b.jpg
 
Last edited:
  • Like
Reactions: christo829

mrrsm

Original poster
Lifetime VIP Donor
Supporting Donor
Member
Oct 22, 2015
7,714
Tampa Bay Area
The Snap-On Vantage Version (5) 05-17-2002 Vintage Memory Card just arrived and after a Quick Swap with its Identical Vintage Brother... It Booted Up Normally and sailed through all of the Dynamic Screen Tabs and Special Settings with Flying Colors.

However... With having "Twins" of ANY Kind... The desire to make Close Comparisons between them is well nigh irresistible. And So... LOOK at what I discovered:

Note these Images of Two Distinct Surface Mount Components present on MY Original Card:

NOTMISSINGCAPACITOR.jpgNOTMISSINGRESISTOR.jpg

Now... View their identical Locations on the Second Card:

MISSINGCAPACITOR.jpg

MISSINGRESISTOR.jpg

I suspect that all I would need to do is Probe the Two "Good Card" Locations to get their Values and then obtain a few of these diminutive things to play around with while performing SMD Repairs. I can use my Digital Microscope to get some very good close up visuals and then... Try my hand with my Soldering - Hot Air Work Station. As long as I don't get "The Coffee Wobbles"... this seems to be a very straightforward process and just might work.

I know that the 'Super Tiny' One must be a Resistor because it has no Polarity Indicator on the Logic Board Layout Box. However, the 'Larger' One (if you could call it that) DOES have a Polarity Requirement. So I'm guessing that it must be a Capacitor of some kind.

EDIT:

The Super Small One is apparently a "Ceramic Capacitor"

CERAMICAPACITORS.jpeg

... and ... The Slightly Larger, Yellow Orange one is a "Tantalum Capacitor"

SMTTANTALUMCAPACITORS.jpegTANTALUMCAPACITORS.jpeg

Hopefully, Our Electronics Experts here at GMTN will know better than I what these are, even without knowing their precise Values. There is no reason for me to rush in and 'MunKee Around' with anything just yet, as they BOTH still work... especially "The Good Card" :>)

These are the eBay Vendors Two Original Photos for comparison. Most Likely... Rough, Careless Handling of this Card during its insertion and removal while being used in an busy Auto Shop Work Setting caused them both to literally get "scrubbed off" from their lightly soldered SMD Mounts atop the Logic Board. Note how they are positioned close to the Gold Tine Insert section on the upper and middle areas of this eBay card

MISSINGPARTS1.jpg
MISSINGPARTS2.jpg

So.... Why even bother with getting a 2nd Flash Memory Card?

Well... Because these Cards are Damned Near Impossible to Find Anymore, even on eBay.

And Why would THAT Be?

Because Smart Original Owners of these Snap-On Vantage Graphical Meters RARELY IF EVER (MEANING ALMOST NEVER, EVER) WILL PART WITH SUCH AMAZING, RICHLY FUNCTION FEATURED ELECTRONIC DIAGNOSTIC TOOLS!

As Long As They WORK! ;>)

...
And neither will I, once I Dope Out how to mend this 2nd Flash Memory Unit.
 
Last edited:
  • Like
Reactions: christo829

azswiss

Member
May 23, 2021
872
Tempe, AZ
Nice catch; good eyeballs! The larger one (C13) is an electrolytic capacitor; it has a specific polarity and orientation. The smaller one (C1) is a regular capacitor, no specific orientation. Looking at the closeup there appear to be fragments of C13 still stuck to the solder pads on the board (see outlines below). Also, it looks like someone may have tried to rework C13 previously as there appears to be residue on the left joint and, more tellingly,the former component's two solder leads are no longer parallel/colinear as you would see from an undisturbed part component. Are there any markings visible on C13 on the good board? C1 looks like it has been physically knocked off and but no repairs attempted. You are going to want to be careful when attempting to measure the capacitance of C1 & C13 in-situ on the board. This is especially important with C1 as it is tied directly to U1 (which, judging from the label, appears to be a custom memory chip containing operating code). Also, when handling these cards you need to be careful about ESD (electro-static discharge).

Capture1.JPG
 

mrrsm

Original poster
Lifetime VIP Donor
Supporting Donor
Member
Oct 22, 2015
7,714
Tampa Bay Area
Thanks for looking things over...

Back on March 22, 2022, I posted the Dope on a $25.00 Digital Microscope I got so I could work on some of my Tag Heuer Model 4000 and Model 6000 Wrist Watches (See the Link Below) and THAT Kit was quite awesome as a Handy and Simple to Set Up USB Scope. I'll grab it along with a Bright Flashlight and clean up around those areas on the Logic Board sometime tomorrow with some 99% Alcohol and try to visualize any Component Factory Markings that can be seen on MY Flash Memory Board... and then We'll SEE What WE Can SEE...


Your Precautions are Echoed from this collection of comments about this issue as follows involving a Different Board... but posing similar difficulties and circumstances to what I am about to deal with:

"I've managed to break off an SMD ceramic 1206 capacitor of a motherboard I am working on, I'm am new to electronics, so be gentle! Anyway this damn capacitor has vanished into the place where all missing tiny components seem to go! I cannot find any schematics for the board to see what I need to replace. Good news is I have two boards, I need both, so no I cannot swap it out. So how do I test the capacitor to replace the missing one as there's no markings at all? I have a Multi-Meter only and it's basic Astro AI AM33D. Any advice would be very helpful! I've attached a photo sorry about the quality the parts are small."
1675500657400.png

“Your best bet will be to remove the capacitor from the second board and measure it there. You can find "smart tweezers" or other tools that can measure capacitance online. You cannot measure it while it is still on the board! Also, don't break off the caps or you will damage the cap and the board. You need its value, from a capacity-meter (Multi-Meter with this function) on the safe board (take it off, measure, & put it again) It looks like it's in parallel with the other 3 SMT capacitors (and maybe the electrolytic) so you might find it works without it (up to a point) then if you get problems, measure the DC voltage across those capacitors and choose a capacitor of the correct voltage rating and take a wild guess at its value (say 100 nF). Then see if any problems that might have happened turn to dust. Since capacitors are not typically marked, the only way to find the value is to measure them. You'll have to get a meter that can measure capacitance, take the corresponding capacitor off of the good board, measure its value, and then purchase a replacement that's the same size and value. Solder both capacitors back onto their respective boards. BTW, even without a scale for measurement, that looks a lot more like 0805 to me than 1206. There are plenty of cheap LCR tester kits on the market that can do this.”


Source:


The LCR Tester Video is A HOOT...

 
Last edited:
  • Like
Reactions: christo829

mrrsm

Original poster
Lifetime VIP Donor
Supporting Donor
Member
Oct 22, 2015
7,714
Tampa Bay Area
Since removing "working" components off of the "working" Vantage Memory Card might wind up going 'sideways' and leave me without a "working" Snap-On Vantage Graphing Multi-Meter... 'A Bird in The Hand' ...approach here seems like a better way to go until I can slide the original VMC Board under a microscope and try to get the Part Numbers WITHOUT taking any unnecessary risks. @azswiss ... Thanks again for contributing to this "Cautionary Way to Go" , Brother.
 

mrrsm

Original poster
Lifetime VIP Donor
Supporting Donor
Member
Oct 22, 2015
7,714
Tampa Bay Area
I keep checking on eBay for any Deals LIKE THIS one...in particular for the ones that are still provably operational and if possible... repairable. THIS is a "2-4-1" Deal that also has a "MAKE OFFER" feature worth considering. Remember this... Having a Graphing Multi-Meter with Bi-Directional and Oscilloscope and other Universal Diagnostic Capabilities is just AWESOME:


s-l400.jpgs-l1600X.jpgs-l1600Y.jpgs-l1600Z.jpgs-l1600YY.jpgs-l1600XXX.jpgs-l1600QQQ.jpgs-l1600RRR.jpgs-l1600TTT.jpgs-l1600UUU.jpgs-l1600III.jpgs-l1600OOO.jpgs-l1600PPP.jpgs-l1600QQQQ.jpgs-l1600WQW.jpgs-l1600YUY.jpg
 

mrrsm

Original poster
Lifetime VIP Donor
Supporting Donor
Member
Oct 22, 2015
7,714
Tampa Bay Area
Here is ANOTHER reasonably priced Used Snap-On Vantage MT-2400 Kit, arguably well used.. .but PROVEN operational here by virtue of the Features LCD Screen WORKING! What generally happens to make these VERY robustly designed (albeit ancient and reliable) Graphing Multi-Meters seem to FAIL... is THIS:

(1) Snap-On Vantage MT-2400 Units that very seldom get used ... AND which have the Two Old, Gnarly Used Giant "D" Cell Batteries left inside under the Rubber Grip... WILL decay away over time inside and dissolve and spill enough Battery Acid in the adjacent compartment long enough to Dissolve and Rust Away the Coil Spring Contacts inside. THIS IS AN EASILY REPARABLE CONDITION. Just R&R The Case Halves, wipe out the Inner Plastic Surfaces with a Wet Cloth, Soaked in Baking Soda... Then Clean the Two Halves Bone Dry and Re-Assemble Them ... Then after Installing Two New "D": Cell Batteries... 'Fire It UP'. READ THE PRIOR REPAIR POSTS AND WATCH THE REPAIR VIDEOS.

(2) When not "exercised" or done so when the Batteries are LOW on Power...the Rolling Selection Wheel needs to be moved around enough to re-contact the "Brighter-Dimmer" Screen Button selection and allow the Screen to become VISIBLE again. This existing Old LCD technology is EXTREMELY HARD TO KILL.

(3) Know that when you see documentation that clarifies WHICH Software Version is working in this Unit Via an Installed RAM Program Card...you can identify WHICH Version is in the unit. In THIS Case... if this Version 5.0 (an indicated) it carries the in-dwelling service of Vehicles up to around the Year 2002...!!!

(4) Even though THIS Unit does NOT seem to have the Add-On KV Unit necessary for High Voltage Ignition Diagnostics... YOU CAN ALWAYS SEARCH AROUND EBAY LATER ON AND GET ONE FOR AROUND $100-$150... or consider the Offer Made in Post #12 that has TWO Units AND a KV Unit in THAT Sale!

(5) Ask yourself this Question...

"If THIS Technology is "SO Out Dated..." Then WHY are there so VERY FEW of these Graphing Multi-Meters around ...and SO VERY HARD TO FIND?"

Answer: "BECAUSE NO SELF-RESPECTING MECHANIC EVER DISCARDS UNIVERSALLY
USEFUL, FOOL PROOF DIAGNOSTIC TOOLS !


THIS would be a Unit that I would Take A Chance on Getting... BUT ONLY AFTER CONTACTING THE EBAY SELLER AND CONFIRMING THAT AFTER INSTALLING 2 "D" CELL BATTERIES INSIDE...THAT THIS MACHINE BOOTS UP TO A WORKING SCREEN!

If you doubt that these Machines actually have endless diagnostic possibilities... START READING THIS THREAD FROM THE BEGINNING...and find out what it is REALLY Capable of Performing!!!


s-l300.jpgs-l160017.jpgs-l160016.jpgs-l160015.jpgs-l160013.jpgs-l160012.jpgs-l160011.jpgs-l160010.jpgs-l16009.jpgs-l16008.jpgs-l16007.jpgs-l16005.jpgs-l16004.jpgs-l16002.jpgs-l16001.jpg
 
Last edited:

mrrsm

Original poster
Lifetime VIP Donor
Supporting Donor
Member
Oct 22, 2015
7,714
Tampa Bay Area
...continued from above...

THIS is a Separate Snap-On KV Unit that gets attached to the Snap-On MT-2400 for use with High Voltage Ignition and Oscilloscope Graphics:


s-l300.jpgs-l1600A.jpgs-l1600B.jpgs-l1600C.jpgs-l1600CD.jpg
 
Last edited:

mrrsm

Original poster
Lifetime VIP Donor
Supporting Donor
Member
Oct 22, 2015
7,714
Tampa Bay Area
Tell You Wuuuut... AFTER You Read Over EVERYTHING covered in THIS Thread...

I'd Bet a Brace of Gutenberg Bibles that THIS *Vintage* Snap-On Vantage Model # MT-2400 can probably be resurrected without too much trouble... as Long as it HAS the Snap-On Program - RAM Card plugged in (Under the Left Rubber Handle Cover)... so...

Do Your DUE DILIGENCE...and ask the Seller on eBay FIRST before making a Low $$$ Offer on this item (well under $100) ...and then... Just tear it down and see Wuuut's Wuuut?

I defy ANYBODY to convince me Why having a Graphing Multi-Meter of ANY Vantage *Vintage* MT-2400 is a BAD Diagnostic Tool to have at your disposal... Go Ahead I DARE YA'

s-l1600a.jpgs-l1600a.jpg


These are Other...Perhaps Even Better... More Complete Kits for the Money... Deals on THIS Gear:


mrrsm

Original poster
Lifetime VIP Donor
Supporting Donor
Member
Oct 22, 2015
7,714
Tampa Bay Area
Speaking of the Snap-On Vantage RAM System Card...

Back in Post #8 and Post #10 of THIS Thread ... @azswiss covered the idea that Measuring a Capacitor while still Soldered onto any PCB ...sends the "Tester" on a Fool's Errand. THIS Video exemplifies HOW to Diagnose the Veracity of this Theory and soundly bears out the observations made by @azswiss. This Video also prompted me to purchase this fairly inexpensive and particularly featured Digital Multi-Meter based upon the recommendations made by the VOP (Video Original Poster) during his Experimentation (10% OFF on Amazon):


UNITUT139C.jpg


NOTE: I have NOT as yet *fiddled* around with the Working Snap-On OEM RAM Card plunked up inside of my Vantage GDMM (Graphing Digital Multi-Meter) to perform the requisite De-Soldering ... However, since our need for understanding this issue is Universal and might benefit others considering taking this mistaken approach to "measure the capacitors ON the PCB WITHOUT De-Soldering them.." approach... knowing what NOT to try might save others a few headaches in the future.
 
Last edited:

mrrsm

Original poster
Lifetime VIP Donor
Supporting Donor
Member
Oct 22, 2015
7,714
Tampa Bay Area
I keep "Touting" the Value of having a "Graphing Digital Multi-Meter" available to us if possible; in particular for those Damned Aggravating, Mysterious *Parasitic Draw* situations. And in THIS Video, Eric "O" from SMA (South Main Auto" up in Avica, NY demonstrates the REAL differences between having a Standard DMM that is generally incapable of showing ACTUAL Wave Forms of LOW AMPERAGE that is so readily obvious on the Snap-On Screen.

He does not mention it here, but THIS Snap-On Vantage Tool runs NOT on any USB Power or External AC-DC 110 Volt AC Power Converter... Oh No... IT uses Two Standard "D" Cell Type Batteries and thus ...it can be set up to Take a Low Current Measurement and Record its ENTIRE Wave Form and Readouts for a Maximum Time Frame of 16 Hours!

So in cases where the Diagnosis of this problem might take half a day to dial in on whatever is going on that is ordinarily INVISIBLE to us all... Having the Vantage Graphing DMM on hand as a sensitive Diagnostic Parasitic Drain Level Recorder ...really is quite remarkable:

Part 1:

Part2:

And here is yet ANOTHER Parasitic Drain Problem on a Chevrolet Truck but this time, Eric "O" is using the updated and much fancier Snap-On Vantage PRO with its Color Graphing DMM Screen:


mrrsm

Original poster
Lifetime VIP Donor
Supporting Donor
Member
Oct 22, 2015
7,714
Tampa Bay Area
And speaking about "The Snap-On Vantage PRO" Color Graphing Multi-Meter... THIS one just popped up as a rare offer available for only $550.00 on eBay. Definitely worth a look or two from Professional and Shade Tree Experts, alike:


s-l1600AA.jpgs-l1600BB.jpgs-l1600CC.jpgs-l1600DD.jpgs-l1600EE.jpgs-l1600FF.jpgs-l1600GG.jpgs-l1600HH.jpgs-l1600II.jpg
 

mrrsm

Original poster
Lifetime VIP Donor
Supporting Donor
Member
Oct 22, 2015
7,714
Tampa Bay Area
The Reasons I Keep Coming BACK...Touting THIS Tool is that EVEN if you can ONLY get your hands on the "Early Versions" of the Insert ROM Card that holds all of the "Guided Component Testing" that ended somewhere around Version 7... You can STILL Use THIS Tool Kit for an Incredible Array of Automotive Diagnostics by employing its Graphing Multi-Meter Features for General Automotive Diagnostics that will NEVER Go Out Of Style. Take the Time to GO BACK and Review the eBay Links and try to find the Least Expensive Kit Available ...with the Most features possible ...for the Money:

Snap On Vantage Memory Card Problem:


And HERE is a PERFECT Example of Using THIS Tool Kit for performing a Parasitic Drain (Draw) and just watch what "This Old Vantage" can do... Noting that unlike a typical DMM that Shuts Off after just a matter of minutes...the Snap-On MT2400 iON Screen Time" is selectable for up to 16 Hours of continuous operation! So having a FRESH Pair of "D" Cell DC Batteries installed in the Tool is key.


And Here is an Intrepid Dude who finds the Common Problems with those Old MT2400s that are Supposedly... *DEAD* that he Breathes New Life back inside...as follows:


And in THIS One...the Dude performs an EFI Wave Form Demo...Just like an Oscilloscope can do... WUUUT? You Mean Component Testing like THIS can be Done on THIS Graphing Multi-Meter? Yup!

 
Last edited:

mrrsm

Original poster
Lifetime VIP Donor
Supporting Donor
Member
Oct 22, 2015
7,714
Tampa Bay Area
These Snap-On Vantage Pro Two Channel Oscilloscope Graphing Multi-Meters (VERY Full Featured Diagnostics Tools) are beginning to become available over on eBay at more affordable prices… and thus...Deserves a segue from the Original Snap-On Vantage LCD Screen Version(s). In this Video, Paul “Scanner” Danner donated a few Professional Training Videos via the Scanner-Danner YouTube Channel that will EXPLAIN WHY THIS TOOL IS INDISPENSABLE and well worth understanding...and Lurking For Every Day Over On eBay:


That First Video was just a *Taste* of what Scanner Danner's Professional Series Offers... here is the 8th Installment on the Snap-On Vantage Pro Training Series covering its AMAZING Graphing Multi-Meter Features (A/C Coupling for Example):

And for THE BEST Diagnostician Oscilloscope Training ANYWHERE seek out ALL of the Training Videos from THESE Guys over at TST Seminars:


And HERE is a Transmission Tech Discovering New Diagnostic Features he NEVER KNEW HE HAD AVAILABLE right there on his own Shop's Snap on Vantage Pro Tool:


https://www.ebay.com/sch/i.html?_fr....m570.l1313&_nkw=snap-on+vantage+pro&_sacat=0

When you invest in Professional Mechanics' Diagnostics Tools ...and Practice with their USE… You instantly move away from “The Realm of Automotive Repair Guess-Work” while also avoiding being Held Hostage to any Dealerships that employ people who put their pants on Just Like US… One Leg At A Time...you begin to become a True Diagnostician.

Thus, they are no more talented or skilled than YOU are. It just takes a little bit of effort to Learn HOW these tools work… finding the Tool Kits at Best Prices & Availability over on eBay… and getting them into your hands for your OWN relief with such complex and difficult to diagnose repairs. There is GREAT comfort in knowing and experiencing THIS Amazing Sensation!
 
Last edited:

Forum Statistics

Threads
23,319
Posts
637,893
Members
18,519
Latest member
chirobo1

Members Online