x2^
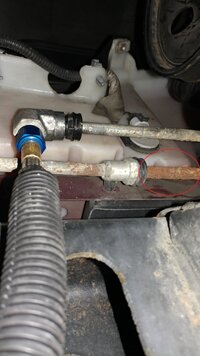
For anyone contemplating replacing their Transmission Cooler Lines with a GM OEM Set… This might seem like a common sense, “basic small mechanical” repair… but it definitely is NOT. This video by “Klowny” (Yes… He likes to ‘Clown around’...but is a Very Good Mechanic) is just about as complete as you can find that shows the idiosyncrasies of this maddening Transmission Sealing Connector. He well describes How the clip to fitting works… How to extract it…. and How to re-install the clip without losing your mind. One last suggestion I can make from personal experience is to Install the New Lines… and New Fittings if needed (probably not) and attach the connections at the 4L60E Transmission In and Out Lines FIRST.
This is the real trick to the job that should be done before attaching the outer lines to the Radiator Fittings in order to overcome the strange mechanical dis-advantage that will happen if you install the lines on the Cooler before doing the close in work inserting the two lines into the two fittings on the Passenger Upper Side of the 4L60E and then performing the re-clipping actions needed to ensure that the lines are correctly inserted.
The line-lock swaging on the ends of the two metal pipes need to be pushed deep inside of the fitting so that BOTH spring locking Clips have actually locked the line securely inside of the fitting in front of the swaged line. For just a few Buck$ ... Harbor Freight sells the Indispensable Small Hook Tool Kit that will save you hours of extra work trying to dope out how to get the Old Clips off and the New Clips in place WITHOUT OVER-STRETCHING THEM TO THE POINT OF BEING TOO LOOSE:
And if instead… the idea is to splice in the intermediate lines with an alternative length of flared Steel Tubing and-or a combination with High Pressure Rubber Hose… The Splice-Lok System or some similar designed repair kit will do the job nicely… just Don’t Use This Kit on any Brake Lines:
As an alternative… here is “Klowny” again… describing how to perform the tube cutting and re-flaring needed to create your own seal-able Flared Tubing of the necessary lengths and the new fittings to reliably secure the lines together and safely contain the fluids they transport: