Timing chain concern delaying cylinder head repair

selectah77

Original poster
Member
Feb 22, 2016
21
Bloomington, Minnesota
Hello Nation,

I have an '07 Envoy SLT 4WD with about 103k on it. A few months back I went on a quick trip to the store. On the way back, I kicked it down to pass somebody and I felt the truck stumble. When I got off the freeway, it had a little roughness to it and died with a violent shake at the light. I got it started, and it reluctantly ran - I had to shift into neutral and rev the engine to keep it from stalling again, easy to do in a stick but not so much in an automatic. Got it home and gave it a once over. I get P0300 - Random Misfire. Cleaned the TB, changed the plugs and even swapped some coils - no change. Hard start, rough idle for a few seconds and then stall. Last thing I did was a compression test. 210 in cylinders 1 through 5 and zip in no. 6. Found out that it could be a burnt valve so I dismantled the engine to remove the head and that is where I am stuck. I got the engine to TDC using an alternative method that Eric the Car Guy used - I didn't feel to good about sticking a screwdriver in the cylinder. I look at the timing marks, they are in the right place but the dark links on the timing chain are not. In fact they are three links advanced. My question is: how did this happen? I have had the vehicle since 2010 and have not performed any maintenance other than what is necessary/recommended. I have trouble thinking that it would have been put on incorrectly at the dealership had it been replaced, I know the timing chain can jump but what causes it and should I be concerned about internal damage?
 

Mooseman

Moderator
Dec 4, 2011
25,317
Ottawa, ON
Welcome to the Nation!

When you PM's me, I misread and thought you had already pulled the head.

There are 4 strokes so you need to keep turning the engine until the links do line up. Last time I had to open it up to replace the cam phaser, I had to do just that until the links lined up to the marks on the gears.

If the chain would have jumped, there would have been even more issues. If it feels tight, it's fine.

Be forewarned, removing the head on these is not an easy job just for the fact that the bolts almost always break in the block and are a pure PITA to remove. Just ask @MRRSM
 
  • Love
Reactions: 808

selectah77

Original poster
Member
Feb 22, 2016
21
Bloomington, Minnesota
I went around a couple of strokes and didn't see any change so I stopped out of worry. I will try again when I reach home this evening. I am aware of the head bolt issue, not looking forward to it. A buddy of mine said to beat the bolts with an air hammer for a good long while to help loosen things up.
 

Mooseman

Moderator
Dec 4, 2011
25,317
Ottawa, ON
Took me like 3 or 4 turns. I too wondered if mine was screwed up but eventually they lined up.
 

mrrsm

Lifetime VIP Donor
Supporting Donor
Member
Oct 22, 2015
7,696
Tampa Bay Area
FWIW... This link might be the second of the two experiences documented here that make an effort to describe this procedure in all of its complexity. First, refer to @Mooseman Signature Two-Part article on "Timing Chain Replacement" and then... if you can stand wading through the highly detailed micro-steps I've written down, you may find some additional things that can help you.

I am still in the middle of this project and unfortunately, I have had to put everything temporarily on hold, as other necessary mechanical repairs have side-lined me on this identical project. This is the GMT Nation link to my work as far as I have gotten to this point. Most immediately, I would urge you NOT to use an Air Hammer anywhere near an Aluminum Engine Head and perhaps instead, follow the careful steps I have been adhering to so far for Head Bolt Removal. There are many paragraphs and photos and links here to assist you in getting a good understanding of the scope of this nightmare the engineers have left us with:

http://gmtnation.com/forums/threads/the-85-000-00-gm-4-2l-engine-repair.14423/
 

mrrsm

Lifetime VIP Donor
Supporting Donor
Member
Oct 22, 2015
7,696
Tampa Bay Area
This PDF will more directly addresses the issue of trying to rotate the crankshaft X number of times to get all three alignment marks correctly positioned and have the rear camshaft flats on the intake and exhaust sides horizontal and flat to accept the holding tool for the purpose of keeping them in stasis during the repair. Don't proceed with the head removal without a thorough understanding of what is in this document or you might wind up destroying the engine:

http://ww2.justanswer.com/uploads/GMGreatWrench/2011-01-08_023933_tblazer_t-chain_part_12.pdf
 
  • Like
Reactions: Mooseman

mrrsm

Lifetime VIP Donor
Supporting Donor
Member
Oct 22, 2015
7,696
Tampa Bay Area
  • Like
  • Love
Reactions: 808 and xavierny25

Mooseman

Moderator
Dec 4, 2011
25,317
Ottawa, ON
The most important thing to remember is to use the wedge tool on the timing chain tensioner to prevent the tensioner from extending. You can't use the hook/screw type chain holders since you are removing the head.

All I can say is the best of luck to you while removing the head bolts.
 

selectah77

Original poster
Member
Feb 22, 2016
21
Bloomington, Minnesota
Well, got the head off! Broke 10 head bolts - tried going in reverse of the tightening sequence @MRRSM like you stated in your post. All I can say is go slooooooooow. I have another problem though, the plastic tube that runs across the back of the cylinder head cracked. GM put a bolt AND a retainer clip in it, weird. Can't for the life of me find what it is called, all I know is it is connected to the secondary air injector. Can any of you all help me identify what it is? Oh, and the valve spring on no. 6 intake is broken.
 

mrrsm

Lifetime VIP Donor
Supporting Donor
Member
Oct 22, 2015
7,696
Tampa Bay Area
Once again... if you can supply us with your tear down images... they will go a long way towards helping us to visual the exact areas involved and become useful to others in the future as well. Have a look at this CARid parts link below for the '07 4.2L Engine "Secondary Air Injection Pump Hose" and let us know if the damaged part you mentioned is included within this "Bag of Snakes" apparatus. It appears to cost just under $100.00:

http://www.carid.com/2007-chevy-tra...nt-secondary-air-injection-pump-86085973.html

As for the broken Valve Spring over the #6 Cyilnder... Since the engine MUST remain fixed with the #1 Cylinder positioned at Top Dead Center... take a small mirror and a bright flashlight and examine the top of the #6 Piston Head for any impact damage from the loosened valve in the head. It will probably be okay... but it will not hurt to examine it for damage while the old head is still off just to make certain the Piston Dome is neither punctured, cracked, nor has any loose metal fragments wedged in, on... or around its surface.
 
Last edited:
  • Like
Reactions: Mooseman

selectah77

Original poster
Member
Feb 22, 2016
21
Bloomington, Minnesota
Sorry for not keeping up on this better. @MRRSM I have examined the piston head and there is a small dent from where it hit the stuck valve. No crack, and no metal around the edge. I think the retainer is wedged in the valve, I took it to the machine shop and the guy who looked at it said the same along with it most definitely being bent. I think I'm going to replace all the springs just to be safe. Stay tuned.
 
  • Like
Reactions: mrrsm

Sparky

Member
Dec 4, 2011
12,927
If that tube is for the secondary air injection system, it might be worth just deleting that entire thing. SAIS has been a trouble for some people so it may be worth nixing. Probably would require a tune to get the computer to ignore it though and not click the SES light on.
 
  • Like
Reactions: mrrsm

Mooseman

Moderator
Dec 4, 2011
25,317
Ottawa, ON
And I highly recommend @limequat from lime-swap for the tune. Great service at an equally great price.
 
  • Like
Reactions: mrrsm and limequat

mrrsm

Lifetime VIP Donor
Supporting Donor
Member
Oct 22, 2015
7,696
Tampa Bay Area
Sorry for not keeping up on this better. @MRRSM I have examined the piston head and there is a small dent from where it hit the stuck valve. No crack, and no metal around the edge. I think the retainer is wedged in the valve, I took it to the machine shop and the guy who looked at it said the same along with it most definitely being bent. I think I'm going to replace all the springs just to be safe. Stay tuned.

I'm glad that the damage is minimal and your approach to replacing all the Valve Springs makes good sense. The problem with these 24 Valve OHC Engines is that in order to reduce the metal mass in the overhead rotating assembly... the Atlas Engine designers used the minimum thickness (think... "Thin as Bird's Legs"...) in the valve stems, in the belief that less mass makes for a more rapid and quicker rotational response from the collection of so many moving parts-per-cylinder in the Valve Train. That implies a potential weakness in the smaller and lighter 24 metal coils for the Valve Springs as well. When suddenly revved... these thinner versions of the more robust valves/springs in V6 and V8 engines are more likely to flex, stretch and suffer rapid metal fatigue than the early model and more sturdy designs of the other engines.

If the Machine Shop is doing a FULL head rebuild at under $750.00 for a quality job... very well then. However...If not...and your concerns extend to the nearly 200,000 miles of engine life you have to look forward to after the proper repair and re-assembly... you might consider either RockAuto or Summit's offers of a guaranteed completely re-built engine head for around the same amount of money... with the chance to get back around a $175.00 rebate on your existing head ...if returned with all the original head parts, broken or otherwise as well... to take the sting out of your expense. In the long run... what you are up against is the risk of having to do this dreadful and expensive procedure all over again in say... 6-8 months... if only a partial repair on the engine head is done. Just food for thought.
 
Last edited:

selectah77

Original poster
Member
Feb 22, 2016
21
Bloomington, Minnesota
$528 for the cylinder head work, looks fantastic to boot! Great place here called D&D Auto Machine. Took a long time to get back to work on it, got the flu something awful. I had to remove 10 broken head bolts - tried the left handed route, no good. Had some DeWalt Gold Ferrous bits that bit right in and made it easy for the easy-out to get the bolt out. There seemed to be quite a bit of play in the plunger so I decided to change out the timing components completely. The guides were worn pretty well themselves and I would have hated for something else to go wrong...

Anyhow, I'm currently stuck. I need to get the stabilizer bar links removed to drop the lower control arm to get at the bolt to remove the rack & pinion to remove the oil pan. The links are so rusted and brittle that the ends split and I have two options as I see it: cold chisel and hammer or cutting torch. I'm leaning towards the latter. My manual says to "remove the steering gear cross member", it doesn't look as easy as they describe. Any tips @MRRSM or @Mooseman?
 

Mooseman

Moderator
Dec 4, 2011
25,317
Ottawa, ON
Sorry man, it's all labour work. Why drop the A-arms? Maybe just disconnect the lower ball joints so you can remove the axles but that's all. Just a bunch of bolts holding that cross member. I left the tie rods connected as well as the lines.
 

selectah77

Original poster
Member
Feb 22, 2016
21
Bloomington, Minnesota
Thanks @Mooseman, I sat looking at it thinking I didn't have to follow what the book says. I seem to remember reading you said something similar in regards to following "the book". I still have to change out the links though, boot is dried out and cracked and there is some remnants of the grease and there is A LOT of play in the link by hand. Too easy for comfort. Book says to remove intermediate shaft too, was that something you did? Yeah, there are a bunch of bolts on that cross member. Question, what about the differential? Leave it attached to the pan or remove and hang on the frame?
 
Last edited:

Mooseman

Moderator
Dec 4, 2011
25,317
Ottawa, ON
Yes, the intermediate shaft has to come out. After removing the disconnect, use a slide hammer to pull the shaft out. The diff has to be unbolted from the pan. I just moved it aside and held it in place with bungees. Did the same with the A/C compressor. Didn't even have to disconnect it.

It's a bitch of a job that I swore I would never do again.
 

selectah77

Original poster
Member
Feb 22, 2016
21
Bloomington, Minnesota
When I was laying underneath it last night, I sighed and asked out loud "what have I gotten myself into?!" I'd probably do it again though. Partly because I'm a glutton for punishment but mostly because I'd feel sorry for whoever found themselves in the same predicament.
 
  • Like
Reactions: Mooseman

mrrsm

Lifetime VIP Donor
Supporting Donor
Member
Oct 22, 2015
7,696
Tampa Bay Area
At the risk of repeating the request... If you can grab some images of your work at various stages and post them with your progress... You will add meaning and assistance to many others as well as gravitas when demonstrating how difficult all this has been for you and will be for them should they attempt to follow in your footsteps and conquer the problem.

Without the slightest doubt... I guarantee you that @Mooseman and a handful of other members well understand what it feels like to be under the GMT360s and feel bewildered and tired... and yet know that bit by bit... You will win the day... If you just keep at it.
 

selectah77

Original poster
Member
Feb 22, 2016
21
Bloomington, Minnesota
I have reached an impasse. I am currently unable to separate the axle from the disconnect. In the past - albeit this was on a front wheel drive vehicle - I stuck a pry-bar in between the tranny and the axle, applied a small amount of pressure and popped it out no problem. It is giving me no quarter using this technique. @Mooseman @MRRSM how did you go about it?

I would like to add, should anyone be reading this for research, when unbolting the steering gear crossmember, brace it with blocks or your knees - anything, really - to keep it from falling on you when you get the bolts removed! I got lucky and moved my head just before it fell, can't say the same for my chest and stomach though.
 
Last edited by a moderator:

mrrsm

Lifetime VIP Donor
Supporting Donor
Member
Oct 22, 2015
7,696
Tampa Bay Area
Here again... having images would certainly go a long way in helping us to see what you are dealing with. Nonetheless... If I understand you correctly, the purpose of doing the tear-down so far has been to allow you to remove the Crankcase - Oil Pan to facilitate the the R&R of the Timing Chain Set and/or Oil Pump...and so my question would be this:

If you have removed enough hardware to facilitate the required access... why is it necessary to do any more dis-assembly of the parts you just described removing; assuming that none of them will prevent you from removing the Oil Pan, performing the Timing set R&R and then re-installing the Oil Pan later on?

Having images of what all this looks like down there right now would probably get you better answers from other experienced members who have already "Been There... and Done That..."

A few years back, the folks over at "realfixesrealfast" performed the Engine R&R in a 2002 Chevrolet Trailblazer 4.2L with 4X4 WD that had thrown a connecting rod through the side of the block, necessitating that they actually completely remove the body off of the vehicle.

Their unique video describes the actions needed to pull the front axle assemblies in order to remove the engine and Oil Pan and replace it towards the last part of the video.
More than likely...if you download and Slo-Mo many sections of this video...you'll get the chance to see how they negotiated the front end dis-assembly and get some more direct information on how to do this. I have the 2WD flavour of the '02 TB...and no experience with what you have been dealing with. But perhaps...this video will guide you:

 
Last edited:

Mooseman

Moderator
Dec 4, 2011
25,317
Ottawa, ON
I have found that to pop out the axle, it's easier to use a long bar or drift, put it against the joint pointing out and whack it with a hammer.
 
  • Like
Reactions: mrrsm

selectah77

Original poster
Member
Feb 22, 2016
21
Bloomington, Minnesota
IMG_1226.JPG IMG_1227.JPG

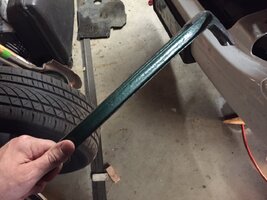
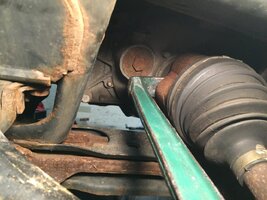
On the advice of @MRRSM, here are a couple pics of my current situation. Top is just pic of the pry-bar being used and bottom is where I am using it to try and pop the CV from the diff (drivers side). From what I am reading, I should be using a punch where I am prying. I do not see how I can hit the back side of the CV with a punch as space is - to put it mildly - limited. Then use a slide hammer to pull the shaft and then pry the diff from the block and hang by wire/bungees/straps. Correct procedure @Mooseman?

Note regarding loosening the flywheel bolt. Most everything I read said to remove the inspection plate on the trans and jam a pry-bar or big flathead screwdriver in the teeth of the flex plate. Nope. What I found worked best was to insert a screwdriver in the holes of the flex plate located just north of the teeth. You can get a big philips wedged in there and against the inspection hole and get it loose with a couple cranks on a breaker bar and not worry about busting any teeth on the plate.
 
  • Like
Reactions: mrrsm

Mooseman

Moderator
Dec 4, 2011
25,317
Ottawa, ON
I have been able to use a long pry bar against the pot from the underside and hit the other end with a hammer. And from the disconnect side, use a slide hammer with a bolt screwed into the end of the intermediate shaft.
 
  • Like
Reactions: mrrsm

Mooseman

Moderator
Dec 4, 2011
25,317
Ottawa, ON
Ah, I don't know off hand. Maybe 8mm? Definitely metric. I just used something laying around.
 

selectah77

Original poster
Member
Feb 22, 2016
21
Bloomington, Minnesota
FINALLY got the !@#$ pan off only to have one screw bend and the other break while jacking the front cover :explode:I danced a jig once I got it off though.

I noticed that there is about a 1/4" or so of play in the plunger, is that a characteristic of failure?
 

Mooseman

Moderator
Dec 4, 2011
25,317
Ottawa, ON
You mean the chain tensioner? Yes. The ratcheting mechanism should prevent the plunger from retracting much, if at all. That's where mine failed and would go loose while idling, causing the chain to flop around. Better replace it.
 

mrrsm

Lifetime VIP Donor
Supporting Donor
Member
Oct 22, 2015
7,696
Tampa Bay Area
I would beg you to re-visit the "85k 4.2L Engine Repair" so you can see the OEM vs. Poor Quality component comparisons I examined in photos so you will know why only using the OEM High Quality Timing Chain Tensioner, Chain Guides and and Timing Chain will do in this case... and spare the worry of what might not last long enough to make you need to re-do this job in six months. Believe me when I say that the minimal additional cost for GM Factory or AC-Delco components will let you sleep well when the job is completed.
 
Last edited:

selectah77

Original poster
Member
Feb 22, 2016
21
Bloomington, Minnesota
I have been being lazy. After fighting with this thing to get to where I need to be, I lost my energy. Getting back to it this weekend though. What is the best way to clean the engine block to prep for the new gasket?
 

mrrsm

Lifetime VIP Donor
Supporting Donor
Member
Oct 22, 2015
7,696
Tampa Bay Area
I have been being lazy. After fighting with this thing to get to where I need to be, I lost my energy. Getting back to it this weekend though. What is the best way to clean the engine block to prep for the new gasket?

Visit this link and read the posts listed as follows:
http://gmtnation.com/forums/threads/the-85-000-00-gm-4-2l-engine-repair.14423/

#18 (Don't skip this dialogue...Read it very carefully if you want your Oil Pan and Front Cover to remain Leak Free and keep Dirt out of the Engine!)
#121-124
#142-144


Also if you have not as yet researched all of the necessary Repair Parts, Kits, Gaskets, etc. then visit this link to my Photobucket to view images them:

EDIT: Wednesday, August 2, 2023

Unfortunately, since I refused to Pay the Dopes at Photobucket their King's Ransom Charges for the 4,500 Images I USED to have listed there... They SH*T-CANNED every single one of them. However, since I am such a Perspicacious Fellow... I have them Backed Up over on my other "Flickr-Bucket Account" at THIS Link Below:


THIS Link is NFG anymore:

http://s557.photobucket.com/user/60...NEREPAIR/TRAILBLAZERENGINEPARTS?sort=2&page=5

Check Out ALL of the other related Flickr Site Albums for Thousands of OTHER GM 4.2L LL8 Motor Tear Down, Parts, Tools and etc... HERE:


THIS Link is also ...NFG anymore:

This link goes to additional parts, GM Sealant for Oil Pan and Timing Chain Cover and MANY other repair tools for the GMT 360

http://s557.photobucket.com/user/60...INEREPAIR/TRAILBLAZEREPAIRTOOLS?sort=3&page=1

GM Atlas 4.2L Engine Head Replacement:

RockAuto LLC Re-Manufactured Aluminum Engine Head for 2002-2004 GM Atlas 4.2L Motor
New Genuine GM 24100263 Engine Camshaft Bolt
New Genuine GM 12565425 Bolt
Fel-Pro ES 72195 Cylinder Head Bolt Set
Fel-Pro Hs26214Pt Head Gasket Set
GM OEM 4.2L TRAILBLAZER OIL PAN
AC-Delco 15-11073 GM Original Equipment Engine Coolant Thermostat Housing
GMC O2 Oxygen Sensor SG1823 15894 234-4344 ES20113 21044 4 wire w/ OEM Plug
Dorman 674-777 Exhaust Manifold
Dorman 917-010 Variable Valve Timing Solenoid
Dorman Kit Exhaust Stud Front Full Size Truck Chevy GMC Sierra 03133
Dorman 03413B Exhaust Manifold Hardware Kit
Dorman 674-777 Exhaust Manifold Kit
Cloyes 9-0195S Timing Chain Set
Sealed Power 224-53582 Oil Pump Repair Kit
Fel-Pro Tcs 45051 Timing Cover Gasket Set
AC-Delco 15-40133 GM Original Equipment Engine Cooling Fan Clutch
Stant 14659 Thermostat And Housing - 190 Degrees Fahrenheit
AC-Delco D1843A GM Original Equipment Engine Oil Pressure Switch
AC-Delco 251-731 GM Original Equipment Water Pump
AC-Delco 251-2029 GM Original Equipment Water Pump Gasket
Cloyes S908 Timing Driven Gear
AC-Delco Re-Manufactured VVT Gear

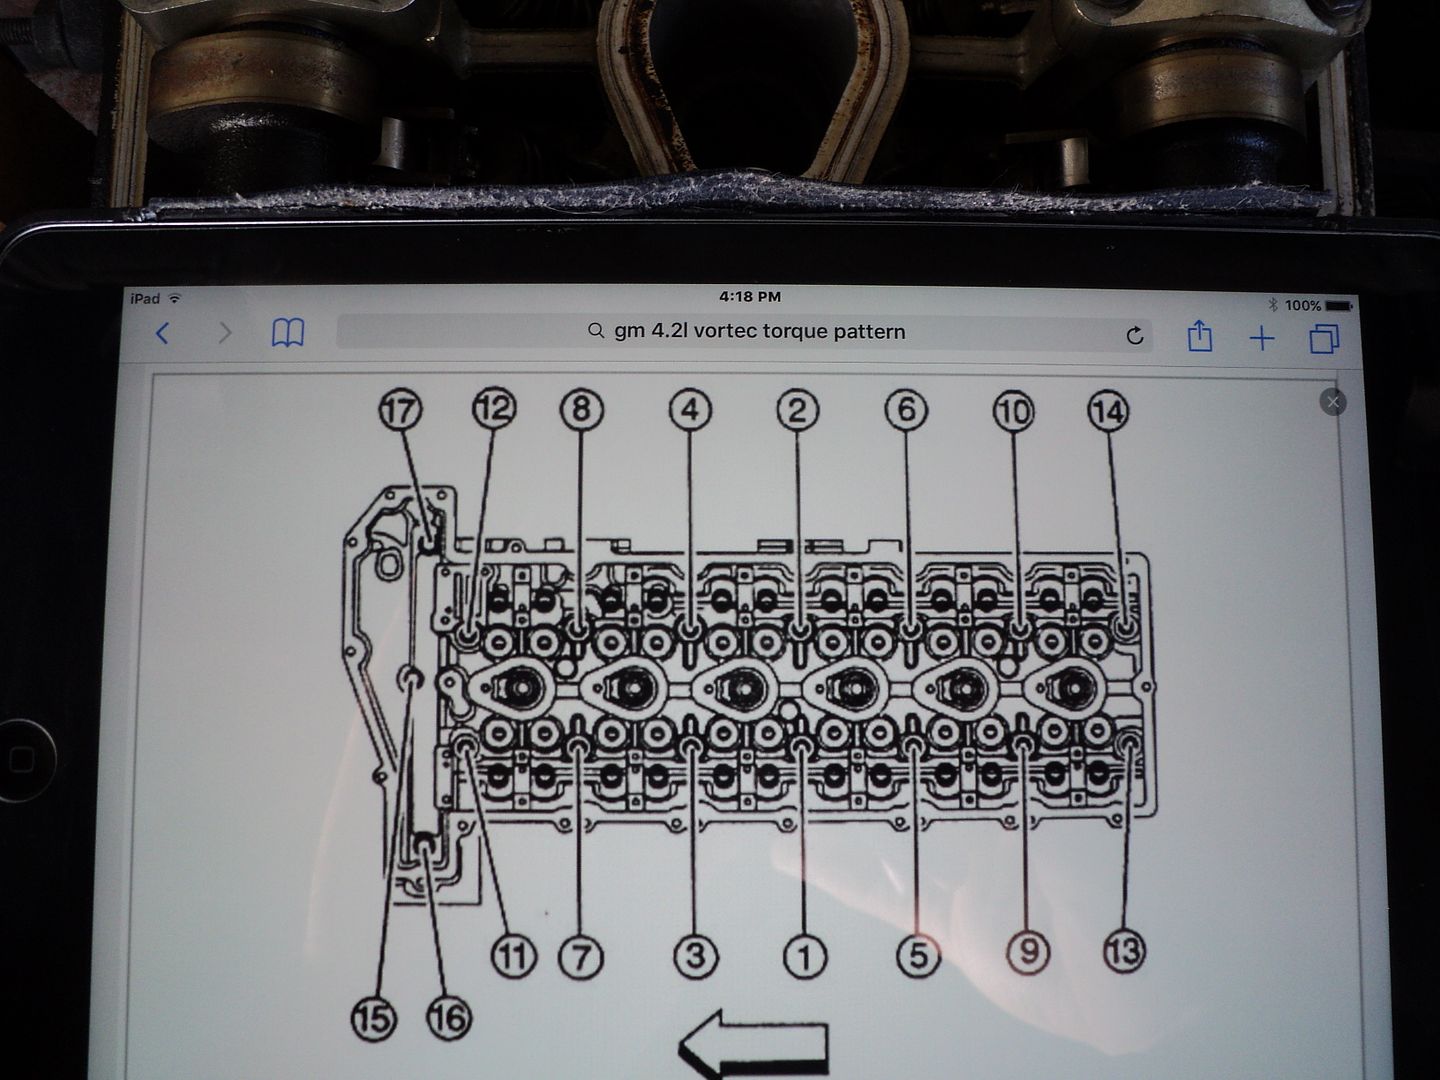
Download and Print Out this FULL SIZE Image from Googling "GM Atlas 4.2L Engine Head Bolt Torque Pattern" and follow "The Manual" to the letter. Having this Template in plain view on top of the engine will help you to "Keep your Place". During the Final "Torque To Yield" pass.. use a Permanent Red Oil Paint Ink Pen to mark each head bolt in succession so you know that no other action is necessary and so that you do not double over tighten them...and then check them off on your template in case you need to "Pause to P" or some other interruptions occur: DO NOT BE TEMPTED TO RE-USE ANY FASTENERS DURING THIS R&R OF THE ENGINE HEAD!

DSC04138.jpg


This is an excerpt from Post #121 concerning Head Bolts that deserves 'special attention"

"In the case of the GM Atlas 4.2L TTY Head Bolts... I will be defying the Factory OEM convention of installing these Fasteners BONE DRY... by applying an EXTREMELY LIGHT COATING OF 3&1 Oil that will then be very thoroughly wiped clean from the threads and leave only the slightest residue therein. The reason for this contingency is that the GM OEM Reps have made this recommendation due to the extremely high number of these Fasteners Snapping Off during standard installation procedures."
 
Last edited:

selectah77

Original poster
Member
Feb 22, 2016
21
Bloomington, Minnesota
Well shucks, it sure has been a while. Been pretty hot in my garage so it really limits what can be done BUT I have gotten the following done:
head back on and torqued to spec
replaced ball joints - upper and lower
timing cover back on
oil pan back on
Now it is really just assembling the rest of it which should go pretty fast since the oil pan is back on. The rest seems, dare I say it, easy :2thumbsup:
 

Mooseman

Moderator
Dec 4, 2011
25,317
Ottawa, ON
Congrats! You musta had the sweats until you turned the key and saw it run. I know I always do after a major repair.
 
  • Like
Reactions: mrrsm

selectah77

Original poster
Member
Feb 22, 2016
21
Bloomington, Minnesota
I just wanted to say a HUGE thanks to @Mooseman and @MRRSM for their input, insight and articles they have posted to this site. I also want to thank this site period, I have found it to be a much better resource than some other forums I have used. This was a learning experience, that's for sure! But as I said previously, patience is key. You will drop bolts (took me a couple of days to find one, fell in a weird little pocket at the front of the frame), sockets, wrenches, crap will get in your eyes, nose and mouth. You will skin up your knuckles and arms, your hands will be sore. But if you keep at it, that one screw that you can't remember or figure out what it went to will reveal itself in due time (happened :celebrate:!). So thanks everybody and keep it up!

Jonathan
 

Forum Statistics

Threads
23,312
Posts
637,824
Members
18,517
Latest member
javier perez

Members Online