Those little bulbs.....

Magyver

Original poster
Member
Apr 9, 2012
64
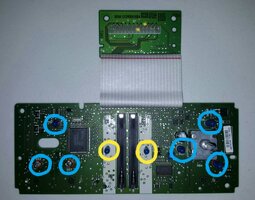
The good news is that I successfully replaced the stepper motors for my instrument cluster:thumbsup:. The bad news is one tiny bulb is out on the cluster, and 1 or 2 bulbs went out on in the headlight switch. It's annoying, and completely cosmetic, but if there's supposed to be light somewhere I want light.

Does anyone know the proper wattage bulb for these? For all I know they are the same but I'll never assume that. I do know that they both are soldered into the PCB in their respective locations.

Thanks in advance!
 

The_Roadie

Lifetime VIP Donor
Member
Nov 19, 2011
9,957
Portland, OR
I bought my gauge steppers from an Ebay merchant who threw in 6-10 of these bulbs for free. Sorry no part number, but many other merchants sell them. I seem to recall a Radio Shack cross-reference number posted on the OS in a thread about window switch lamps.
 

Magyver

Original poster
Member
Apr 9, 2012
64
I would imagine just about any 12v bulb would work but I have no idea about the wattage. I want to guess its around 1.5 or close to that? I hate bright spots almost as much as dim spots but maybe I shouldn't be do fussy
 

Matt

Member
Dec 2, 2011
4,023
the roadie said:
I seem to recall a Radio Shack cross-reference number posted on the OS in a thread about window switch lamps.

Here you go: Radio Shack Part #: 272-1154 12v/50mA Incandescent Bulb
 

Shdwdrgn

Member
Dec 4, 2011
568
Its also worth considering changing over to LEDs. For about $10 I got a bag of 100 cool-white LEDs and resistors, and I've been slowly converting my dash. To me the LEDs look much cleaner, a more true 'white' while the original bulbs now look dirty, like someone smoked too much. The conversion is time-consuming, but I'll eventually get it finished.

For an example of the difference in appearance... The radio still has the original bulbs.
 

Ed H

Member
Oct 18, 2012
167
For an example of the difference in appearance... The radio still has the original bulbs.

WOW! That looks great. I just read in a thread on the OS that the lights in the heater controls are not user-serviceable. Clearly, this is not the case. I have the same heater controls and the light behind the fan speed selector just died. Can you advise how easy / difficult the job was? Are they soldered to a board(s)? I am not shy of soldering.

I have the same question for the light behind the pop-up dimmer switch. User serviceable? Easy to replace? I was just about to search the archives. That might be my project for tomorrow.
 

Shdwdrgn

Member
Dec 4, 2011
568
If you have the digital climate control, you are in luck. I believe it is the manual model that is sealed and cannot easily be opened up.

I have a number of pictures from when I worked on my own unit, because this was the first piece I did my LED conversion on. You can view those images from here. Once you have it out of the dash, the whole unit comes apart easily. The only difficult part was keeping the resistors out of the way so the rubber overlay could still lie flat. The LEDs I used are 20,000mcd. For single bulbs I used a 680 ohm resistor, and for dual bulbs (where they could be paired in some of the other controls) I believe I used 560 ohm. Check ebay for 100-packs of 5mm LED's... you should be able to find a bag for around $6.

The best bet for using the proper resistor is to find the forward voltage of the LEDs you buy, and find an online resistor calculator. Punch in 14.4V, and the number of LEDs you are grouping together (no more than 3 in series). The ratings are right on the edge for using 1/4 watt resistors, but I've had no problems with mine overheating. Once you know the optimal resistor to use, you may need to modify it. In certain spots, I found the LED looked noticeably brighter, so I would use a slightly larger resistor (not much - try using a 620 in place of a 560) to tone it down a little. There are no limits to using larger resistors, just never use a resistor that is smaller than what the calculator recommends. Additionally, in some spots I sanded the top of the LED flat and left it scuffed so it would make more of a floodlight effect rather than a pinpoint spotlight.
 

gmac310

Member
Dec 4, 2011
174
Ed H said:
WOW! That looks great. I just read in a thread on the OS that the lights in the heater controls are not user-serviceable. Clearly, this is not the case. I have the same heater controls and the light behind the fan speed selector just died. Can you advise how easy / difficult the job was? Are they soldered to a board(s)? I am not shy of soldering.

I have the same question for the light behind the pop-up dimmer switch. User serviceable? Easy to replace? I was just about to search the archives. That might be my project for tomorrow.

I remember reading a post about this. It's the sliding levers that do not come off. The person who wrote the post said he had to use a Dremel tool to grind a groove in the side of the slider and then gluing it back on, luckily the groove was barely noticeable.
 

Blckshdw

Moderator
Nov 20, 2011
10,681
Tampa Bay Area, FL
gmac310 said:
I remember reading a post about this. It's the sliding levers that do not come off. The person who wrote the post said he had to use a Dremel tool to grind a groove in the side of the slider and then gluing it back on, luckily the groove was barely noticeable.

:wink: Partially correct. I dremeled a hole on the inside part of the tabs, and touched my soldering iron to the metal slider. The heat softened the plastic so it would slip off of the slider's teeth. Putting it back on didn't require any adhesive, they are still on firmly to this day. Other people have had luck wiggling them for a while, and they eventually gave way. I'm too impatient (which is how I broke the first one :duh: :redface:)
 

gmac310

Member
Dec 4, 2011
174
Blckshdw said:
:wink: Partially correct. I dremeled a hole on the inside part of the tabs, and touched my soldering iron to the metal slider. The heat softened the plastic so it would slip off of the slider's teeth. Putting it back on didn't require any adhesive, they are still on firmly to this day. Other people have had luck wiggling them for a while, and they eventually gave way. I'm too impatient (which is how I broke the first one :duh: :redface:)

Now I remember. Looks like I'll be doing this soon myself since it appears the light for the left slider has a loose solder joint. Light goes out intermittently when adjusting the temp.
 

Magyver

Original poster
Member
Apr 9, 2012
64
Matt said:
Here you go: Radio Shack Part #: 272-1154 12v/50mA Incandescent Bulb

I concur, sir!

I came to the same conclusion after taking apart the switch and bringing the circuit board to the Shack to match it up. Just finished the repair and they do work just like the originals.

@Shdwdrgn : I considered the conversion to LED but I'm just not a big fan of the kind of light those put out inside the cab. I like the softer light of incandescants. Even the LED buttons on my HU bug me: When I was shopping for a new radio I actually took into account how bright the buttons were. What a fuss-ass I must be lol :crazy:
 
Oct 13, 2012
24
I replaced the bulbs in my manual climate control without much issue. Used the radio shack bulb mentioned above. Bulbs have to be removed and new ones re-soldered to the board. Everything works fine now. Just be very careful removing the temp sliders. I used a fork to help. which was also mentioned by a member
 

C-ya

Member
Aug 24, 2012
1,098
Are the bulbs in the door for the windows/lock/etc the same? I would imagine so, but wanted to see if anyone has changed them.
 

Matt

Member
Dec 2, 2011
4,023
C-ya said:
Are the bulbs in the door for the windows/lock/etc the same? I would imagine so, but wanted to see if anyone has changed them.

Yes they are. I haven't changed them yet, but I do have them to get the bad ones changed.
 

C-ya

Member
Aug 24, 2012
1,098
Thanks, Matt. Now to get some. I have a few out in the driver's door, and the front passenger door window switch is dark, too. Both front windows are out on the driver's side, so at night, I have to remember to move up from the lighted ones to get the front window(s) down.
 

Matt

Member
Dec 2, 2011
4,023
C-ya said:
Thanks, Matt. Now to get some. I have a few out in the driver's door, and the front passenger door window switch is dark, too. Both front windows are out on the driver's side, so at night, I have to remember to move up from the lighted ones to get the front window(s) down.

No worries. Both the front windows on the drivers door are out on mine too.
 
Nov 23, 2016
17
Texas
Hope I'm posting in the correct thread?

My tem control bulbs are out except for 3 on the right side. I have the manual 2 slide temp control.

What are the correct sizes & volts of the oem bulbs needed? The bulbs circled in blu are? The bulbs circled in yellow? Do the bulbs have to be the exact size for the illumination to work? Wife doesn't care. I brothers me very much.

Thank you for your response, time & patience.
 

Attachments

  • 20170214_000828.jpg
    20170214_000828.jpg
    140.9 KB · Views: 9
Nov 23, 2016
17
Texas
I looked up on how to test out of Envoy & avoid the in & out to the enviy to check every time. Will this power up all properly soldered bulbs or only sections?

Top row (in black) is negative -
Bottom row (in red) is positive +

I'm gonna use a radio shack multi ac adaptor (set to 12V). Hope this works

Thank you for all the info & helpful replies.
 

Attachments

  • 20170214_001317.jpg
    20170214_001317.jpg
    115.5 KB · Views: 8

Forum Statistics

Threads
23,319
Posts
637,878
Members
18,518
Latest member
Firebaugh86

Members Online