Thermostat and Temp Sensor tips

AzTruckGuy

Original poster
Member
Dec 1, 2015
501
scottsdale, az
So when I first got my 2003 TB LS, I never noticed the temperature gauge was staying around the 180 range when warmed and wouldn’t go to the 210 range. Took a trip to Phoenix and then I noticed that the TB hit 210. With the help of the forum, seemed the Thermostat was the issue and with that I started buying parts.
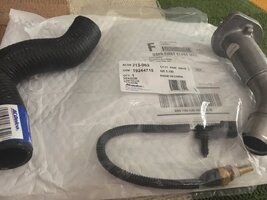
IMG_1478.JPG

  1. ACDelco GM Original Equipment Thermostat 15-11006
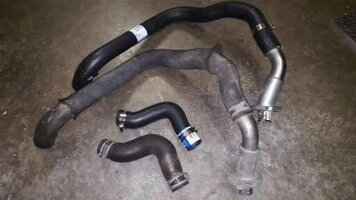
  2. ACDelco 20382S Professional Upper Molded Coolant Hose
  3. ACDelco 26398X Professional Lower Molded Coolant Hose
  4. ACDelco 213-963 GM Original Equipment Engine Coolant Temperature Sensor
  5. Dexcool Radiator fluid, I didn't go Ac Delco this route and ended up getting Preston Dexcool.
  6. Crimps for the hoses if yours are bad, I ended up using all my old ones, as they seemed to be fine and still held a tight grip on the hoses.
I recommended all the parts above as a must, since you're in there replacing these parts, might as well get peace of mind. (I found out I had original parts on mine dated 10/30/2002 after I replaced them)


I added the following since I was having a stall issue on my TB and since I was going to be working on the vehicle I might as well replace it and see if it cures my stalling.

  1. ACDelco 214-641 GM Original Equipment Vapor Canister Purge Valve (Drivers side on engine)
I think this video is great to get some insight on how the process is:

https://www.youtube.com/watch?v=qk2__HwMIqY

Now for the tips I recommend that are not on the video since I made some mistakes that took me 2 days instead of 1 day to repair my Trailblazer.


Make sure you get Ac Delco parts only, while I have an issue that the parts are not made in America, they still have to pass standards by GM and I am not about to do this again! Also flush your radiator system, do a search as there are many methods to do the flush.
  1. Make sure you have a 18MM deep cutaway socket for the Temp Sensor, trust me on this one, I didn’t have one and it took an extra day for me to install the Temp Sensor.
  2. The 18MM deep cutaway socket is very expensive that may seldom get used, so it’s hard to justify $40+ for that socket , as MRRSM recommended to me http://www.harborfreight.com/4-12-in-43-amp-angle-grinder-69645.html
    http://www.harborfreight.com/4-in-40-grit-metal-cut-off-wheel-with-38-in-arbor-10-pc-61525.html and a $2 18mm deep socket for around $25+ is justified, since you can do some custom sockets with the cutaway feature in the future or do some metal work to grind off some the rust that the Trailblazers tend to have. The parts.JPG 18MM my way.JPG
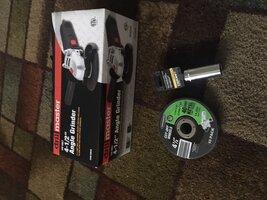
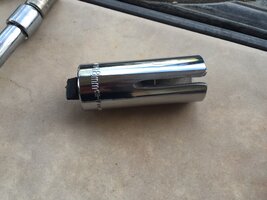
  3. Be prepared to curse like a MFer, while I feel the Trailblazer has been easy to do some updates interior wise and outside motor work, this was a challenge, it’s not impossible but its time consuming and is awkward due to the tight spaces you have to work with and the fan and plastic bits just eating up your arms and bruising you. fucked up arms.JPG
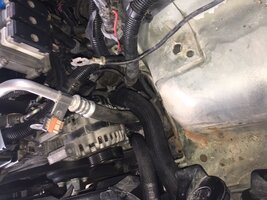
  4. The alternator can be tricky, especially the bottom bolt since its in front of a AC hose, that just seems to say hey, how the hell you going to get that bolt out? I ended up taking off the plastic tray that holds the battery since I was just having an issue with the bottom bolt on re-install, after I took it off it made re-installing easy. I would recommend this to remove it for easier removal and re-install. The bolts near the horns can be tricky to get at, but its worth the room this gives you for that bottom bolt. battery box  in.JPG battery box taking out.1JPG.JPG
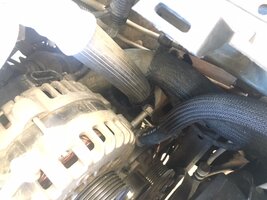
  5. I would pre-assemble the new Thermostat to the new lower radiator hose, this will make it easier to crimp in place, so you wont have fumble through all the hoses and cables from the top. If you need help on how it should go, just line it up with the old T-Stat and hose, and you should be fine. I ended up using the cover that was on the old radiator house since it was in good condition, it was tricky to get on since it seemed to tighten when I stretched it out and realized if you compress this cover it will widen and make install on the new hose a lot easier.
  6. Try to be positive while doing this, I let the heat and my annoyance get to me, that I didn't want to deal with the Temp Sensor anymore, lucky for me the board was giving me tips and advice that helped me fix my Trailblazer quickly, instead of waiting for another day.
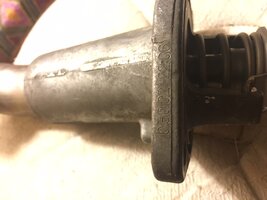
  7. As I learned the hoses and Thermostat where original as when the Trailblazer left the showroom of Chevy. The upper hose was hard to get off and I had to cut it off, if you have to do this DO NOT let any debris fall into the pipe that goes down into the block. 10/30/02 date on the thermostat. Hose wont come off.JPG Old Thermo stat.JPG
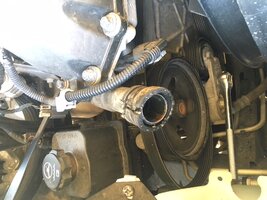
  8. Before putting back the Alternator now is the time to make sure all bots and nuts are tight, otherwise more scrapes to the arms to tighten any loose parts if you have to take the Alternator off again.
  9. Well the Trailblazer got up to 210 quickly, so everything seems to be working. IMG_1337.JPG
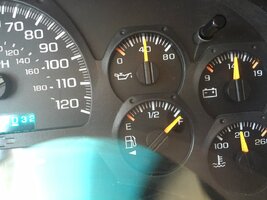
  10. Drive around and let the Trailblazer warm up and check for any leaks when you turn it off.
 
Last edited:

Mooseman

Moderator
Dec 4, 2011
25,344
Ottawa, ON
Very good article. Never thought about pre-attaching the hose to the thermostat. Good one!
 
  • Like
Reactions: AzTruckGuy

AzTruckGuy

Original poster
Member
Dec 1, 2015
501
scottsdale, az
Very good article. Never thought about pre-attaching the hose to the thermostat. Good one!

Photo credit goes to RTTBLT1, perfect example pre-attaching Thermostat to Hose, I didn't want to have any issues with the crimp on the top with the wires and hoses in the way and easier to transfer that cover on the old hose to the new one as long as its in good condition.
95710_5f1fb39471b521d3369afc5c7f235423.jpg
 

mrrsm

Lifetime VIP Donor
Supporting Donor
Member
Oct 22, 2015
7,733
Tampa Bay Area
Excellent Step-By-Step Write up...AZ... These kinds of insights are always Paid for in Blood, Sweat and Tears...But in the future...For all the people who will need to know...and not suffer... Your article will light their way!


"When the Student is Ready... The Teacher Emerges..."
Confucius
 
Last edited:
  • Like
Reactions: AzTruckGuy

mrrsm

Lifetime VIP Donor
Supporting Donor
Member
Oct 22, 2015
7,733
Tampa Bay Area
Photo credit goes to RTTBLT1, perfect example pre-attaching Thermostat to Hose, I didn't want to have any issues with the crimp on the top with the wires and hoses in the way and easier to transfer that cover on the old hose to the new one as long as its in good condition.
View attachment 76896

Of the Two Types of Hose Clamps familiar to us all... the Least Forgiving is also the Most Reliable because it simply depends upon unending Compression and Squeezing that cannot fail to hold as long as these clamps are applied upon hoses that are not damaged by Dry-Rot , Torsion or Twisting Damage or excessive exposure to Heat and Chemicals. Otherwise...Spring Steel Loop and Flat Hose Clamps are Mechanically Perfect. But the problem comes when it is time to either re-position or remove and install these Damned Clamps entirely that we wind up adding Man-Years of labour to the process. Most of the time ...we simply cannot get either a good enough grip on the opposing tangs to hang on to the Damned Things or...we have the strength and determination to do so...but our choices of tools to do this are almost always woefully inadequate for the job.

There are however...Two Tools that while being bit on the pricey side... they can take this Clamping Nightmare and Change it...into a Dream. This is possible because once the Tools holding ends are applied to a whole range of clamps with a very wide margin of sizes... from the very small to the ridiculously large clamps that populate Automotive Hosing...and then LOCK THEIR HOLDING POSITIONS OVER THE ENTIRE SIZE RANGE...PERFECTLY. All you need to do is look at the expressions of dismay on the faces of every single mechanic alive after you have told them. "I need to have the Heater Core in My Car Replaced...and I need by NOON..."

With these tools, the replies from our intrepid raft of Mechanics would become, "Cool Beenz... No Sweat ... You'll have your ride back before Lunch." And the reason they can say this with a smile of relief on their faces is because by using the Cable Clamp Tool and its Little Brother... you can reach all the way back to the Firewalls... lay the rectangular "Box Lock" over the clamp ends... and at the other end with the handles ...just squeeze down steadily until you can see daylight around the loosening clamp...and then it LOCKS. Then... just lay down the handles... and reach in with your Free Hands... and simply slide the clamps further up the Hose... and release the Tool, Done! After that... you can wrangle with the Heater Core and re-install the clamps in reverse. This is a very quick easy method and Guaranteed to be... "Blood Blister Free":

View attachment 76897 View attachment 76898 View attachment 76899 View attachment 76900 View attachment 76901 View attachment 76902 View attachment 76903 View attachment 76904
 
Last edited:

AtlWrk

Member
Dec 6, 2011
674
I think I mentioned it in a thread specifically about removing the alternator but the easiest way by far is with a ratcheting 15mm wrench. The bottom bolt and wrench will back out against the AC hose which precludes a traditional wrench or socket (an open ended wrench obviously works too but takes forevvvver). When the bolt is out of the block you just pull the alternator, wrench and bolt all out together.
 

AzTruckGuy

Original poster
Member
Dec 1, 2015
501
scottsdale, az
Update:

Its been 3 days since this was completed. I think the PCM is still re-learning so I will post again in a couple of days.

The Trailblazer seems smoother and seems to have less vibration with the Ac turned off or on, I am thinking now that's its operating at normal temps, this has helped. The SES light has not turned on the dash, I am hoping the new purge valve has cured my P0440 code.

Today I took it for a drive in 92F weather to keep testing it to make sure nothing else is wrong. Well I am petty sure I have a clogged cat, I feel the power isn't there sometimes and when I push the gas it delays to move forward. It did that today, I was pushing on the gas and it didn't want to go forward as fast I wanted it too, then all the sudden it kicks in and starts to haul. I am guessing since the thermostat was neglected by my sister and her husband and they gave it to me, it pretty much destroyed the cat, since its been running like for a while now?
 

AzTruckGuy

Original poster
Member
Dec 1, 2015
501
scottsdale, az
Ok update:

Its been a week since the work was completed... SES with P0440 code has not returned and I assume since the Thermostat and Purge Valve were replaced these 2 were the causes, I have not experienced any stall issues at all.

I am not sure I have a clogged Cat, even though with the engine not running at operating temps for a while, I would assume this destroyed the cat? I released the vacuum on my brake booster and replaced the check valve and the power seems to be back. I have not experienced in delays to gas pedal push to speed up. I will continue to see how the Trailblazer reacts, but for now its all good.

Now to get ready for the tranny fluid change.
 

Mooseman

Moderator
Dec 4, 2011
25,344
Ottawa, ON
Best way really to check for a clogged cat is with a backpressure test.
 

Forum Statistics

Threads
23,330
Posts
637,984
Members
18,532
Latest member
timmerk

Members Online