Temp Sensor Hell

Status
Not open for further replies.

AzTruckGuy

Original poster
Member
Dec 1, 2015
501
scottsdale, az
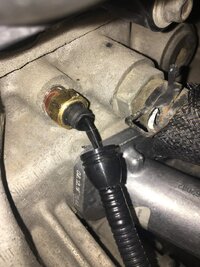
Not fun doing the T-Stat and Temp Sensor this weekend, what should have taking a couple of hours, is on the 2nd day. I made the mistake of not getting the 18MM cutaway socket and Ive been to Autozona, Pepboys, Napa, Home Depot and Lowes to see if they have this socket, no dice....I am getting resistance from the new sensor and its almost there but, it isn't moving now and I don't want to strip the bolts.....Know of anyone who has this 18MM notched socket or another way to get this sensor in?

IMG_1505.JPG
 
Last edited:

Sparky

Member
Dec 4, 2011
12,927
Buy a cheap socket and grind a notch in it?
I borrowed a crow's foot from a neighbor, that sucked, I wished I had just gotten another socket and notched it.
 

Wooluf1952

Member
Nov 20, 2011
2,663
Milwaukee, Wisconsin
I and others have bought a (cheep) 18mm deep wall socket, and grind or hacksaw a slot into it. Sand off sharp edges to prevent cutting into the wire.
 

AzTruckGuy

Original poster
Member
Dec 1, 2015
501
scottsdale, az
Emailed a couple of machine shops to see how much it cost for them to cut into a 18MM, I'm sore and scraped up bad from installing the purge valve and, taking off the Alt and T-Stat, piss poor design from GM, that damn fan is hell when trying to take things off. The Belt was simple to take off, after that is when started to have issues, its not impossible but time consuming and awkward when trying to get into tight places. Don't have the patience to do the hacksaw cutting.
 

Mooseman

Moderator
Dec 4, 2011
25,310
Ottawa, ON
For the socket, just a slit cut into it with an angle grinder will work.

And to help with the fan shroud, cut a notch in the shroud to clear the top radiator hose nipple. Less wrestling to install and remove in the future.
 

AzTruckGuy

Original poster
Member
Dec 1, 2015
501
scottsdale, az
For the socket, just a slit cut into it with an angle grinder will work.

And to help with the fan shroud, cut a notch in the shroud to clear the top radiator hose nipple. Less wrestling to install and remove in the future.

What do you think I am, a autoshop lol...basic tools man so no grinder, I honestly don't like working on vehicles, never cursed so much changing out parts on a vehicle. The fan won this battle with my arm ha ha

IMG_1508.JPG
 
Sep 20, 2015
501
Western Mass.
There was a post about this on the OS. A member provided a great picture of his finished product (a hacked up Craftsman 18mm Deep Socket) and it looked great. In fact when I replace my ECT this week, this is my plan. The guy actually used a saw but an angle grinder will work fine for this application too. Maybe even a Dremel with a blade rated to cut metal.

Anyways, food for thought.

home-fashioned 18mm coolant temp sensor socket.jpg
 

KNBlazer

Member
Feb 8, 2012
811
Snapon (FRXM18) makes this socket... I used a crow socket, longest 30 minutes of my life, lol..each way... next time, I'm buying a socket and grinding it..
 

AzTruckGuy

Original poster
Member
Dec 1, 2015
501
scottsdale, az
Snapon (FRX
There was a post about this on the OS. A member provided a great picture of his finished product (a hacked up Craftsman 18mm Deep Socket) and it looked great. In fact when I replace my ECT this week, this is my plan. The guy actually used a saw but an angle grinder will work fine for this application too. Maybe even a Dremel with a blade rated to cut metal.

Anyways, food for thought.

View attachment 76852

Yes I did see this and I have been looking for my Dremel, but I think I lost this a while back.

Snapon (FRXM18) makes this socket... I used a crow socket, longest 30 minutes of my life, lol..each way... next time, I'm buying a socket and grinding it..

$50 for a tool that I may never use again, I went to napa they wanted to sell me a crown socket for $18, went to harbor freight bought a set for $11, I'm taking them back as they don't fit. I just had one of the machine shops email me back, they think $5 to $10 to cut in my 18mm socket, I'll do just go that route
 

mrrsm

Lifetime VIP Donor
Supporting Donor
Member
Oct 22, 2015
7,685
Tampa Bay Area
What about trying via Wheel Well accessibility through the small rubber Flap Window...after jacking and Stacking the Vehicle and then pulling the Wheel-Tire off the Driver's Side?
 

AzTruckGuy

Original poster
Member
Dec 1, 2015
501
scottsdale, az
What about trying via Wheel Well accessibility through the small rubber Flap Window...after jacking and Stacking the Vehicle and then pulling the Wheel-Tire off the Driver's Side?

I tore the wires off and used a box ended wrench to remove the old TS, which worked great because how's its angled. The issue is the wires and the harness attached at the other end of the new TS, I cant fit them in the box ended wrench due to the wiring harness being too big. As you can tell from the pic, I have some clearance, straight wrenches don't work and I have tried to do a T, with a 18MM wrench and vice grips, worked for a little but now I need the socket to really power through, since it wont move anymore and needs a little more to go. I don't want to strip the bolt by forcing it or damaging the sensor. Ive never encountered this issue before on my last 10 vehicles I have owned. IMG_1507.JPG
 

AzTruckGuy

Original poster
Member
Dec 1, 2015
501
scottsdale, az
Ok this is a bad sign, I had an idea on how to maybe get the TS all in the way in and I pulled back the rubber cap and I could feel liquid at the wires? Did this sensor go bad? I ended up putting the T-Stat back and hoses and filled the Rad since I just wanted to complete that phase and wait to figure out the TS. I think I read some where on the board another member had a leak with his new sensor as well?
 

Attachments

  • wet.JPG
    wet.JPG
    171.3 KB · Views: 22
Last edited:

mrrsm

Lifetime VIP Donor
Supporting Donor
Member
Oct 22, 2015
7,685
Tampa Bay Area
There was a post about this on the OS. A member provided a great picture of his finished product (a hacked up Craftsman 18mm Deep Socket) and it looked great. In fact when I replace my ECT this week, this is my plan. The guy actually used a saw but an angle grinder will work fine for this application too. Maybe even a Dremel with a blade rated to cut metal.

Anyways, food for thought.

View attachment 76852

If that sensor is the New One... I recommend pulling it before it gets any more beat to death and getting another one and starting from scratch. Seth has shown you the "Easy Climb out of Water Temp Sensor Hell''...And as far as how frustrated you are right now... We get it...really... But it might confuse people who are trying to help you with suggestions, and your replies become complaints about "not having this or that" as this may not get you any closer to a solution than you are at this very moment... unless you keep an Open Mind.

Right now... you are just one short trip away from making this Nightmare disappear... by visiting your local Harbour Freight store and for the modest price of $15.00 for an Angle-Grinder and springing for an additional $10.00 purchase of a 10 Pack of 1/16" THIN 4.5" Wide Cut-Off Discs while you are there ... And then you can start over after creating a customized "One Off" Tool and make your SUV "Kinetic" once again... :>)

Look around the adjacent areas on the Driver's Side of the Engine nacelle for items that can either be unbolted and moved to one side...or...the other, or in the case of the Battery and Battery Box or the PCM...completely removed. And once out of the way ...these absent things will give you more Top Down access and Different Angles of Approach to access the Temp Sensor. There will always be something in such tight quarters that will grab your arm to cut and bruise you and substantially reduce your manual mechanical advantage... until you figure out that the items that are obstructing you... can often just be unfastened and completely moved out of the way.

Three Very Important Last Suggestions... While you are still at Harbour Freight... pick up 1-16MM, 1-17MM and 1-18MM Deep Sockets... so you can MATCH the actual size of the barrel of your New Replacement Sensor EXACTLY.. .B4 Grinding away on the Wrong One... either Too Loose... or Too Tight! If you can... try cutting the Wire Slot just wide enough and smooth the sharp edges In between the socket angles to leave "L" shaped edges that can GRAB and hold onto the barrel of the sensor and NOT flex open too much. If you need to and can reach it... once the tool is in place... use a thick Zip-Tie around the barrel and snug it up tight to reinforce the Tool against spreading open... for both removing the old one... and installing the "Newest" New One.

http://www.harborfreight.com/4-12-in-43-amp-angle-grinder-69645.html
http://www.harborfreight.com/4-in-40-grit-metal-cut-off-wheel-with-38-in-arbor-10-pc-61525.html

image_21332.jpg


image_23697.jpg
 
Last edited:

RTTBLT1

Member
Jan 25, 2016
512
Louisburg, KS
I think I read some where on the board another member had a leak with his new sensor as well?

That was probably me.

I do have a very small leak coming from the new ECT Sensor, I mean SMALL, not even enough to make it to the ground. But it's still a leak!

After seeing your picture, I'm starting to wonder if mine is leaking from behind the Wires and not around the Threads like I was thinking.

Yesterday I took a spray bottle and rinsed the area so the Coolant won't stain the block and to be able keep a eye on the leak. I just went out and looked at it and after driving it today (not a dd vehicle), oddly there was nothing...dry!. So crossing my fingers that it sealed itself...but will be keeping a eye on it.
 

Mooseman

Moderator
Dec 4, 2011
25,310
Ottawa, ON
Won't delete it but can lock it.
 
Status
Not open for further replies.

Forum Statistics

Threads
23,310
Posts
637,778
Members
18,515
Latest member
jonnnnyj

Members Online