I have a 2002 trailblazer LS 4X4. Cat back exhaust system, Throttle body spacer and K&N air filter in stock air filter housing. I bought this new in 2001 and these items have been on it from almost new. It has 136000 miles and does not get driven a lot. About 3000 miles per year but gets driven some every month. From new it has had a slight hesitation at off idle and still has it; this is even before the spacer was installed. Dealer said that was normal B/S. The problem I need help with is that it started running rough at idle and at speed a few weeks ago, but does not do it all the time, seemed like a fuel issue but no check engine lights, no service engine soon lights. The truck has had all maintenance done, oil changes at 3000 miles using a Valvoline max life 10/30 I live in Tucson AZ so it’s hot even in the winter. I cleaned the throttle body; it was not gummed up that much. Checked for vacuum leaks using carb cleaner, did not find any. Changed the fuel filter even though it did not have that many miles, it was about 5 years old, it had clean fuel, smelled fine and the filter was not plugged. It has original fuel pump and fuel pressure regulator, I have always filled up before it got to ¼ tank of fuel. I checked the Fuel pump pressure at the fuel filter and it read 52 PSI even when truck was missing. Specifications are 48 to 54 PSI. I get a slight burnt gunpowder smell sometimes. I have a basic code reader and was not able to pull any codes. it was still running rough so I decided to take it to a shop that I have used in the past but it was a few days before I could take it. Of course it ran fine all the way there but I had them use their diagnostic equipment. This is from their notes. (found a P0300 code on cyl 3 and 4 at startup will have 2 to 4 misfires on Cyl 3 and 4 between idle and 1500 RPM but misfires are at PCM only and cannot feel at idle or driving) they pulled the 3 and 4 plugs and were fine some rust in number 4 tube probably from the rain at the hood cowl. I had them go ahead and do a fuel injector cleaning while it was there. The plugs were installed at 114000 miles at the dealer after trying the E3 plugs and it running bad, I am assuming that they are AC Delco since it was done at the Chevrolet dealer. Also had the water temp sensor and the thermostat changed at the same time. I had my wife drive it every day for a couple of weeks and a couple tanks of gas with no issues except that it seems and sounds like it is pinging on medium to hard acceleration, it still has good acceleration. Then one night it started running rough but not all the time. I have stopped driving it every day in case it is something that may harm the catalytic converter if it hasn’t happened already. Sorry for being long winded but I wanted to give as much information up front. Please Help
You are using an out of date browser. It may not display this or other websites correctly.
You should upgrade or use an alternative browser.
You should upgrade or use an alternative browser.
Rough Running Trialblazer
- Thread starter Fleetboy
- Start date
First a small request… A Paragraph Break every 1-2” makes digesting so much information a little easier… otherwise… reading through the whole thing we call “A Wall of Words” to get to the ‘finer points’ in solving the problems can be a bit bewildering to the folks trying to help you.
In orders of importance… using 10W30 Motor Oil is Big No-No in an engine that uses a unique and sensitive Hydraulic Cam Phaser and multiple Camshaft Position Sensing devices and sensors to regulate your engine’s performance from idle all the way up through the full power ranges at higher RPM. So the requirement and demand for using Mobil1 5W30 or some other product equal to or better... is a good thing to know.
Next... This link… with a special emphasis on Post Message #16 ...will give you a detailed explanation of What these components are… Why they are in the design… Why they sometimes fail… and What can be done to repair each one of them. For example...One visual clue that can be seen just from looking over the engine is to see if there is any Dirty Motor Oil inside of the electrical connector of the CPAS indicating that it must be replaced as an essential component needed to keep the engine from running rough in all RPM ranges (if you watch the videos...it will all become clear). And so If after that… the problems of rough idling and engine stumble persist... more possibilities can be explored. But for now… First Things First:
http://gmtnation.com/forums/threads/05-tb-4-2-stumble.14621/#post-477407
Last edited:

Thanks for the info and the post tips, this was the first time I have ever done any of this blog stuff.
I have used 10/30 since new on recommendation from the dealer. The info you provided makes sense I will change to 5/30. should I do a engine flush before I change the CPS and the CPAS. If so do you recommend any particular brand of flush?
The CPAS has been changed before, its been a while, probably because of the 10/30 oil.
I’m not a big advocate of using Engine Flush inside an All Aluminum Engine because you would have to use this stuff very judiciously as follows:
(1) Leave the OLD CPAS and CPS Sensors IN PLACE.
(2) Drain the Old Oil and remove the Used Oil Filter. Then use only One (1) Quart of Any Good Engine Flush along with the balance of Six (6) Quarts of Any Good Basic Organic Motor Oil and any Cheap Basic Oil Filter.
(2) Only Allow the Engine to Run at IDLE for approximately Five (5) Minutes. Do NOT Race the Engine!
(3) Drain the Engine Block Well and re-install the Drain Bolt without using Too Much Torque.
(4) Take at LEAST THREE MINUTES to Hand Fill the Empty New Oil Filter… watch how much air is being expelled as the Oil Filter Paper Roll inside absorbs so much more oil using this technique to avoid having a “Dry Start”. When it stays ‘Topped Off’ with Mobil1 ...it will be ready for installation.
(5) Use Seven (7) Quarts of New Mobil1 5W30 Motor Oil and either a Mobil1 or K&N Oil Filter are installed afterwards.
(6) R&R the Old CPAS and CPS Sensors with Brand New OEM Quality Components. Start the engine and allow it to completely warm up before taking it for a Test Drive. Minimum Oil Pressure is 12 PSI… if you can’t see any oil pressure… Shut Off the Engine and Investigate the problem.
(7) Do NOT Replace the CKP (Crankshaft Sensor) ...unless you have $100 to give away to the ‘Stealership’ for a necessary CASE Re-Learn re-programming of the PCM.
Last edited:
I’m not a big advocate of using Engine Flush inside an All Aluminum Engine because you would have to use this stuff very judiciously as follows:
(1) Leave the OLD CPAS and CPS Sensors IN PLACE.
(2) Drain the Old Oil and remove the Used Oil Filter. Then use only One (1) Quart of Any Good Engine Flush along with the balance of Six (6) Quarts of Any Good Basic Organic Motor Oil and any Cheap Basic Oil Filter.
(2) Only Allow the Engine to Run at IDLE for approximately Five (5) Minutes. Do NOT Race the Engine!
(3) Drain the Engine Block Well and re-install the Drain Bolt without using Too Much Torque.
(4) Take at LEAST THREE MINUTES to Hand Fill the Empty New Oil Filter… watch how much air is being expelled as the Oil Filter Paper Roll inside absorbs so much more oil using this technique to avoid having a “Dry Start”. When it stays ‘Topped Off’ with Mobil1 ...it will be ready for installation.
(5) Use Seven (7) Quarts of New Mobil1 5W30 Motor Oil and either a Mobil1 or K&N Oil Filter are installed afterwards.
(6) R&R the Old CPAS and CPS Sensors with Brand New OEM Quality Components. Start the engine and allow it to completely warm up before taking it for a Test Drive. Minimum Oil Pressure is 12 PSI… if you can’t see any oil pressure… Shut Off the Engine and Investigate the problem.
(7) Do NOT Replace the CKP (Crankshaft Sensor) ...unless you have $100 to give away to the ‘Stealership’ for a necessary CASE Re-Learn re-programming of the PCM.
Ok this weekend I did the engine flush, Changed the CPS and the CPAS as per your instructions, I let the oil drain the whole time I was changing the components.
The CPAS was not dirty (maybe because of the flush) or had oil coming out of the electrical connector. Filled the oil filter up all the way (I do this anyway on a strait up oil filter). And filled with 5/ 30 oil.
Started it and let it warm up. Plenty of oil pressure. It still had the rough idle, and at increased RPM but it was different than before, maybe more constant, before it was more of a lope.
I did not drive it, it was getting late. I did read on one of the post to fold a piece of printer paper in half and hold it half way over the exhaust. It would blow it away and then suck it back in. I just don’t remember what the reason was for that, and have not been able to find the post anymore.
What next? And thanks for the help.
Last edited by a moderator:
About the "Folded Paper" Test...I posted that suggestion a while back... It hearkens back to an Old School method used to determine whether or not any of the Exhaust Valves may be Burned and losing the Cylinder Seal on the Intake and Compression Strokes.
What will happen is that if the Exhaust Valves do NOT seal... instead of the steady flutter the 1/2 sheet of paper should exhibit (like a birds wings) with a steady vibration of the paper as it covers the Exhaust Pipe... The loss of seal will allow the downward pull of the partial vacuum that happens during the Intake Stroke as the Piston heads downward inside the cylinder with a Bad Leaking Pair of Exhaust Valves... the sucking action will actually pull the exhaust flow from the around the Leaking Exhaust valve right back down inside of the Cylinder...causing the 1/2 Sheet of Paper to suddenly get sucked almost completely back inside of the the Exhaust Pipe.
But as a Diagnostic Tool on an engine with VVT (Variable Valve Timing) that uses an Exhaust Camshaft Phaser... its behavior may be altered and thus give inconclusive results. Therefore... the Definitive Test for Bad Exhaust Valves is first... a Dry ...then a Wet Compression Test (The former is for the Bad Valve question... that latter one is for Bad Rings ...which can also cause a Loss of Compression... if the Compression improves after the introduction of a few drops of Motor Oil...then the Rings are likely Bad)). There are some very good posts here at GMT Nation to explain both of those procedures, too. But... Other Members watching your post here will offer some less strident things to look at before you have to do either one of these things...
Last edited:
Mooseman
Moderator
About the "Folded Paper" Test...I posted that suggestion a while back... It hearkens back to an Old School method used to determine whether or not any of the Exhaust Valves may be Burned and losing the Cylinder Seal on the Intake and Compression Strokes.
What will happen is that if the Exhaust Valves do NOT seal... instead of the steady flutter the 1/2 sheet of paper should exhibit (like a birds wings) with a steady vibration of the paper as it covers the Exhaust Pipe... The loss of seal will allow the downward pull of the partial vacuum that happens during the Intake Stroke as the Piston heads downward inside the cylinder with a Bad Leaking Pair of Exhaust Valves... the sucking action will actually pull the exhaust flow from the around the Leaking Exhaust valve right back down inside of the Cylinder...causing the 1/2 Sheet of Paper to suddenly get sucked almost completely back inside of the the Exhaust Pipe.
But as a Diagnostic Tool on an engine with VVT (Variable Valve Timing) that uses an Exhaust Camshaft Phaser... its behavior may be altered and thus give inconclusive results. Therefore... the Definitive Test for Bad Exhaust Valves is first... a Dry ...then a Wet Compression Test (The former is for the Bad Valve question... that latter one is for Bad Rings ...which can also cause a Loss of Compression... if the Compression improves after the introduction of a few drops of Motor Oil...then the Rings are likely Bad)). There are some very good posts here at GMT Nation to explain both of those procedures, too. But... Other Members watching your post here will offer some less strident things to look at before you have to do either one of these things...
I had to be out of town for a while and just got back to continue working on the TB.
I did check the codes and finally got a P0300 random misfire code.
1st. I did a coolant pleasure test just in case. was on cold engine held 15PSI for 20 minutes.
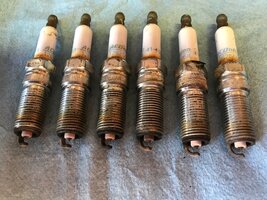
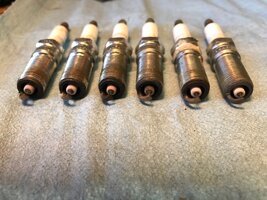
2nd. I pulled the plugs. I will try to upload the pics, they are from left to right 1-6. with #6 by its self that I will explain later. #3&4 were the only ones that looked different, especially #4. these were also the cylinders that the shop detected slight misfires on, but not enough to throw a code.
3rd. I did a dry and wet compression test, results below.
1 dry 145 wet 165
2 dry 155 wet 165
3 dry 155 wet 160
4 dry 160 wet 162
5 dry 160 wet 162
6 dry 100 wet 120
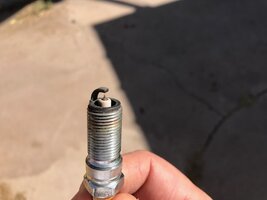
so the Picture of #6 Plug is for the low compression in the cylinder. the plug is clean no oil.
What Next?
Attachments
Mooseman
Moderator
Compression on #6 is low but not super low which is probably why you're getting intermittent misfires and it can't pinpoint it. It's not the rings because the wet test only brought it up by 10, like the others. Likely a valve going bad or not sealing right. You should do a leakdown test to pinpoint where you're losing compression.
It might be worth having a look at this contemporary post as it concerns trying out a Top Engine Cleaner that might salvage the situation without actually having to pull the head if the exhaust valves are not actually burned... but still... not sealing properly because of the extent that thick Carbon Deposits can build up a ring-like barrier around the margins of the exhaust valves that keeps them from seating correctly. @gmcman 's post Message in the link below covers two products that in combination... might relieve the Carbon build up situation and bring back a good seal for the exhaust valves:
http://gmtnation.com/forums/threads/x66p-upper-engine-f-i-cleaner-88861803.16887/
Having personally pulling pulled two of these aluminum engine heads and seen first hand just how much of this crap can REALLY build up... it also makes sense that the changes in the "quench" caused by having so much additional Carbon Matter occupying the upper combustion chamber must serve to also increase compression and inviting pre-ignition as a result. The Carbon in such quantity can also heat up and begin to glow like a "Glow Plug" and invite pre-ignition by igniting the F/A mixture before the spark plugs are set to fire. What the Hell.... Maybe this stuff will help out with both of these conditions and make the mysterious random misfires go away.
Last edited: