Rear Upper Driver Control Arm Snapped

TequilaWarrior

Original poster
Member
Dec 5, 2011
576
Central Pennsylvania
This is probably going to be the stupidest question I've ever asked:

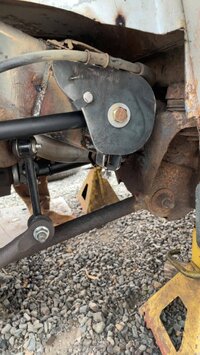
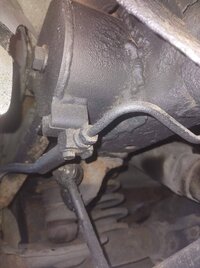
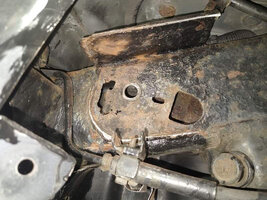
How bad is it that my Driver's Rear Upper Control Arm is snapped completely through?

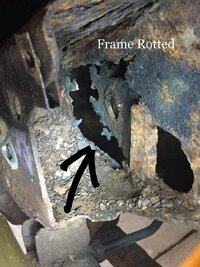
Last year I failed my inspection due to a spot of my frame being rusted through completely. I welded it up with some patch steel and passed my reinspection. No one ever mentioned anything about my control arms.
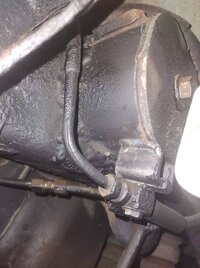
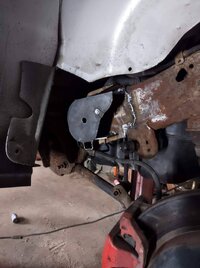
Just tonight, bringing my dogs back in through the garage I happened to peak under the rear wheel well and noticed the Driver's Upper Rear Control Arm is snapped, completely. I hadn't noticed any real change in how the car handles, no strange noises or knocks/clunks, etc...

I'm assuming this is still very bad and that I should change the arm before driving.... but, in practice, has anyone managed to drive on with a snapped upper control arm for any length of time? Lord knows how long mine has been this way.
 

azswiss

Member
May 23, 2021
881
Tempe, AZ
All of the acceleration & braking torque reaction loads are now being channeled thru the remaining upper control arm on the passenger side (as opposed to being shared). Lose the remaining upper control arm and the whole axle will rotate when any torque is applied. Excessive rotation can lead to drive-line damage (driveshaft, universal joints, flanges, etc.).

I would not drive it until the damaged control arm is replaced. What does the other side look like?
 

Mooseman

Moderator
Dec 4, 2011
25,355
Ottawa, ON
If it's just the arm itself that's snapped, easy fix. Just replace the arm. If it's the frame mount that's gone, more welding in your future. There are replacement frame mounts available on eBay but require welding.
 

TequilaWarrior

Original poster
Member
Dec 5, 2011
576
Central Pennsylvania
The opposite side looks "OK". Both mounts look solid, rusted, but solid. I'll order replacement arms for both sides. When I install them (ASAP), I'll clean up the mounts and frame area and paint with rust converting paint. Unfortunately, my wife and I need to be in different places at the same time several days this week.
 

TequilaWarrior

Original poster
Member
Dec 5, 2011
576
Central Pennsylvania
New rear uppers and rear lowers on the way from RockAuto.... should arrive Friday. Time to start soaking mounting hardware with penetrating oil....
 

Mike534x

Member
Apr 9, 2012
934
If possible, I would coat the inside of the new rear upper arms with something like FluidFilm, or Woolwax. The biggest weak spot with them was how "open" they are, and crap just builds up inside. Why they aren't enclosed is beyond me, seems like they would last a lot longer if they were like the lower ones.

Bright side is, with the arms removed, you can give the inside of the frame and the mount a good cleaning and then apply whatever rust inhibitor/FF/WW to keep it from becoming like this (not mine). The inside, and backside of the mount/frame love to be hidden spots for rust to develop.


1709751807680.png
 

TequilaWarrior

Original poster
Member
Dec 5, 2011
576
Central Pennsylvania
The weather finally broke and temps hit 71 degrees last evening here in Central PA.

I replaced upper and lower rear control arms on both sides. The good news is everything came out fairly easily with no broken bolts.

The bad news is the frame mounts for the lower control arms are not pretty. I wouldn't say they're shot... but they're getting close.

While I was in there, i stripped the ECAS level sensors and ziptied the pigtails to the frame.

If anyone goes to do this the best advice I can give is to remove the e-brake cable clip from the lower control arm mount to make it much easier to pull the arm out once it's loose. I didn't on the first one I did and struggled to get the broken arm end out of the pocket.

The ends of the arms are bushed... something I didn't know before I did this. I was under the impression they just rotated freely but it turns out the bushings are pinched in place when you tighten the through-bolts similar to the way the bushings in the front control arms behave.

The new arms felt a little heavier than the old and the rear suspension seems a little stiffer. It also eliminated a squeak I had. These are just RockAuto "daily driver" parts. Nothing special.

Inspecting the snapped arm it appears it's been snapped for a very long time as the edges had very mature rust. The break was certainly not fresh. I suspect it had been this way for at least my last inspection, perhaps longer.

20240313_172237.jpg20240313_175459.jpg20240313_175509.jpg
 
Last edited:

Regionvoices

Member
Aug 12, 2022
7
Highland Indiana
The weather finally broke and temps hit 71 degrees last evening here in Central PA.

I replaced upper and lower rear control arms on both sides. The good news is everything came out fairly easily with no broken bolts.

The bad news is the frame mounts for the lower control arms are not pretty. I wouldn't say they're shot... but they're getting close.

While I was in there, i stripped the ECAS level sensors and ziptied the pigtails to the frame.

If anyone goes to do this the best advice I can give is to remove the e-brake cable clip from the lower control arm mount to make it much easier to pull the arm out once it's loose. I didn't on the first one I did and struggled to get the broken arm end out of the pocket.

The ends of the arms are bushed... something I didn't know before I did this. I was under the impression they just rotated freely but it turns out the bushings are pinched in place when you tighten the through-bolts similar to the way the bushings in the front control arms behave.

The new arms felt a little heavier than the old and the rear suspension seems a little stiffer. It also eliminated a squeak I had. These are just RockAuto "daily driver" parts. Nothing special.

Inspecting the snapped arm it appears it's been snapped for a very long time as the edges had very mature rust. The break was certainly not fresh. I suspect it had been this way for at least my last inspection, perhaps longer.

View attachment 111681View attachment 111682View attachment 111683
I sell replacement Upper Trailing Arm Mounts
 

Attachments

  • received_251132097637507.jpeg
    received_251132097637507.jpeg
    372.6 KB · Views: 12
  • IMG_20220720_111140870.jpg
    IMG_20220720_111140870.jpg
    413.7 KB · Views: 10
  • IMG_20220811_125110219.jpg
    IMG_20220811_125110219.jpg
    263.1 KB · Views: 10
  • 16523072682867045558329832606149.jpg
    16523072682867045558329832606149.jpg
    136.7 KB · Views: 11
  • Like
Reactions: mrrsm

budwich

Member
Jun 16, 2013
2,052
kanata
can you explain / describe how the "rot" that is pictured can be overcome with the units that you "suggest"?
 

Regionvoices

Member
Aug 12, 2022
7
Highland Indiana
The weather finally broke and temps hit 71 degrees last evening here in Central PA.

I replaced upper and lower rear control arms on both sides. The good news is everything came out fairly easily with no broken bolts.

The bad news is the frame mounts for the lower control arms are not pretty. I wouldn't say they're shot... but they're getting close.

While I was in there, i stripped the ECAS level sensors and ziptied the pigtails to the frame.

If anyone goes to do this the best advice I can give is to remove the e-brake cable clip from the lower control arm mount to make it much easier to pull the arm out once it's loose. I didn't on the first one I did and struggled to get the broken arm end out of the pocket.

The ends of the arms are bushed... something I didn't know before I did this. I was under the impression they just rotated freely but it turns out the bushings are pinched in place when you tighten the through-bolts similar to the way the bushings in the front control arms behave.

The new arms felt a little heavier than the old and the rear suspension seems a little stiffer. It also eliminated a squeak I had. These are just RockAuto "daily driver" parts. Nothing special.

Inspecting the snapped arm it appears it's been snapped for a very long time as the edges had very mature rust. The break was certainly not fresh. I suspect it had been this way for at least my last inspection, perhaps longer.

View attachment 111681View attachment 111682View attachment 111683

can you explain / describe how the "rot" that is pictured can be overcome with the units that you "suggest"?

You'll need a professional welder to be able to attach the new mounts to the side frame Here are some before & after.pictures.of the repair
 

Attachments

  • received_3139221759740227.jpeg
    received_3139221759740227.jpeg
    285.1 KB · Views: 9
  • 278916267_5392855214079932_2440931243828395364_n.jpg
    278916267_5392855214079932_2440931243828395364_n.jpg
    72.7 KB · Views: 10
  • received_1386543715102559.jpeg
    received_1386543715102559.jpeg
    289.6 KB · Views: 9
  • received_1299899553873949.jpeg
    received_1299899553873949.jpeg
    149.6 KB · Views: 10
  • Like
Reactions: budwich

Forum Statistics

Threads
23,336
Posts
638,055
Members
18,541
Latest member
33chevyrod

Members Online