Not sure which forum this falls under so I'll put it here. I just got done installing a set of rear back up sensors on my son's silver Envoy. The color matched perfectly and looks totally factory. He's 14 and driving now so he needs all the help he can get. My wife has them factory installed on her Tahoe and can't live without them so it will keep her from backing in to anything when she drives the Envoy. Easy 2 hour install taking my time. The sensors work perfectly and only cost $18 shipped from eBay. I highly recommend the seller as he got them out right away and had good communication. Here is a link if anyone wants to take a stab at it.
6 Colors 4 Parking Sensors LED Display Car Reverse Backup Radar Sound Kit | eBay
EDIT: I'm adding a "how to" but I don't have any pictures except for my final ones.
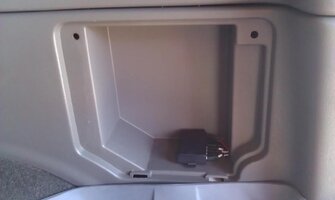
- Figure out where you are going to mount the control unit and the LED. I chose the right rear side compartment and the top right headliner (with sticky back hook end velcro) as it can be easily seen from the rear view mirror.
- Push on the back of your bumper in several areas and make sure you have a space behind it so the sensors will fit when pushed through. THIS IS THE MOST IMPORTANT THING SO TAKE YOUR TIME!!! Also look behind the bumper skin to confirm you have clearance. CHECK IT AGAIN AND AGAIN!!!!
- Once you have you locations set, start measuring and marking the location with a sharpie. I did not do mine in a straight line across the but rather the outsides at the same height and the insides at the same height. I then took masking tape and made lines across the back and measured down from the crease of the bumper to make sure they were the same distance. Remember, measure 10X and drill once!
-Use the hole bit included with the kit and drill your 4 holes. Clean the piece out of the bit after each hole.
- With the kit I got, the 4 little tabs on the outside of the sensors were too shallow to allow them to "clip" around the bumper skin because the skin was thicker. I took a utility knife and cut a tiny bit off the tabs. I then used clear silicone and coated the hole and the outside of the sensor to help secure it once pushed in. Smooth out the silicone on back side of the sensors and wipe off the excess on the front. I also used a blow gun to get any out of the sensors on the front. Do this for all 4 sensors.
-You'll need some extra wire to connect power from the reverse light to the control box. Everyone can probably figure out how to splice into the wires. On my Envoy brown was negative and the other was positive (green I think). The Envoy you just stick your head under the rear end and the connection is there. For a TB I think you'll probably have to take out the rear lens and route your wire different than I did.
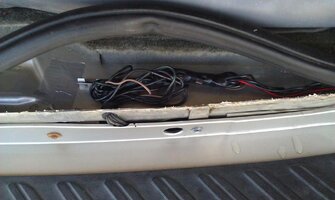
- Next is routing the wires. You'll have to do what you think is best and use lots of cable ties. I took my wires along the inside of the bumper securing with cables ties along the way and then up between the bumper skin and lip of where the weather seal is (see picture). I popped the cover off the back latch sill and drilled a hole through the lip of where the weather strip goes and used a grommet so the wires wouldn't get cut. I also took my dremel to the bumper skin just a little so it wouldn't pinch the wires. You can't tell it's there when you put the weather strip back on.
- You can then get the wires how ever you want to the locations you have chosen for the control unit and LED. I think everyone can figure that out for themselves.
It's really an straight forward process but just take your time and measure 10X before you drill anything. I believe you can color coat these to your vehicle as well but you might want to check with whomever you are thinking of buying them from. Good luck!
View attachment 16992
6 Colors 4 Parking Sensors LED Display Car Reverse Backup Radar Sound Kit | eBay
EDIT: I'm adding a "how to" but I don't have any pictures except for my final ones.
- Figure out where you are going to mount the control unit and the LED. I chose the right rear side compartment and the top right headliner (with sticky back hook end velcro) as it can be easily seen from the rear view mirror.
- Push on the back of your bumper in several areas and make sure you have a space behind it so the sensors will fit when pushed through. THIS IS THE MOST IMPORTANT THING SO TAKE YOUR TIME!!! Also look behind the bumper skin to confirm you have clearance. CHECK IT AGAIN AND AGAIN!!!!
- Once you have you locations set, start measuring and marking the location with a sharpie. I did not do mine in a straight line across the but rather the outsides at the same height and the insides at the same height. I then took masking tape and made lines across the back and measured down from the crease of the bumper to make sure they were the same distance. Remember, measure 10X and drill once!
-Use the hole bit included with the kit and drill your 4 holes. Clean the piece out of the bit after each hole.
- With the kit I got, the 4 little tabs on the outside of the sensors were too shallow to allow them to "clip" around the bumper skin because the skin was thicker. I took a utility knife and cut a tiny bit off the tabs. I then used clear silicone and coated the hole and the outside of the sensor to help secure it once pushed in. Smooth out the silicone on back side of the sensors and wipe off the excess on the front. I also used a blow gun to get any out of the sensors on the front. Do this for all 4 sensors.
-You'll need some extra wire to connect power from the reverse light to the control box. Everyone can probably figure out how to splice into the wires. On my Envoy brown was negative and the other was positive (green I think). The Envoy you just stick your head under the rear end and the connection is there. For a TB I think you'll probably have to take out the rear lens and route your wire different than I did.
- Next is routing the wires. You'll have to do what you think is best and use lots of cable ties. I took my wires along the inside of the bumper securing with cables ties along the way and then up between the bumper skin and lip of where the weather seal is (see picture). I popped the cover off the back latch sill and drilled a hole through the lip of where the weather strip goes and used a grommet so the wires wouldn't get cut. I also took my dremel to the bumper skin just a little so it wouldn't pinch the wires. You can't tell it's there when you put the weather strip back on.
- You can then get the wires how ever you want to the locations you have chosen for the control unit and LED. I think everyone can figure that out for themselves.
It's really an straight forward process but just take your time and measure 10X before you drill anything. I believe you can color coat these to your vehicle as well but you might want to check with whomever you are thinking of buying them from. Good luck!
View attachment 16992