Parking Brake or E-brake Adjustment

linneje

Original poster
Member
Apr 26, 2012
404
Summary:
Vehicle: GM Envoy 2003 XL
Difficulty: Easy (2 out of 5)
Estimated Time: 2 hours for both sides depending on tools
Part Numbers:
Cost: your labor time

This article does not include anything that hasn't been posted here or on the old site, but when I did mine I ran into a few problems and had to do a lot of reading to solve them. I thought I would try to gather everything into one place for an article since this is a common problem, and something anyone can do themselves.

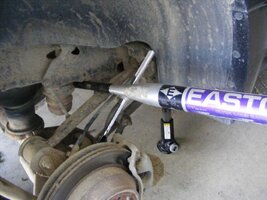
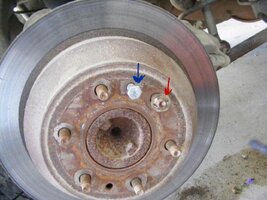
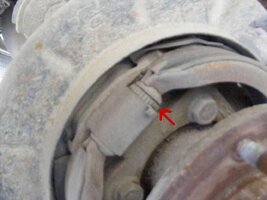
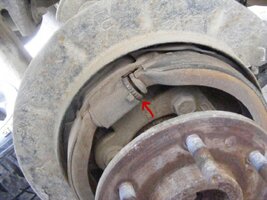
Tools needed: Jack, blocks for wheels, PB blaster or similar, ratchet with 18mm socket, 19mm socket, flat head screwdriver, needle nose pliers
 

linneje

Original poster
Member
Apr 26, 2012
404
DSCF3530.jpg
Start by blocking the wheels you are not working on. Remove the center cap of the wheel with a screwdriver. If you are not using an impact, loosen the lug nuts and then jack up the side on the rear wheel on which you would like to work. Remove the lug nuts. Remove the tire.
 

linneje

Original poster
Member
Apr 26, 2012
404
DSCF3531.jpg
Locate the caliper mounting bolts behind the assembly. The two bolts are 18mm, and you should hit them with a penetrating oil like PB blaster. These bolts are factory installed with yellow loctite, and they will be tough to get out the entire way, unless someone has had your bolts out before. The red arrow is pointing at the top one, the other is straight below it.
 

linneje

Original poster
Member
Apr 26, 2012
404
The first side I did, I could not crack the bolts with a breaker bar or any other method I tried. Someone somewhere suggested an old baseball bat - magic! Use a solid part of the frame and the bat is placed like a lever to either push down or pull up on the ratchet handle. In this picture I want to turn the ratchet clockwise to loosen (because the bolt is behind) so I am pushing down (hard!) on the bat handle to crack the bolt.

Be careful that you have the vehicle blocked because you are using great force and do not want the jack to slip.
 

Attachments

  • DSCF3532.jpg
    DSCF3532.jpg
    97.8 KB · Views: 32
  • Like
Reactions: Blckshdw

linneje

Original poster
Member
Apr 26, 2012
404
When you take these two caliper mounting bolts off, you will need to remove the caliper by sliding off and hang the caliper by a wire or tuck it carefully into the frame as I have done. Do not let it hang by the brake line. Once this is done, you need to remove the rotor. You may find two small round clips holding the rotor on. You can remove with pliers and discard these as they are not necessary. This side did not have the clips, so I put one on for viewing (red arrow).

If this rotor has not been off before, you may not be able to pull it off. If this is the case, threading a hex bolt into the two empty threads on the rotor will push it out (blue arrow). This one I could pull right off, so the hex bolt wasn't necessary but is there for illustration. Set the rotor aside.
 

Attachments

  • DSCF3533.jpg
    DSCF3533.jpg
    104.7 KB · Views: 24

linneje

Original poster
Member
Apr 26, 2012
404
The ebrake works with a thin pad on a horseshoe shaped ring. The gear pointed at in the picture is actually threaded and will expand if you turn it which will in turn expand the brake ring. If you expand it too far the rotor will resist going back on. I use pliers to grab and turn the gear (up in this picture) about half a rotation, and then I try to put the rotor back on. If I have no resistance when replacing the rotor, then I need to turn the gear more.

If I cannot get the rotor back on or there is a lot of resistance, then I reverse the rotation a bit until I can replace the rotor. If I have a bit of resistance when replacing the rotor then I have it adjusted correctly.
 

Attachments

  • DSCF3534.jpg
    DSCF3534.jpg
    72.5 KB · Views: 31

linneje

Original poster
Member
Apr 26, 2012
404
You can see the increased gap between the gear and the rest of the assembly. The brake has increased in diameter because of this, and will be ready to press against the inside of the rotor when the parking brake is engaged. Reassemble by replacing the rotor, then sliding the caliper back on the rotor and putting the caliper bracket mounting bolts back in. Make sure you tighten these down snugly or torque to specifications. Replace the wheel, putting the lug nuts back on tight. Remove the jack and torque the lug nuts in a star pattern to 100 ft lbs. Replace the center cap.

I tested my brake in my sloped driveway. Start vehicle, place in neutral, engage parking brake. There should be no roll.
 

Attachments

  • DSCF3535.jpg
    DSCF3535.jpg
    102 KB · Views: 24
  • Like
Reactions: bLAzen03

neohio

Member
Nov 11, 2013
85
Having not taken a look at my rear brakes yet, do these trucks not have a rubber plug in the backing plate? Usually you can remove the plug and adjust without even removing the wheels? I believe my S-10 Blazer had the plugs.
 

The_Roadie

Lifetime VIP Donor
Member
Nov 19, 2011
9,957
Portland, OR
No plug. Too much structure in the way because the shoe diameter is so small compared to full size drum brakes. You have to pull the wheel and rotor repeatedly to adjust them.
 
  • Like
Reactions: bLAzen03

Forum Statistics

Threads
23,336
Posts
638,053
Members
18,541
Latest member
33chevyrod

Members Online