Installing New Head Unit Kenwood DDX-419 2din

Michblaze02

Original poster
Member
Nov 20, 2011
29
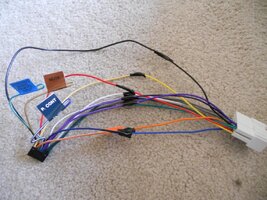
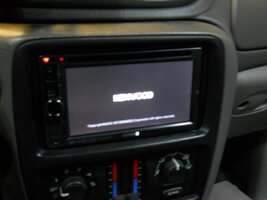
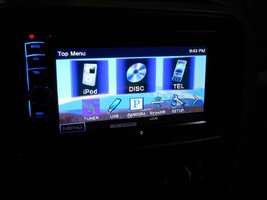
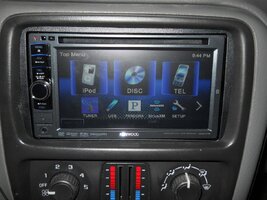
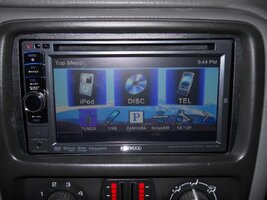
I recently purchased a kenwood 2din ddx419 head unit. Before I go tearing into things I wanted to check and see if anyone has installed a radio similure to this one, and about how difficult it may be. I have the standard stock radio in right now, no bose, and no onstar. As far as mounting hardware, I believe I have everything I need. Please let me know if you have any pictured instructions, or other helpful tips I may need before I get started.
 

Boricua SS

Member
Nov 20, 2011
3,080
Ohio
looks like your basic DD HU.. i have the pioneer AVH4300 7" touchscreen DVD player, MP3, blah blah blah lol...

all the hardware you would need is the mounting kit, antenna adapter, and then your wire harness.. i also have nonBOSE, but i do have On-Star, and i wanted to retain my chimes and RAP's, so i went with the GMOS-01 for non amplified vehicles.. if you're not familiar with getting to the radio and taking it out, YouTube had some videos on how to remove your factory radio... is that what you were looking for?
 

GCTB1289

Member
Mar 19, 2012
699
:iagree: Also when you get the old radio out there is some plastic back there that you might have to cut to get the new radio to fit. I had to do that to mine. Also not sure if you are aware but you will not be able to retain your steering wheel controls unless you purchase an adapter PAC SWI-RC or Axxess ASWC
 

Michblaze02

Original poster
Member
Nov 20, 2011
29
Boricua SS said:
looks like your basic DD HU.. i have the pioneer AVH4300 7" touchscreen DVD player, MP3, blah blah blah lol...

all the hardware you would need is the mounting kit, antenna adapter, and then your wire harness.. i also have nonBOSE, but i do have On-Star, and i wanted to retain my chimes and RAP's, so i went with the GMOS-01 for non amplified vehicles.. if you're not familiar with getting to the radio and taking it out, YouTube had some videos on how to remove your factory radio... is that what you were looking for?


Got the mounting kit, antenna adapter, and wiring harness. I would like to keep the chimes, think I found what I need on crutchfield.com. Non bose, non onstar about 65 bucks. I can access the radio just fine. I have installed a powered overlay for my gauges, so, familure with taking all of that stuff out. The antenna seems to be hardwired to the stock headunit though for some reason. So, wasnt able to get it completly out. I did see where there is some plastic that a nub from the stock unit kind of positions itself on. My concern is making sure I connect the right wires to the right places. Was hoping someone had installed something like it and took pics as they went. I searched youtube for the model I have, but didnt come up with much. Are most of the 2dins similar in wiring color schemes?

gcacace1289 said:
:iagree: Also when you get the old radio out there is some plastic back there that you might have to cut to get the new radio to fit. I had to do that to mine. Also not sure if you are aware but you will not be able to retain your steering wheel controls unless you purchase an adapter PAC SWI-RC or Axxess ASWC

Dont have any steering wheel controls at all, so all set there. I did see that plastic you speak of, shouldnt be a problem with a dremel tool
 

Michblaze02

Original poster
Member
Nov 20, 2011
29
View attachment 22565

Here is what I have so far. Just took some electrical tape to hold the wires together for this picture. The Mute, P.Cont, and Steering wheel remote input wires have no matches. The P.Cont and Steering wheel I can understand, but the mute seems important. In the manual for the headunit, mute is use when a call comes in or are on a call. So, apparently it kills the audio for the radio so you can hear through the speakers if im understanding this right.

If there is a brown wire on the stock wire harness, would I dare connect it to that, or just leave this one disconnected since there was no match on the new harness?
 

Attachments

  • DSCN4384.jpg
    DSCN4384.jpg
    95.2 KB · Views: 15

Boricua SS

Member
Nov 20, 2011
3,080
Ohio
i googled "2002 trailblazer stereo wiring diagram" and this is what popped up (i just used 2 examples).. dont know how accurate it is.. but it looks like the brown wire is not the mute wire on our factory harness...

2002 Chevrolet Trailblazer Stereo Wiring Information

Radio Constant 12v+ Wire: Orange
Radio Switched 12v+ Wire: Yellow
Radio Ground Wire: Black
Radio Illumination Wire: Gray
Stereo Dimmer Wire: Brown
Left Front Speaker Positive Wire (+): Tan
Left Front Speaker Negative Wire (-): Gray
Right Front Speaker Positive Wire (+): Light Green
Right Front Speaker Negative Wire (-): Dark Green
Left Rear Speaker Positive Wire (+): Brown
Left Rear Speaker Negative Wire (-): Yellow
Right Rear Speaker Positive Wire (+): Dark Blue
Right Rear Speaker Negative Wire (-): Light Blue

Audio
Radio 12v orange + radio harness
Radio Ground black/white - radio harness
Radio Illumination brown/white (dimmer) + radio harness
Power Antenna gray + radio harness
LF Speaker +/- tan - gray radio harness
RF Speaker +/- lt. green - green radio harness
LR Speaker +/- brown - yellow radio harness
RR Speaker +/- blue - lt. blue radio harness

and this is from modifiedlife.com
2002 Chevrolet Trailblazer Car Stereo Radio Wiring Diagram

Car Radio Constant 12v+ Wire: Orange
Car Radio Switched 12v+ Wire: Yellow
Car Radio Ground Wire: Black
Car Radio Illumination Wire: Gray
Car Stereo Dimmer Wire: Brown
Car Stereo Antenna Trigger: Pink
Car Stereo Amp Trigger Wire: N/A
Car Stereo Amplifier Location: N/A
Front Speakers Size: N/A
Front Speakers Location: N/A
Left Front Speaker Positive Wire (+): Tan
Left Front Speaker Negative Wire (-): Gray
Right Front Speaker Positive Wire (+): Light Green
Right Front Speaker Negative Wire (-): Dark Green
Rear Speakers Size: N/A
Rear Speakers Location: N/A
Left Rear Speaker Positive Wire (+): Brown
Left Rear Speaker Negative Wire (-): Yellow
Right Rear Speaker Positive Wire (+): Dark Blue
Right Rear Speaker Negative Wire (-): Light Blue
 

Michblaze02

Original poster
Member
Nov 20, 2011
29
Hmm, ok. Those must be from the vehicle side of the wiring. Not even close to what is on the wire diagram for the harness I bought and manual for the headunit. The colors must change from this harness to whats in the vehicle. So, when they are plugged in, one side has one color, but changes on the other.
 

munkae

Member
Apr 17, 2012
26
the stereo you bought should have manuals that show what color wire does what function. also the gmos adapter that you bought should have a paper that shows what color wire does what function. when i did my kenwood dd with gmos 04, pretty much its match colors. as long as your not color blind you should be able to tackle this :thumbsup:
 

Michblaze02

Original poster
Member
Nov 20, 2011
29
Turned out they gave me the wrong wiring harness. I ended up just turning in my man card and had them finish installing it. Took way less then what I would have been able to by myself. Oh well, its pretty awesome for as little as ive played with it so far. Thanks for the help though
 

Boricua SS

Member
Nov 20, 2011
3,080
Ohio
what... no pix??? :rotfl:
 

munkae

Member
Apr 17, 2012
26
Hey no worries man. I'll admit I've done lots I stereo installs and systems but when I first saw the gmos 04 i was like wtf is this bs. But either way lad you got it installed post up some pics
 

MAY03LT

Member
Nov 18, 2011
3,420
Delmarva
Radio Switched 12v+ Wire: Yellow

For anyone who may find this thread down the road, this is incorrect. There is no switched 12v source in the factory radio harness. The switched 12v lead (red) for any aftermarket radio has to come from either an adapter like a gmos or gmrc or any of the switched leads in the vehicle wiring. The only yellow wire in the harness is pin B9 for the left rear - output and it's only there in the non bose (non-UQA) trucks.

Radio Constant 12v+ Wire: Orange

Also worth noting, both bose and non bose have 2 orange wires in the head unit connector. One of these is the data line and can not be used to provide constant memory to the radio.

Sorry for the threadjacking just don't want anyone to cook anything in their ride.:cool:
 

Boricua SS

Member
Nov 20, 2011
3,080
Ohio
MAY03LT said:
Sorry for the threadjacking just don't want anyone to cook anything in their ride.:cool:

i was hoping you'd chime in Drew... i just pasted and copied as i kinda thought things werent right because after all, its the internet LOL... glad you clerified, because i sure dont know about switched power from the radio either lol..
 

Michblaze02

Original poster
Member
Nov 20, 2011
29
Yes, the sound from my aftermarket door speakers is much clearer and louder now. I really like the Bluetooth for phone calls and playing audio from my phone wire free. Very happy with it
 

Dad-O-Matic

Member
Dec 5, 2011
228
Michblaze02 said:
I really like the Bluetooth for phone calls and playing audio from my phone wire free. Very happy with it

:iagree: I feel the same way about mine, although I've found that playing your tunes from the USB sounds MUCH better than streaming from Bluetooth. I never use my CD player anymore, everything is on my jump drive.
 

munkae

Member
Apr 17, 2012
26
Agreed for some reason the sound quality seems better through the USB but the Bluetooth is nice
 

Forum Statistics

Threads
23,355
Posts
638,320
Members
18,563
Latest member
memoremix

Members Online