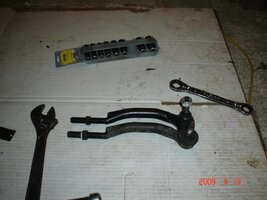
How to Replace Outer Tie Rods

keitho64

Original poster
Member
Mar 27, 2012
21
Tools Needed
21mm Socket (tie-rod nut, my new one was a 22mm)
22mm and 24mm open end for tie-rod shaft (I do not have large metric open end wrenched so I used two adjustable ones). Also, I am not 100% sure on the size wrenches needed.
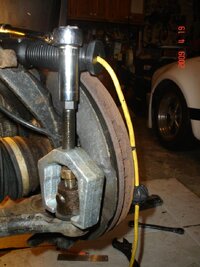
Pickle fork or tie rod puller.
Machinist’s ruler
PB Blaster

I sprayed the nut and tie rod shaft threads with PB Blaster the day before I planed to do this job. The nuts all came off with little trouble. I was somewhat surprised and my Trailblazer has spent 5 years in Chicago, winters included. I also found out that I should have installed both tie rods and it cost me a second trip to the store.

The total cost for both tie rods was about $140.00. All in it took be 1 hour and 15 minutes to change both tie rods and this included taking the pictures. This job was MUCH simpler than I originally thought.

Step 1

(Assumption is you already have the car securely supported and the tire removed.)

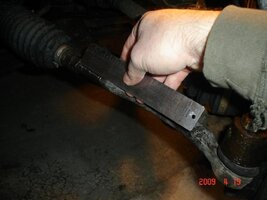
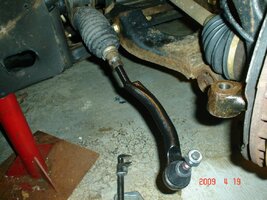
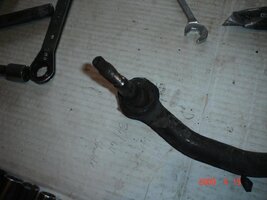
Using a machinists ruler measure the exposed threads on the tie-rod (see picture) and write this figure down. This step will allow you to get the alignment close to original but you still need to get an alignment done. I measured to the end of the threads, as well as to the end of the shoulder on the tie rod.

- - - Updated - - -
 

Attachments

  • Tie-Rod-1.jpg
    Tie-Rod-1.jpg
    70.1 KB · Views: 25

keitho64

Original poster
Member
Mar 27, 2012
21
Step 2

Loosen the jam nut on the tie rod while holding the nut closest to the steering rack and turning the outer. I found it easiest to wedge the on wrench against the lower control arm as seen in the picture. Once this is loose leave it for now

- - - Updated - - -
 

Attachments

  • Tie-Rod-3.jpg
    Tie-Rod-3.jpg
    94.6 KB · Views: 30

keitho64

Original poster
Member
Mar 27, 2012
21
Step 3

Loosen the 21mm nut on the top of the tie rod where it attaches to the spindle (see picture). Do not take the nut all the way off. Now you must separate the tie rod from the spindle. This can be done with a puller of a fork. I have a puller so that is what I used. Once the tie rod has separated from the spindle you can remove the nut and pull the tie rod all the way out. Now just unscrew the tie rod from the steering rack.
 

Attachments

  • Tie-Rod-5.jpg
    Tie-Rod-5.jpg
    91.8 KB · Views: 25
  • Tie-Rod-6.jpg
    Tie-Rod-6.jpg
    94.5 KB · Views: 21

keitho64

Original poster
Member
Mar 27, 2012
21
Step 4

Installation is generally in reverse of the removal. . I found it best to lay the old and new side by side. Then I installed the jam nut at the same distance as listed from Step 1. Install the new tie rod into the steering rack and try to screw it in the same amount as the one removed. Do not snug the jamb nut yet
 

Attachments

  • Tie-Rod-7.jpg
    Tie-Rod-7.jpg
    79.3 KB · Views: 16

keitho64

Original poster
Member
Mar 27, 2012
21
Step 5
Now you need to slide the tie rod into the spindle. You will need to wiggle the spindle some for it to pop into place. My manual said the nut should be tightened to 33 foot pounds. You need to make sure the tie rod is all the way into the spindle and use caution to ensure the tie rod is going in straight. Once the tie rod is tight on the spindle verify the length of the threads on the shaft and once close to the original measurement tighten the jam nut while holding the nut on the steering rack.
 

Attachments

  • Tie-Rod-8.jpg
    Tie-Rod-8.jpg
    94.2 KB · Views: 17

keitho64

Original poster
Member
Mar 27, 2012
21
Here is how the tie rod looks prior to tightening. I forgot to take a picture after it was all tight.


Here is what the original one looked like prior to removal. The new one has about the same amount of threads showing after installation and tightening.


Reinstall the tire, lower the car and take a short, slow, test drive to verify all is good. I would recommend rechecking the nut on the spindle and steering shaft after your first drive to make sure all is good. Once this is done I suggest you head off to your favorite alignment store and have an alignment done.

One more word of advice, I would HIGHLY recommend replacing both sides. I did not plan to but went back to the store and bought the drivers side as well.

This whole job took me about 30 minutes per side. The end result is steering that is spot on again and it feels like everything is connected.
 

Attachments

  • Tie-Rod-9.jpg
    Tie-Rod-9.jpg
    95.9 KB · Views: 22
  • Tie-Rod-2.jpg
    Tie-Rod-2.jpg
    90.7 KB · Views: 22
  • Tie-Rod-10.jpg
    Tie-Rod-10.jpg
    66.3 KB · Views: 22

keitho64

Original poster
Member
Mar 27, 2012
21
OK so this is my first article submission, for some reason my pictures did not align correctly on a few of the posts. I have this in PDF format if you want it. Send me a PM and I will post it.

I will try to post my Spark plug change one tomorrow.
 

Cable810

Member
Dec 5, 2011
690
Good Write Up!!!
 

Matt

Member
Dec 2, 2011
4,025
Keith,

Thanks for bringing this article over from the OS.

Getting the spindle back into the steering knuckle is a PITA.
 

Hypnotoad

Member
Dec 5, 2011
1,584
I just did tthis myself, and noticed that my TB has a castle nut and cotter pin.

Thanks for the write up.
 

Matt

Member
Dec 2, 2011
4,025
Hypnotoad said:
I just did tthis myself, and noticed that my TB has a castle nut and cotter pin.

Thanks for the write up.

My new arms did, but the old ones didn't.
 

anthonyl79

Member
Jul 15, 2012
127
Colorado
View attachment 22596

I have never used the pitman arm puller that you are showing in the picture to remove tierod ends. When I was working in an automotive shop we whould use a small hammer after loosening the nut and hitting the knuckle a few times where I have circled it in red. We would also do the same thing we removing ball-joints. Using a pickle fork can damage the boot if you are replacing a cv shaft or something else and not the ball-joint. One less tool you have to have, so that equals less money you need to spend.
 

Attachments

  • Capture.JPG
    Capture.JPG
    84.7 KB · Views: 20

mubai

Member
Jan 5, 2012
321
I just attempted this and can't get the damn jam nut loose. I tried PB Blaster, couldn't get it to turn. Then I tried some heat, still couldn't get it to turn.

I assume Lefty Loosey still applies in this situation?
 

The_Roadie

Lifetime VIP Donor
Member
Nov 19, 2011
9,957
Portland, OR
1) There are no Rightly Loosey backwards nuts on the vehicle.

2) Impact forces are the key. You can safely use Vice Grips on the threaded part of the outer tie rod end, and put a wrench on the jam nut, and whale away with a 3 pound hand sledge.
 

meerschm

Member
Aug 26, 2012
1,079
mubai said:
I just attempted this and can't get the damn jam nut loose. I tried PB Blaster, couldn't get it to turn. Then I tried some heat, still couldn't get it to turn.

I assume Lefty Loosey still applies in this situation?


That is why I replaced my inners and outers. was reported by the tech as frozen during an allignment check.

I was able to get the jam nut loose, but the outer would not budge vs inner.
 

mubai

Member
Jan 5, 2012
321
Thanks for the tips/suggestions. I gave up and took it to NTB, b/c I have their 5 year alignment package. The tech asked me if I tried to remove the nut, b/c there was PB Blaster all over the jam nut. I said, "yes, I tried but couldn't get it to move." He showed me the nut, it was almost destroyed. He said, "there's no way you would have been able to move it. He showed me the heavy duty wrenches and the 3 foot vise grips he used, but no luck. He ended up using an air hammer on the nut to get it to move.

I'll post a pic of it tomorrow. Seemed like such an easy job from the article, but sometimes those damn stubborn rusted nuts/bolts :hissyfit: can be so problematic.
 

Forum Statistics

Threads
23,336
Posts
638,065
Members
18,541
Latest member
33chevyrod

Members Online