This is the second of several articles during my work to replace the timing chain and tensioner. I thought it better to separate into articles for those that are looking for specific instructions.
How to remove the I6 oil pan in vehicle
Difficulty (out of 5): 5
Tools required: Assortment of wrenches, ratchets, extensions, screw drivers. Socket sizes: 7mm, 8mm, 10mm, 11mm (or 7/16), 13mm, 14mm, 15mm, 17mm, 18mm, 21mm. Hammer, pry bar, long punch or drift, slide hammer with screw attachment.
Time required (removal and install): 6 to 8 hours or more
It is very similar to removing the rack and pinion because you have to lower it out of the way of the pan. It's not for your average DIY'er. Sorry for not having any pictures of this job. Not easy under the vehicle.
- Disconnect the battery
- Pull out dipstick.
- 4x4/AWD only: While the vehicle is still on the ground, loosen the axle nut with a 35mm socket (36mm will also work)
- Jack up the front of the truck and support securely with jack stands as igh as possible.
- Remove both front wheels
- Remove the plastic skid plate, drain the oil and remove the oil filter.
- 4x4/AWD only: Remove the front differential fill plug to ensure it can be removed to refill. Drain the differential.
- 4x4/AWD only: Remove both front axles: - Disconnect the upper ball joint from the upper A-arm. - Remove the axle nut and push the axle out of the wheel hub. It may be necessary to turn the steering wheel to maximize flex or disconnect the lower ball joint (which I did, as well as removing the brakes since I was replacing them). - Using a long punch or drift and a hammer, tap on the inner axle joint to pop it out of the disconnect or differential. Prying usually doesn't work with these. Pull the axle out of the truck and set aside. Now is a good time to clean and inspect them for any damage to the boots.
- 4x4/AWD only: Unplug and unbolt the axle disconnect from the oil pan. Now is a good time to take it apart, clean out the congealed grease, inspect all the parts and bearings and repack with fresh grease.
- 4x4/AWD only: Using a bolt and slide hammer, thread the bolt into the end of the shaft in the oil pan with the slide hammer attachment. Attach the slide hammer to the attachment and use the slide hammer to remove the shaft from the differential.
- 4x4/AWD only: Disconnect the driveshaft from the front differential by removing the u-joint strap bolts. You might have to pry the u-joint from the differential yoke. Try not to let the u-joint cups fall off the trunnion and tape all around the joint to keep the cups on. Push/slide the driveshaft towards the transfer case to clear the differential.
- 4x4/AWD only: Unbolt the front differential from the oil pan and move towards the left, out of the way. Use bungee cords to hold it in place.
- Unbolt the A/C compressor from the oil pan. It does not have to be disconnected or the system emptied. Use bungee cords to hold it away from the pan.
- 2002 models only: Disconnect the oil level sensor located midway at the bottom of the oil pan.
- Remove the rack and pinion crossmember. Ensure all bolts are removed. Some are vertical going into the frame, including one large bolt that also holds the lower control arm bracket. Others are are horizontal, accessible from the rear vertical part of the frame. Crossmember should drop fairly easily without much force or prying.
- Go into the truck and lock the steering wheel from turning, either using the actual steering locking tool or with bungee cords. I used an allen key of the proper size in the hole for the steering lock, located under the steering column. It MUST be locked to prevent it from turning and damaging the clock spring in the column.
- Back under the truck, remove the two long horizontal bolts holding the rack and pinion. Drop the rack and pinion a bit.
- Remove the bolt holding the steering shaft to the pinion. You may have to move the rubber sleeve to access it. Slide the pinion out of the steering shaft.
- Drop the rack and pinion and let it hang by the outer tie rods. You do not have to completely remove the rack nor do you have to disconnect the lines. You only need to drop it enough for the oil pan to clear it.
- Remove the 4 transmission to oil pan bolts
- Remove the two rubber plugs located at the bottom of the bellhousing/oil pan. This will allow you to access and remove the two oil pan bolts located in there using a long extension and socket.
- If applicable, unhook and move out of the way the transmission cooling lines.
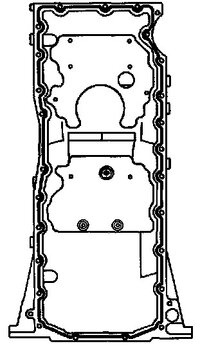
- Remove all of the oil pan bolts, including the three at the front.
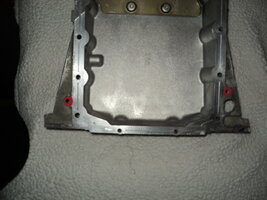
- DO NOT PRY ON THE PAN! There are two blank bolt holes at the outer rear of the pan as per this image (circled in red). Thread two oil pan bolts into these holes and evenly turn them to break the seal of the oil pan to the block. If the pan doesn't separate from the block fairly easily, ensure that all oil pan bolts have been removed. You should be able to pry the rest of the pan off by hand. (Thanks to MRRSM for the pic)

- Tilt and remove the pan clearing the oil pickup tube.
- Clean the oil pan and mating surface of the old sealant. Clean the inside and outside as well. A pressure washer works very well for this. Dry out the pan. Clean the mating surface on the engine block. Brush out the mating holes where the differential and disconnect go into to remove all corrosion.
- Put a continuous bead of silicone sealant (I used Permatex Ultra Grey)

- When you put the pan in place, you need an assistant to hold it there while you put in the first few bolts
- Initially put the pan bolts loosely snug. It must be able to slide back so you can re-align the oil pan with the transmission bell housing. Put on the transmission to oil pan bolts on snugly and then torque the side oil pan bolts to 18 ft.lbs, the front and rear bolts to 89 inch.lbs and then the bell housing bolts to 35 ft.lbs.
- Brush the round parts of the differential and disconnect that go into the oil pan and apply some anti-seize to both surfaces to prevent corrosion and ease future removal. They have a tendency of welding themselves to each other over time.
Last edited:


