- Dec 4, 2011
- 242
How to Install Headrest DVD Players
Most headrest DVD players are similar in design, so these instructions should generally apply to any brand or model. These instructions and pictures are from my 2005 Trailblazer LT, your year and model may differ in some ways. Whichever brand you go with, I recommend hooking them up temporarily to test them out before doing all the permanent wiring.
What you’ll need:
Headrest DVD Player(s) with 10mm posts that are fixed or adjustable to 5 7/8” apart – I went with the Autotain 9” model from DVD Headrest Monitor, Car DVD Player, Dual Car Monitors, Car Video
Deep 18mm socket with extension and driver
Soldering iron and solder OR wire crimper and connections
Heat shrink
Wire stripper
Wiring snake or wire coat hanger
Electrical Tape
12” spare wire (maybe)
I purchased an Autotain 9” dual DVD headrest package from www.onfair.com; including the extra year warranty and an ‘add-a-fuse’, my total cost delivered was around $285. I emailed several questions to their customer service on a Saturday night. I had an email back by Sunday morning, which is incredible enough, but it also answered all of my questions in detail and attached a software patch to upload to the headrests that resolved all my problems. I can’t stress enough how impressed I am with their customer service.
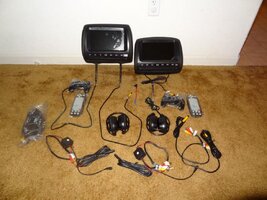
What’s in the box.
View attachment 26140
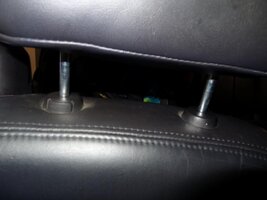
1. Remove the old headrests. Depress the button while inserting a small nail or push pin into the little hole on the opposite side to release the headrests. Lift off and set aside.
View attachment 26141
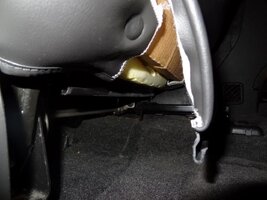
2. You need to release the J-Channel that retains the bottom of the leather on the back of each seat. This is one of those annoying things that is easy once you’ve done it on one side. I found it easiest to slide part of it to the side so you could slide a finger between the two halves of the channel and separate them.
View attachment 26142
View attachment 26143
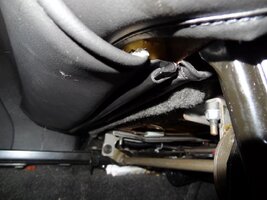
3. Use your preferred method of wire snake to fish the wires down the post hole to the bottom of the seat. I used a length of ¼” plastic tubing – firm enough to push down, flexible enough to pose zero risk to the leather. Inside the leather is cardboard; you can run the wires inside or outside of that cardboard. I found it easier to run it inside the cardboard then pop it out of the cardboard at the bottom.
View attachment 26144
4. Remove the front and rear plastic floor trim pieces to get under the carpet. They all simply pop out of their connectors with little effort. Then remove the center B pillar plastic trim piece.
5. Remove the rear seat. Simply remove the two 18mm nuts and lift it out.
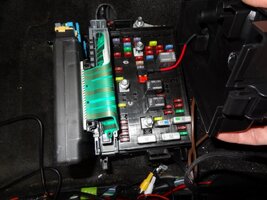
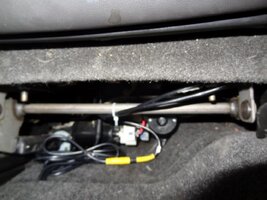
6. Using the add-a-fuse, join both power wires to the one fuse. I strongly recommend solder and heat shrink for permanent wiring connections. If your power/ground wires are as short as mine, add a few inches of extra wire to both the power and ground to give you wiring flexibility. These headrests only draw a couple amps each, so a 10 amp fuse is fine. I recommend using one that is only on when the key is on to prevent the battery being run down when the vehicle is parked. I used the ‘Rain Sense’ fuse since I don’t have that option and knew there wouldn’t be an issue with it being over utilized.
View attachment 26145
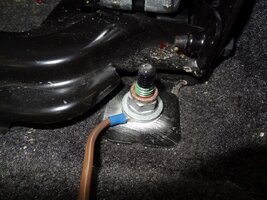
7. Join both ground wires together - the easiest nearby ground is an 18mm nut for the seat back. Make sure to sand the paint off first.
View attachment 26146
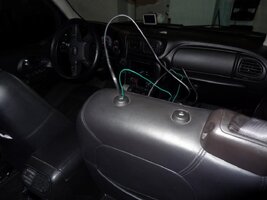
8. Plug in the fuse and bolt in the ground. Plug in any additional wires for shared AV inputs. Route all wires behind the fuse block and along the channel next to the door.
View attachment 26147
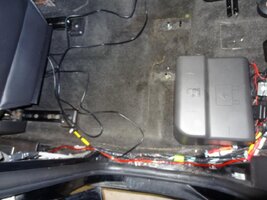
9. Using your wire snake, pull all wires under the carpet to the carpet seam under the driver’s seat. Pull the excess wiring through, taking care not to over-extend the wire connections at the fuse block.
10. Using your wire snake, run the applicable wires from the driver’s side, under the center console, to the passenger side. Tuck the wiring under the carpet seam to prevent them from getting caught on the seat mechanism or being visible. If you’re running AV wires from your head unit, you may need to remove the center console, but you can snake the wires under from side to side fairly easily without removing it.
11. Connect your wiring to the headrest wires in the seat. Ensure you are routing the wires to the sides of the seat to avoid obstructing the J-Channel, and be very careful to stay away from any moving parts like the adjustable seat frame.
12. Turn on the key and test your DVD players. If everything works as designed, turn the car off again. Fasten the wiring with a zip tie to a fixed point to prevent any movement into dangerous areas. Bundle any excess wires.
View attachment 26148
13. Using your fingers and palm, pinch the two halves of the J-Channel together to reconnect it on each seat. This can be a little challenging to do the first time, so be patient and keep trying.
14. Reinstall the plastic trim pieces, starting with the B-pillar piece.
15. Reinstall the rear seat with the 18mm nuts. Be very careful to ensure your seat does not crimp the wires when you lower it.
16. Test the headrests again and enjoy!
I’m very happy so far with the Autotain DVD players I purchased – excellent build quality and the black leather matches my TB black leather very well. The picture quality is excellent, the wireless headphones work well, the internal speakers are decent, and the controls are fairly intuitive. If you purchase these and have some DVD playback issues, contact them for a software patch that should resolve it.
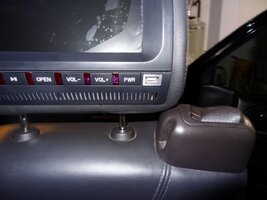
I did have to use a loop of electrical tape on the posts to prevent the headrest from slipping down. They do not stay up with the factory post mechanism, so pick where you want them and wrap a loop of tape to hold them there. Please note the shoulder seatbelt prevents any headrest of this size from lowering all the way.
View attachment 26149
Quality control approved.
View attachment 26150
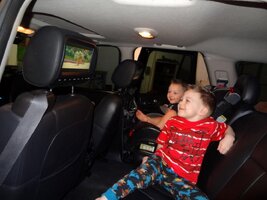
My three year old exclaimed “This is SO COOL, Daddy! Thank you SO MUCH!” which made it all worth it.
View attachment 26151
This is a fairly easy and inexpensive project that is highly recommended if you have kids in the backseat. If you have any questions, please let me know and I’d be happy to help in any way I can.
Cheers!
Most headrest DVD players are similar in design, so these instructions should generally apply to any brand or model. These instructions and pictures are from my 2005 Trailblazer LT, your year and model may differ in some ways. Whichever brand you go with, I recommend hooking them up temporarily to test them out before doing all the permanent wiring.
What you’ll need:
Headrest DVD Player(s) with 10mm posts that are fixed or adjustable to 5 7/8” apart – I went with the Autotain 9” model from DVD Headrest Monitor, Car DVD Player, Dual Car Monitors, Car Video
Deep 18mm socket with extension and driver
Soldering iron and solder OR wire crimper and connections
Heat shrink
Wire stripper
Wiring snake or wire coat hanger
Electrical Tape
12” spare wire (maybe)
I purchased an Autotain 9” dual DVD headrest package from www.onfair.com; including the extra year warranty and an ‘add-a-fuse’, my total cost delivered was around $285. I emailed several questions to their customer service on a Saturday night. I had an email back by Sunday morning, which is incredible enough, but it also answered all of my questions in detail and attached a software patch to upload to the headrests that resolved all my problems. I can’t stress enough how impressed I am with their customer service.
What’s in the box.
View attachment 26140
1. Remove the old headrests. Depress the button while inserting a small nail or push pin into the little hole on the opposite side to release the headrests. Lift off and set aside.
View attachment 26141
2. You need to release the J-Channel that retains the bottom of the leather on the back of each seat. This is one of those annoying things that is easy once you’ve done it on one side. I found it easiest to slide part of it to the side so you could slide a finger between the two halves of the channel and separate them.
View attachment 26142
View attachment 26143
3. Use your preferred method of wire snake to fish the wires down the post hole to the bottom of the seat. I used a length of ¼” plastic tubing – firm enough to push down, flexible enough to pose zero risk to the leather. Inside the leather is cardboard; you can run the wires inside or outside of that cardboard. I found it easier to run it inside the cardboard then pop it out of the cardboard at the bottom.
View attachment 26144
4. Remove the front and rear plastic floor trim pieces to get under the carpet. They all simply pop out of their connectors with little effort. Then remove the center B pillar plastic trim piece.
5. Remove the rear seat. Simply remove the two 18mm nuts and lift it out.
6. Using the add-a-fuse, join both power wires to the one fuse. I strongly recommend solder and heat shrink for permanent wiring connections. If your power/ground wires are as short as mine, add a few inches of extra wire to both the power and ground to give you wiring flexibility. These headrests only draw a couple amps each, so a 10 amp fuse is fine. I recommend using one that is only on when the key is on to prevent the battery being run down when the vehicle is parked. I used the ‘Rain Sense’ fuse since I don’t have that option and knew there wouldn’t be an issue with it being over utilized.
View attachment 26145
7. Join both ground wires together - the easiest nearby ground is an 18mm nut for the seat back. Make sure to sand the paint off first.
View attachment 26146
8. Plug in the fuse and bolt in the ground. Plug in any additional wires for shared AV inputs. Route all wires behind the fuse block and along the channel next to the door.
View attachment 26147
9. Using your wire snake, pull all wires under the carpet to the carpet seam under the driver’s seat. Pull the excess wiring through, taking care not to over-extend the wire connections at the fuse block.
10. Using your wire snake, run the applicable wires from the driver’s side, under the center console, to the passenger side. Tuck the wiring under the carpet seam to prevent them from getting caught on the seat mechanism or being visible. If you’re running AV wires from your head unit, you may need to remove the center console, but you can snake the wires under from side to side fairly easily without removing it.
11. Connect your wiring to the headrest wires in the seat. Ensure you are routing the wires to the sides of the seat to avoid obstructing the J-Channel, and be very careful to stay away from any moving parts like the adjustable seat frame.
12. Turn on the key and test your DVD players. If everything works as designed, turn the car off again. Fasten the wiring with a zip tie to a fixed point to prevent any movement into dangerous areas. Bundle any excess wires.
View attachment 26148
13. Using your fingers and palm, pinch the two halves of the J-Channel together to reconnect it on each seat. This can be a little challenging to do the first time, so be patient and keep trying.
14. Reinstall the plastic trim pieces, starting with the B-pillar piece.
15. Reinstall the rear seat with the 18mm nuts. Be very careful to ensure your seat does not crimp the wires when you lower it.
16. Test the headrests again and enjoy!
I’m very happy so far with the Autotain DVD players I purchased – excellent build quality and the black leather matches my TB black leather very well. The picture quality is excellent, the wireless headphones work well, the internal speakers are decent, and the controls are fairly intuitive. If you purchase these and have some DVD playback issues, contact them for a software patch that should resolve it.
I did have to use a loop of electrical tape on the posts to prevent the headrest from slipping down. They do not stay up with the factory post mechanism, so pick where you want them and wrap a loop of tape to hold them there. Please note the shoulder seatbelt prevents any headrest of this size from lowering all the way.
View attachment 26149
Quality control approved.
View attachment 26150
My three year old exclaimed “This is SO COOL, Daddy! Thank you SO MUCH!” which made it all worth it.
View attachment 26151
This is a fairly easy and inexpensive project that is highly recommended if you have kids in the backseat. If you have any questions, please let me know and I’d be happy to help in any way I can.
Cheers!
Attachments
-
 DSC02520.jpg95.3 KB · Views: 26
 -
 DSC02507.jpg48.1 KB · Views: 22
 -
 DSC02510.jpg74.2 KB · Views: 25
 -
 DSC02512.jpg78.7 KB · Views: 24
 -
 DSC02531.jpg58.2 KB · Views: 24
 -
 DSC02817.jpg89.7 KB · Views: 25
 -
 DSC02818.jpg97 KB · Views: 22
 -
 DSC02820.jpg74.9 KB · Views: 21
 -
 DSC02829.jpg74.2 KB · Views: 23
 -
 DSC02551.jpg73.6 KB · Views: 24
 -
 DSC02841.jpg73.1 KB · Views: 27
 -
 DSC02843.jpg63.4 KB · Views: 22
 I have seen it done! The customer also complained because they could not put the movie from the main screen (GM nav radio installed by the other guy) on the headrests or the other way. So I had to redo it all. Including the rear camera, lockpick module, dvd headrests. I left the GPS antenna in place big mistake. The other guy ran it in such a way that the cable fell down in front of the brake pedal and got broke