Not knowing your level of expertise with your system... since you have to evacuate it prior to disassembly... perhaps since the lines will be open and accessible... it would be a good time to replace the following AC Components after flushing out the Old PAG 46 Oil, Dirt and Gunk in the Lines. Otherwise... Putting in a Brand New AC Condenser without performing the following steps will be akin to putting on a Brand New Pair of Nike Shoes...while wearing Dirty Socks:
(1) Remove the AC Hi-Lo Line Manifold from the AC Compressor and Flush the lines with a large cannister of AC Flush from Autozone. Never Flush an AC Compressor as it will chemically damage "The Innards". Avoid breathing trhe heavy vapors of this stuff or spilling it on your skin as it has an extreme solvent capability that can soak in and harm your liver and kidneys while trying to rid the body of this junk. Wearing a Painter's Mask and Rubber Gloves as Good Safety Measures are in order here.
(2) Replace the 2 Old Washer/Rubber Sealing "O" Ring Grommets from the AC Compressor Manifold with OEM AC Delco ones.
(3) Replace the Accumulator any time the system has been opened for repair using an AC Delco version and fill it with 2 Ounces of PAG 46 Oil. After removing the Pre-Install Plugs om the New Accumulator and pouring in at least 2 Ounces of PAG 46 Oil... Put the plugs right back into the lines and port holes. Poly-Alkyl Glycol is EXTREMELY Hygroscopic (NOT HYDROscopic) and the PAG Oil inside the New Accumulator will very quickly become saturated with atmospheric moisture and become useless in less than 20 minutes of exposure to ambient air. Remove the plugs only just before installing the Lines and Fittings on the Accumulator; remembering to lubricate the Lines' and Fittings' Green "0" Rings with a little PAG Oil so they will vacuum seal properly when the system gets 'pulled down' during the pump down evacuation.
(4) Replace the In-line Filter-Orifice Tube with an OEM flavor as it will be Loaded With Crap. Don't skip this procedure as loosening and installing Major AC System Components can dislodge a lot of junk during the flushing action. FLUSH THE HIGH SIDE LINES ONLY AFTER THE IN-LINE FILTER ORIFICE AND ACCUMULATOR HAVE BEEN REMOVED. Then install the New Orifice Tube and Accumulator afterwards.
(5) Unless the New AC Condenser Coil has been pre-charged with PAG 46 Oil.... Fill it with only 2 Ounces of New PAG Oil.
(6) The Old AC Compressor Unit will be primed with Old PAG 46 Oil that will drain out when the AC Hi-Lo Manifold is unbolted... so either have the proper size plugs to prevent it from completely draining while the lines are being flushed and purged. Replace the Washer/Sealing Grommets as soon as possible afterwards.
(7) Or...If you capture any draining PAG 46 Oil in a container during disassembly...then you will know how much you will need to put back in as New PAG 46 Oil added to the 2 Ounces being poured into the New Accumulator.
(8) Pull a decent 45 Minute to One Hour Vacuum on the system using an inexpensive 2.5 CFM Vacuum Pump from Harbor Freight... and the Best Vacuum Oil you can buy... something like Robinair sells or of a similar quality ...to clean and dehydrate the system.
(9) Use the information from the AC Fill Chart for GM Trucks to determine the exact weight of the R-134A and PAG 46 Oil to refresh and re-charge the system:
http://www.techchoiceparts.com/refrigerant-and-oil-capacities/chevrolet-light-truck
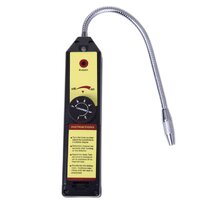
And finally... in lieu of using an indwelling Green UV Dye... a more accurate method of pin-pointing leaks that does not require either a UV Dye, UV Light or UV Detection Glasses... this inexpensive ($23.00 with Free S&H) Halogen Gas Detector would be a much more friendly and practical method-tool in finding and pin-pointing any leaks in the entire AC System:
 https://www.amazon.com/dp/B009CBH1EQ/?tag=gmtnation-20


