Engine Build

bruhaba

Original poster
Member
Apr 17, 2012
118
I recently spun a rod bearing on my supercharged 06 trailblazer. You can see the failure at the end of my other thread. I figured I'd start a thread to document the build I am doing on the motor now. Decided I would go all out. I'll use this thread to share information that was difficult for me to come across and hopefully get a little assistance as I run into any issues.

Forged Venolia custom pistons
K1 billet 4340 rods
ported cylinder head
etc...

more to come...pics, details and specifics...
 

bruhaba

Original poster
Member
Apr 17, 2012
118
Porting heads. There is a lot of improvements to be made in the valve bowls, especially exhaust side. Its a ton of work but it's coming out nicely. These pics were in the process but I'm much further along now. I wouldn't be surprised if this uncorks 50hp.

FYI, one eastwood porting kit seems to cover it and I found that kit to be of really nice quality. I already owned a few carbide burrs for roughing in the initial shape.

stock valve pockets... a lot of improvement to be made here. Tough to grasp in the pictures.


Work in progress...again, tough to grasp just how smooth the new shape is blended in the pics compared to the stock ports.


K1 rod


stock rod
 
Last edited by a moderator:
  • Like
Reactions: littleblazer

littleblazer

Member
Jul 6, 2014
9,265
Looking good.

Question, you also porting the runners into and out of the head or just the bowls on top of the pistons?
 

bruhaba

Original poster
Member
Apr 17, 2012
118
I am doing both sides although I would say there is not much to do on the runners as there is a lot of flow area there and the casting is pretty smooth. However, due to the design of my intake, I did push the floor of the intake runner down to give the air a straight shot from the plenum. I don't think you would want to do this on a stock intake. I'll be bringing the exhaust closer to match the exhaust header I have too.

But from an area/restriction perspective, the runners don't need much work IMO.
 
  • Like
Reactions: littleblazer

Nexus1155

Member
Jan 26, 2012
141
I am glad you are back on with this all. AFAIK the newer heads don't need as much work as the older heads, but efi-diy did point out that the exhaust runners needed some work to uncork full potential. I can't seem to get my login to work on TV or find his photobucket, but he did have some molds of how much can be taken out safely.

At WOT the engine was making 5" of vacuum ! so it was starving for air from 5300 to 6900 RPM. 5" is a lot. Its like running at 3/4 throttle.

http://forums.trailvoy.com/showthread.php?t=59269

A good read. I know it is a little different being supercharged and all.
 

bruhaba

Original poster
Member
Apr 17, 2012
118
Thanks...I flipped the head over and started on the exhaust side...I didn't realize how tight those runners are compared to the intake side. I agree, thanks. I'll open that up quite a bit. Wish I knew how thick the walls were...
 
Last edited:
  • Like
Reactions: littleblazer

mrrsm

Lifetime VIP Donor
Supporting Donor
Member
Oct 22, 2015
7,696
Tampa Bay Area
I salute and applaud such an ambitious improvement of this engine... FWIW...The only thing I would mention about the head work you are intent on doing in the region of the exhaust ports is to be very careful not to penetrate too deeply with your exit port enhancement. I ran into some difficulty when installing a Time-Sert Exhaust Manifold Bolt Hole Repair after breaking off a Carbide EZ Out in the rear position of the #1 Cylinder... by penetrating very easily into the Water Jacket about 20 MM down inside of the hole tilting in towards the water column near the open Exhaust Port. I'm not sure if the All Aluminum Engine Heads are cast with the same "Lost Foam" Technique used in making the GM Atlas Aluminum Engine Blocks that allows for thinner walls and internal structures... but it seemed almost too easy to dig in a bit too deep in those Exhaust Ports. so

EDIT for Updated Information:

Okay... After looking at the images of your Head Porting efforts... I can see that it bears the striation markings in the middle of the Combustion Chamber Dome and that would indicate that even though the head is a Later Model design... it still is manufactured using GM's Proprietary "recyclable" Casting Sand and their Special Styrofoam Plankings that follows the same "Lost Foam" Aluminum Casting Technique used in the earlier designs of the Atlas Engine Block and Engine Head. This informational PDF bears this out and it has some other useful technical data about the 2002 Engine... and so again caution when grinding is definitely the byword for the Exhaust Port "grinding and polishing":

https://archives.media.gm.com/division/powertrain/news/4200_Spec.pdf
 
Last edited:

bruhaba

Original poster
Member
Apr 17, 2012
118
Venolia Pistons. If anyone else has interest, these guys were great to work with. I paid for the layout work so the valve cutouts are in the same location, same stock squish, same pin offset, uses mahle production steel ring pack part# 41906CP, thicker lands for use with serious boost, pin buttons for oil ring support and pin retention.
 

bruhaba

Original poster
Member
Apr 17, 2012
118
I finished porting the head. Just a little feedback for you all. I took a bunch of metal out of the exhaust port....you guys are right, they are really small.

I have 3 decent heads, so I ported out my header flange nearly all the way to the 1-3/4" tube and then traced it out and overlayed it on a spare head. Cut it out roughly on the spare head to make sure I wouldn't cut into a water jacket and then transferred over to my good head. These ports are way way bigger.

There is a good amount of material before you hit a water jacket from the ports. The difference is pretty drastic.


I also deshrouded the valves in the combustion chamber best I could. GM does the best they can with radius cutters, but there are a lot of improvements to be made by hand. If you scroll up and look at the port photos, you can see where the radius cutter GM uses meets the casting. There is a major angle change there that needs to be blended out. I'm sure this will help low lift numbers big time.

I can't wait to get this thing together and blow some serious boost, e85 and methanol injection at it.
 

bruhaba

Original poster
Member
Apr 17, 2012
118
The thought crossed my mind more than once! To me it just seem like too much risk to tear that far into the block. I also didn't want to have to deal with getting a head gasket that works. An aluminum in-line six has serious challenges with a head gasket. I'm sure GM put a lot of effort into validating the head gasket and getting it to work reliably. The risk of those two things killed it for me.

It would be ultra cool!
 

bruhaba

Original poster
Member
Apr 17, 2012
118
she's built and fired....sounds good so far! I was expecting more noise out of the forged pistons. Sounds pretty good so far.

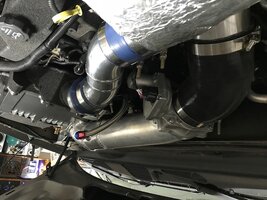
What a tight squeeze to fit that 4" intake and throttle body. That thing is huge. Took remaking the top supercharger mount and some real careful positioning to get the hood to close.

Here is the list...I'm sure I'm missing stuff.

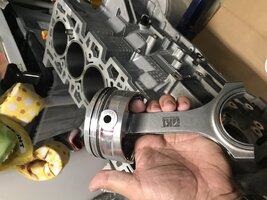
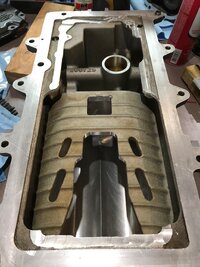
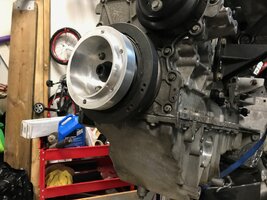
built motor with k1 billet rods, forged venolia custom pistons 8.5:1, cylinders honed, new crank and oil pump, shimmed oil pump

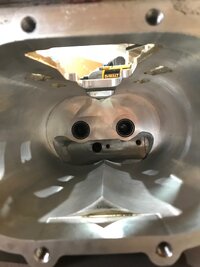
ported a new head and header flange to match exhaust-all this porting took forever...don't think I'll ever do this again! Making the custom gaskets took longer than I'll ever admit.
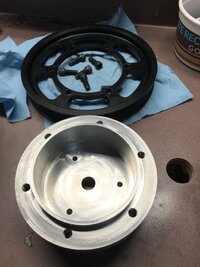
ported blower
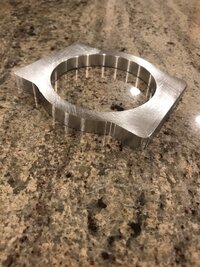
bigger crank pulley to target 15 or 16 psi boost, custom crank pulley hub I made to use LFP pulley. like this
4" throttle body and new 4" inlet to supercharger, custom flanges made
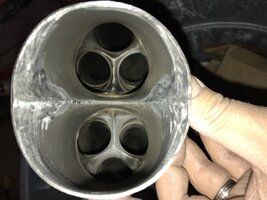
reworked and opened up header collector diameter
added resonator to quiet it down a bit and reworked exhaust
converted to 2wd, rebuilt tranny with beefed up components and a bunch of 4l65 upgrades
ebay radiator adapted to fit in stock location...its a perfect fit using the stock mounts and my derale fan. quite happy with how this turned out. It struggled to pull the temps down with the factory radiator.
ebay mopar radiator - trailblazer size
shortened a factory aluminum driveshaft to work with the SS rear

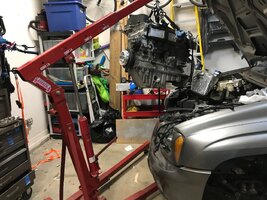
I've attached a bunch of photos.IMG_6085.jpg
 

Attachments

  • IMG_0848.JPG
    IMG_0848.JPG
    916.9 KB · Views: 13
  • IMG_1364 - Copy - Copy.JPG
    IMG_1364 - Copy - Copy.JPG
    380.2 KB · Views: 13
  • IMG_1533 - Copy.JPG
    IMG_1533 - Copy.JPG
    393.2 KB · Views: 13
  • IMG_1552.JPG
    IMG_1552.JPG
    490.3 KB · Views: 13
  • IMG_3778.JPG
    IMG_3778.JPG
    881.7 KB · Views: 13
  • IMG_3780.JPG
    IMG_3780.JPG
    662.4 KB · Views: 12
  • IMG_3916.JPG
    IMG_3916.JPG
    868.1 KB · Views: 13
  • IMG_3917.JPG
    IMG_3917.JPG
    505.1 KB · Views: 15
  • IMG_3961.JPG
    IMG_3961.JPG
    874.7 KB · Views: 15
  • IMG_3963.JPG
    IMG_3963.JPG
    737 KB · Views: 14
  • IMG_3969.JPG
    IMG_3969.JPG
    819.6 KB · Views: 14
  • IMG_6086.jpg
    IMG_6086.jpg
    95.6 KB · Views: 14
  • IMG_4508.JPG
    IMG_4508.JPG
    287.5 KB · Views: 14
Last edited:

littleblazer

Member
Jul 6, 2014
9,265
Everybody says forged makes noise... I don't hear it ever. If you're set up right it's fine.
 

Mooseman

Moderator
Dec 4, 2011
25,317
Ottawa, ON
That looks like a helluva lot of work but looks like a sweet build!
 

littleblazer

Member
Jul 6, 2014
9,265
I plan to switch my rear with the SS rear end and was wondering was it mandatory to shorten the drive shaft?
Iirc the location of the yoke is about an inch further forward because of the larger case. Don't quote me on that but I think you'll have issues without it.
 

bruhaba

Original poster
Member
Apr 17, 2012
118
I plan to switch my rear with the SS rear end and was wondering was it mandatory to shorten the drive shaft?
Yes, you have to shorten it. I think I may have just thrown away my shortened shaft from when i was 4wd. Are you 2 or 4wd?
 

xavierny25

Member
Mar 16, 2014
6,324
Staten Island, N.Y
Yes, you have to shorten it. I think I may have just thrown away my shortened shaft from when i was 4wd. Are you 2 or 4wd?
it's a 4wd. If the question was relating to swapping out the front axle also I have it on hand aswell.
 

HARDTRAILZ

Moderator
Nov 18, 2011
49,665
If lifted with stock rear control arms you will need to shorten due to the diff being pulled forward by lift. The lowered ones I have seen swap a SS diff into do not need to shorten since the lowering pushes the diff to the rear. When i did my SS rear and I could only find one other that had done it to a lowered one, I did not shorten the shaft right away and it all bolted up but the rear was pushing on the TC. I just needed to get it home to remove shaft and take to driveline guy. But it did drive.
 
  • Like
Reactions: xavierny25

bruhaba

Original poster
Member
Apr 17, 2012
118
She's back on the road and is quite beastly.....18psi boost, e85, generous porting work on head and supercharger, opened exhaust a bit, built trans, 4in throttle body and inlet. Finally feels like all this work was worth it. Blitzes the tires. I haven't even begun the tuning yet but it pulls hard. Cheers!
 

TollKeeper

Supporting Donor
Member
Dec 3, 2011
8,052
Brighton, CO
WOAH!.. Nice build, but I got a question... I am about to buy a SS rear end, Are you guys saying that I would have to shorten the drive shaft on my XUV for it to work? If I do, Im not buying the rear end.. Just have to find a 4.10 out of a V8 or LWB
 

HARDTRAILZ

Moderator
Nov 18, 2011
49,665
I had to shorten my driveshaft 1.5 inches with the SS 14Bolt.
 
  • Like
Reactions: Mooseman

Forum Statistics

Threads
23,312
Posts
637,823
Members
18,517
Latest member
javier perez

Members Online